

It’s a busy afternoon, the kind where homework waits, snacks are half-eaten, and the kids want to make something now. You pull out a simple kitchen setup, clear the table, and in under an hour you can have shiny, wearable art that feels special right away.
RESIN BRACELETS: ART THAT GLEAMS IN YOUR HANDS fits that exact moment. It asks for just a little focus, a few common supplies, and a calm surface to work on. If you like quick projects that still look polished, this is one you can begin between chores or after school projects. For another quick, sparkly craft you can try later, see this easy pink crystal heart ornaments idea that uses similar thinking about color and shine.
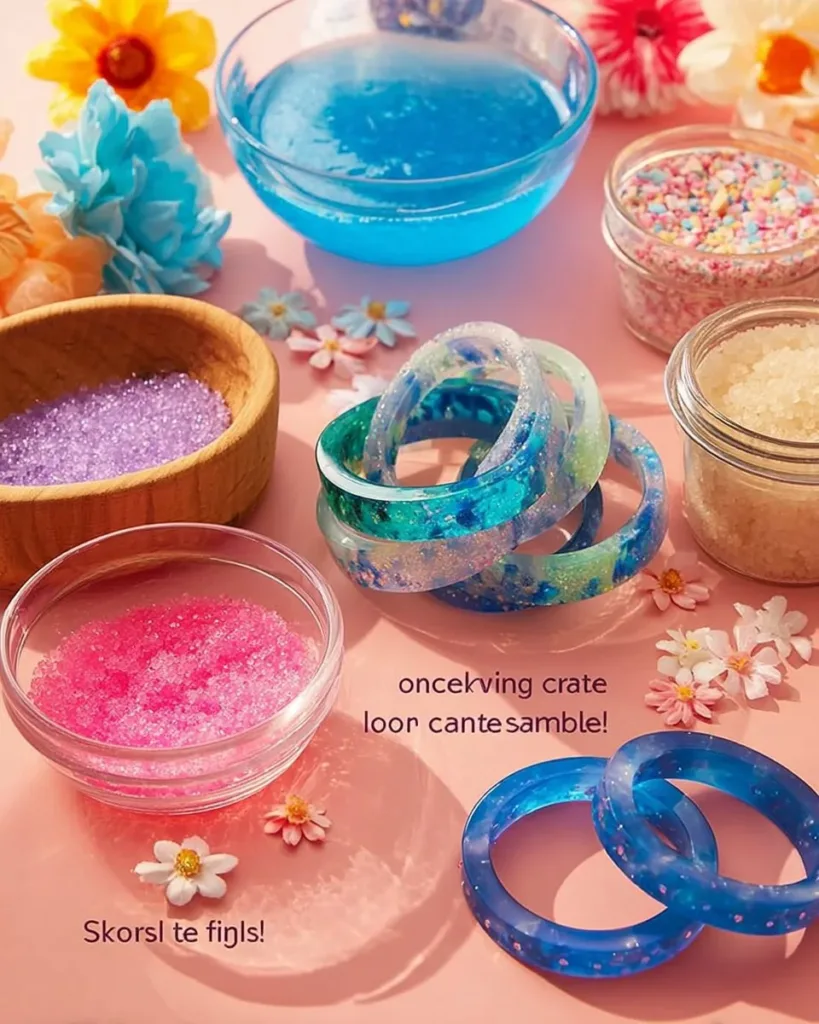
Why You’ll Love Making RESIN BRACELETS: ART THAT GLEAMS IN YOUR HANDS

This project works because it uses low-prep materials and clear steps, so you do not spend hours setting up. You measure and mix, add color or bits for sparkle, pour into a mold, and wait for the resin to set. That simple loop gives quick wins and beautiful results.
It fits real-life schedules. You can do the mixing and pouring in about 20 to 40 minutes, then let the bracelet cure while you do other things. Cleanup is straightforward if you act right away. A small spill wipes up with rubbing alcohol and paper towels before it cures into a stubborn patch.
This craft is approachable for families. An adult can handle the mixing and the hotter tools while kids help drop in glitter, beads, or pressed flowers. You do not need fancy tools or a large workspace. A covered kitchen table and a box fan for ventilation will do.
Resin gives reliable, glossy results when you follow the basic ratio and mix thoroughly. That gloss feels professional and makes simple designs stand out. You do not get perfect glass on the first try always, but small sanding and polishing at the end fix most blemishes.
A Quick Look Before You Begin
This step needs a short setup. Expect about 40 to 60 minutes of hands-on time spread over two days. The actual mixing, coloring, and pouring takes under an hour. Curing takes the longest plan for at least 24 hours before demolding and about 48 to 72 hours for full hardness on pieces that will bend or get regular wear.
Setup is light. Cover a table with a plastic drop cloth or a tray, pull on gloves, and lay out your molds and mixing cups. Keep a small heat source handy like a torch or heat gun to tame bubbles if they appear.
Mess level stays low if you work clean and measure carefully. Resin is sticky and can drip, so use disposable cups and stirring sticks. If a drip lands on the table, wipe it up before it dries.
Adult involvement: an adult should handle the resin mixing and any torching steps. Kids can help with decorative bits, gentle pouring into molds, and picking color chips or glitter. Supervision keeps things safe and stress free.
For a calm, sparkly sibling project that uses a similar finish, consider trying the turquoise crystal heart idea found here quiet joy making turquoise crystal heart.
Materials You’ll Need
- Epoxy resin and hardener (clear two-part resin) follow product ratio
- Silicone bracelet mold flexible for easy demolding
- Disposable mixing cups common household item
- Stirring sticks wooden popsicle sticks work fine
- Nitrile gloves safety item
- Protective mask or respirator rated for organic vapors safety item
- Pigment powders or liquid resin dye optional, easy color change
- Fine glitter, tiny beads, or small pressed flowers optional, personal touch
- Rubbing alcohol and paper towels cleanup and surface prep
- Heat gun or small butane torch helps remove bubbles
- Sandpaper (220 to 600 grit) and polishing cloth finishing touch
- Plastic drop cloth or tray keeps workspace tidy
STEP-BY-STEP DIRECTIONS

- Read the resin label and set a clean, ventilated workspace. Put on gloves and a mask before you touch the resin. Have paper towels and rubbing alcohol close at hand.
- Measure the resin and hardener in the exact ratio the product requires. Use separate cups for each part to avoid mistakes. Accurate measurement keeps the resin from staying tacky.
- Pour the hardener into the resin cup and stir slowly. Mix for the time the manufacturer lists, usually two to five minutes, and scrape the sides and bottom while stirring.
- Add pigments, glitter, or tiny decorations to the mixed resin. Stir until the color looks even and the sparkle disperses. Stop stirring when the mix looks smooth.
- Pour a thin base layer into the silicone mold. Tilt the mold gently so the resin fills corners without trapping air. A thin layer lowers the chance of overflow later.
- Let the base layer sit for a few minutes and pop any surface bubbles with a heat gun or torch held several inches away. Watch the bubbles lift; do not overheat.
- Pour the rest of the resin slowly into the mold until you reach the desired thickness. Add small decorations on top with a toothpick to place them precisely.
- Hold the heat source again for a few seconds over the resin to remove bubbles after the final pour. Keep the heat moving and do not keep the flame in one spot.
- Cover the mold loosely with a box or container to keep dust off while the resin cures. Place it somewhere level and out of direct sunlight.
- Wait the recommended curing time before touching the resin. This is often 24 hours to be firm, but full hardness may take longer. Check the product instructions.
- Demold gently by flexing the silicone. If edges feel soft, return it to cure longer. If small bumps or thin spots appear, sand and add a thin layer of resin as a top coat.
- Sand rough edges starting with 220 grit, then move to finer grits and finish with a polishing cloth. Clean with rubbing alcohol before wearing.
The Learning Behind This DIY

Making resin bracelets supports simple science and practical skills. Mixing two parts to make one whole shows cause and effect. The chemical reaction between resin and hardener is a basic transformation kids notice liquid becomes solid.
Fine motor skills develop while placing beads and flowers. Stirring, scooping, and careful pouring improve hand control. Moving a toothpick to nudge a tiny bit of glitter or a pressed flower teaches precision and patience.
You get a feel for timing. Waiting for the resin to de-gas, applying heat for a few seconds, and knowing when to demold all teach observational skills. Your child learns to watch for visual cues like cloudiness, shine, or tackiness.
There is also an art element. Choosing color mixes, layering decorative bits, and deciding where to place shimmer all exercise creative judgment. The process encourages trial and error in a safe way small fixes like sanding or a thin top coat rescue many imperfect results.
Troubleshooting Common Issues
If the resin stays tacky after the cure time, it often means the mix ratio was off or mixing was too fast and trapped air. Check the product instructions first. If you catch tackiness early, you can mix a small extra batch correctly and pour a thin top coat. That often bonds to the sticky surface and cures hard.
If you see lots of bubbles after pouring, the mix was likely stirred too quickly. Next time stir slower and longer, scraping the cup. For the current piece, gently pass a heat gun over the surface to coax bubbles up. A light breath or a hairdryer on low sometimes helps for shallow molds, but be careful with heat near children.
If the resin looks cloudy or milky, the room may be too cold. Resin cures best in a warm, stable place. Move pieces to a warmer room and give them more time. Cloudiness from trapped moisture or rapid temperature changes can clear with longer curing.
If decorations sink or move, they may be too heavy or wet. Use lighter items or press heavier pieces into a thin base layer and let it tack before adding more resin. A toothpick helps reposition items gently.
If edges are rough or uneven after demolding, sand from coarse to fine grit and then polish. Most surface problems resolve with a quick sand and a thin finishing layer of resin.
Easy Variations to Try
- Metallic shimmer. Add a pinch of metallic pigment powder to the mixed resin for a pearlescent glow. Use sparingly; pigments change the cure slightly.
- Nature-in-the-loop. Press tiny dried flowers or fern bits flat before placing them in the resin so they sit close to the surface and stay visible.
- Layered color. Pour a thin layer, let it become tacky, then add another contrasting color. The layers create depth and make the bracelet feel like a tiny scene.
- Embedded charms. Place a small metal charm in the center and pour around it. Choose charms that fit the bracelet cavity so they do not interrupt wear.
- Glow-in-the-dark. Mix a small amount of glow powder for fun evening wear. Make sure the powder you choose is resin-safe.
For a seasonal twist that uses a similar layering idea, try the rainbow crystal heart guide here rainbow crystal heart for inspiration on color placement.
Storing or Reusing This Project
Store leftover resin in its original sealed containers in a cool, dry place. Keep the caps tight and use what you can within the product’s shelf life. Once open, small amounts in sealed jars will thicken faster, so label and date opened bottles.
If you have leftover mixed resin that did not cure, do not pour it down the drain. Let it harden in a disposable cup, then toss the cup in the trash. Hardened resin is inert and safe to dispose of in regular garbage.
Keep silicone molds in a drawer or on a shelf away from heat. Clean them with rubbing alcohol after use if you want to reuse them quickly. A soft cloth will remove any thin residue; avoid sharp tools that can damage the mold.
Be careful storing finished bracelets. Keep them flat and out of direct sunlight to prevent any slow yellowing over many years. If you plan to gift or sell, include a small note about care: avoid prolonged sunlight and heavy chemicals like nail polish remover.
Small scraps of cured resin make good practice pieces. Use them to test sanding, polishing, or color mixes before touching a finished bracelet.
FAQs About RESIN BRACELETS: ART THAT GLEAMS IN YOUR HANDS
Can my child do this alone, or does an adult need to help?
I always have an adult do the measuring and mixing because resin can irritate skin and release fumes. Kids can help pick colors, place tiny decorations, and do light sanding once pieces fully cure. Working together makes it safe and fun, and you get nice results without the stress.
What happens if I get resin on the table or clothes?
Wipe fresh spills with paper towel and rubbing alcohol right away. The earlier you act, the easier the cleanup. Once resin cures it becomes hard and harder to remove. For clothes, treat fresh spots quickly; if the stain cures, it probably will not come out fully but you can reduce it with careful scraping and solvent, knowing this may not restore the fabric perfectly.
Can I substitute glitter or flowers with household items?
Yes, you can use many small, dry items that sit flat and are not absorbent. Tiny sequins, small beads, or thin paper shapes work. Avoid anything wet, very porous, or that contains oils, as these can interfere with the cure or cause discoloration. Try a small test piece if you are unsure.
Will my bracelet stay shiny, or will it scratch easily?
Resin gives a glossy finish, but resin is not as hard as metal or glass. It can scratch with rough wear. Small scratches buff out with fine sandpaper and polishing. Treat the bracelet like a delicate piece of jewelry avoid hitting it against rough surfaces and store it in a soft pouch.
How long will the resin stay safe to handle after pouring?
Surface touch usually works after 24 hours for many resins, but full hardness can take several days. Follow the product instructions. If the surface still has a slight tack, wait longer. Rushing demolding or wearing a piece too soon risks distortion or fingerprints that are hard to fix.
A Final Helpful Note
Take your time with the first project. Following the steps slowly and watching for small cues like surface bubbles or tackiness makes most common problems easy to fix. Keep your workspace tidy, set expectations with helpers, and treat this as a shared craft rather than a race. The gloss of the finished bracelet feels rewarding, and small imperfections often add character more than they ruin the piece. Trust the process, and know a thin top coat or light sanding will usually save the day.
Conclusion
If you want to see a larger craft event that celebrates handmade projects and hands-on making, check out the Northwest Spring Fest for inspiration and community craft ideas at Northwest Spring Fest | Student Experiences & Engagement. For a deeper look at working with resin in art and preserving natural elements, this write-up gives a helpful perspective: The Art of Resin: Creating Beauty by Recreating Nature.
Enjoy the shine, and remember that small, steady steps make handmade feel easy.
PrintResin Bracelets: Art That Gleams in Your Hands

Create beautiful and shiny resin bracelets using simple materials and clear steps in under an hour.
- Prep Time: 15 minutes
- Cook Time: 45 minutes
- Total Time: 60 minutes
- Yield: 2 bracelets
- Category: Craft
- Method: DIY
Ingredients
- Epoxy resin and hardener (follow product ratio)
- Silicone bracelet mold
- Disposable mixing cups
- Stirring sticks
- Nitrile gloves
- Protective mask or respirator
- Pigment powders or resin dye (optional)
- Fine glitter, tiny beads, or pressed flowers (optional)
- Rubbing alcohol and paper towels
- Heat gun or small butane torch
- Sandpaper (220 to 600 grit)
- Plastic drop cloth or tray
Instructions
- Read the resin label and set a clean, ventilated workspace. Put on gloves and a mask before you touch the resin.
- Measure the resin and hardener in the exact ratio required.
- Pour the hardener into the resin cup and stir slowly.
- Add pigments, glitter, or tiny decorations to the mixed resin.
- Pour a thin base layer into the silicone mold.
- Let the base layer sit for a few minutes and pop any bubbles.
- Pour the rest of the resin into the mold until the desired thickness is reached.
- Use a heat source to remove bubbles after the final pour.
- Cover the mold loosely and place it in a level, dust-free area.
- Wait for the recommended curing time before touching the resin.
- Demold gently by flexing the silicone.
- Sand rough edges and finish with a polishing cloth.
Notes
Keep a clean workspace and act quickly to clean up spills. Adult supervision is recommended for safety while mixing resin.
Nutrition
- Serving Size: 1 bracelet
- Calories: 200
- Sugar: 0g
- Sodium: 0mg
- Fat: 0g
- Saturated Fat: 0g
- Unsaturated Fat: 0g
- Trans Fat: 0g
- Carbohydrates: 0g
- Fiber: 0g
- Protein: 0g
- Cholesterol: 0mg