

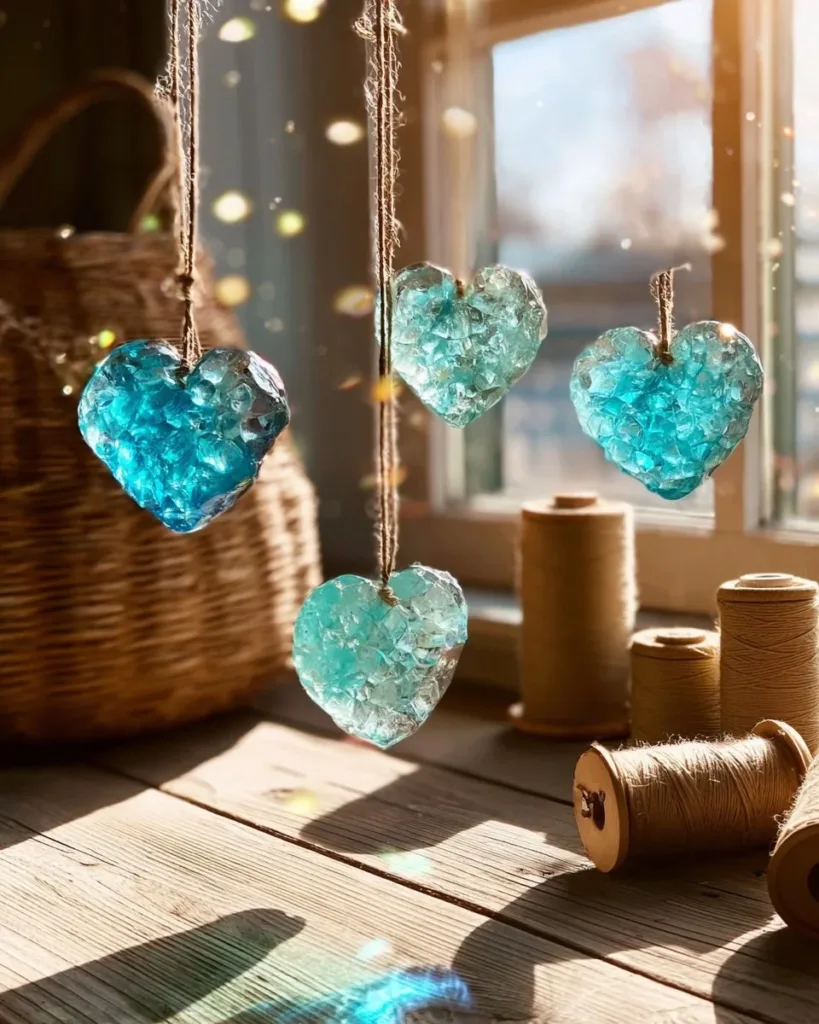
A busy afternoon had just arrived. The kids asked for something crafty and quick, the kitchen counter still held a cup of coffee, and you wanted a calm project that felt a little special without a lot of prep. That is the quiet moment where The Quiet Joy of Making Turquoise Crystal Heart fits perfectly. It gives you one focused, gentle activity that looks lovely when it finishes and uses things you likely have on hand or can buy easily.
This project works well when you need something simple but satisfying. You will mix a baking soda solution, let tiny crystals grow on a heart-shaped howlite blank, and watch the color and texture change over a few days. If you want another low-key, kid-friendly maker idea while this grows, try a different quick activity like our budget-friendly heart project for a short break that keeps the creative energy going.
Why You’ll Love Making The Quiet Joy of Making Turquoise Crystal Heart

This craft feels special without being fussy. You do a little stirring, a little waiting, and then nature takes over to grow tiny crystals on a pretty heart shape.
It uses just a few items from the kitchen or a quick trip to the craft store. The process mostly needs gentle attention rather than constant work, so you can step away and come back during the day.
It suits families because kids can help with safe parts like stirring and checking the heart. An adult can handle heating water and lowering the heart into the solution.
The finished piece looks delicate and thoughtful. It makes a nice small gift, a drawer treasure, or a gentle reminder of a calm afternoon together.
A Quick Look Before You Begin
This project takes a little time but little effort. The hands-on part takes about 10 to 20 minutes; then crystals grow over one to three days.
Setup stays small. Use a single bowl or jar on a towel or tray and keep the rest of the counter clear. You will want a quiet, undisturbed spot for the heart to sit while crystals form.
Mess stays low. The solution can spill if you are careless, so use a tray or paper towel to catch drops. Cleanup is mostly wiping the bowl and drying your tweezers.
Adult supervision keeps things smooth. Kids can do stirring and observing. An adult should heat the water and handle the dye and the moment of lowering the heart into the solution.
Materials You’ll Need
Turquoise howlite or dyed howlite heart blank (about 40 to 50 mm)
Baking soda powder (2 tablespoons)
Warm distilled water
A few drops of turquoise or blue-green dye (optional)
Cotton gloves or clean hands
A small glass or ceramic bowl
A spoon for stirring
Fine mesh strainer or coffee filter (optional)
Tweezers
Drying rack or shallow tray lined with paper towel
A thermometer (optional)
A shallow jar or container for storage
Notes: The heart blank is the base for your crystals. Baking soda is common and cheap. Use distilled water to reduce impurities. Dye is optional if you want a stronger color. Gloves keep oils off the stone. A bowl and spoon are items you probably already own. A strainer helps if the baking soda lumps. Tweezers help you move the heart without touching it. A drying rack helps the heart dry evenly. A thermometer is optional if you want exact warmth.
Step-by-Step Directions

- Prepare your workspace and wash your hands or put on gloves.
Wipe a small area of counter and lay a paper towel to catch spills. This simple prep keeps the table easy to clean and gives you a clear spot to work. - Heat the distilled water to just warm, about body temperature.
You want it comfortably warm, not hot, so it helps the baking soda dissolve. A thermometer can confirm if you like, but a fingertip check works well. - Measure two tablespoons of baking soda into the bowl and add a small pour of warm water, stirring until the mixture becomes a cloudy liquid.
Stir slowly and notice the texture change from powder to a cloudy slurry. Small bubbles or a little fizz are normal when you first add the water. - Continue adding warm water slowly until the baking soda dissolves fully, aiming for a thin syrup consistency.
Add a tablespoon at a time and stir between additions so you do not over-dilute. You should see a glossy, slightly viscous liquid rather than coarse grains. - Strain the liquid if needed to remove undissolved grains.
Pour through a fine mesh strainer or coffee filter into a clean container. This keeps stray grains from forming odd bumps on the heart while crystals grow. - Add a drop or two of turquoise dye into the solution, if desired, and stir gently.
Start with one drop and add a second only if you want a richer tone. Stir slowly so you do not create bubbles that will disturb the surface. - Hold the heart gently with tweezers and lower it into the solution, then cover the container loosely.
Lower the heart until it sits mostly submerged but not pressed against the sides. Covering loosely keeps dust off while allowing slow evaporation. - Check the heart after six to twelve hours, and top up with more solution if needed.
You should see tiny sparkles or a faint crust forming. If the solution level drops, add a little more warm mix to keep the heart mostly submerged. - Let the crystals grow for one to three days, then lift the heart out with tweezers and place it on a towel to dry.
You will see more defined crystal clusters after a day. If they look very sparse, leaving it a little longer often helps. - Once dry, softly polish the surface with a clean, dry cloth.
Rub gently to remove loose powder and reveal the subtle shimmer of the crystals. Store the heart in a shallow jar or display it as you like.
The Simple Science or Skills at Work

You are inviting crystals to grow by making a saturated baking soda solution and then letting water slowly leave the mixture. As the water evaporates, baking soda molecules arrange into tiny crystal patterns on the heart surface.
Children learn simple cause and effect. They see how more evaporation gives bigger crystals, and how a warmer spot or more concentrated solution speeds things up.
Fine motor skills improve when kids stir slowly, add drops of dye, or use tweezers to lower the heart. Those small movements build control and focus.
Observation and patience are real skills here. Checking the heart at intervals teaches gentle attention, and the quiet waiting gives space to notice small changes.
Troubleshooting Common Issues
If the crystals do not appear after a day, the solution may not be concentrated enough.
Try making a slightly thicker syrup and re-submerging the heart for another day. Avoid over-diluting during the first mix.
If the heart has uneven crystal coverage, it may have touched the container sides or sat at an angle.
Lift it and re-submerge it so the exposed areas face the solution and not a table surface. Small bare spots often fill in after another day.
If grains or bumps form on the surface, the baking soda may not have fully dissolved.
Next time strain the solution through a fine mesh or coffee filter before adding the heart. This keeps the growth smooth and even.
If the dye looks blotchy, you may have stirred too vigorously or added too much dye at once.
Use a single drop and stir gently. Remember that the final color often reads softer after the crystals form.
If a spill happens, blot it with a damp cloth and wash the counter.
Baking soda is safe but can cake into a residue if it dries. Wipe up quickly to keep cleanup easy.
Easy Variations to Try
Try a lighter turquoise tone by skipping the dye and letting the heart’s natural color peek through.
This gives a softer, more mineral look that still has delicate crystal shimmer.
Make a set using different heart blanks and stagger start times.
Begin one heart on Monday and another on Tuesday to compare how timing and warmth affect crystal size.
Use a shallow dish and tilt the heart slightly for asymmetrical growth.
Small angle changes help you see how gravity and evaporation patterns shape crystals.
Add the heart to a small shadow box once dry to make a tiny keepsake.
The crystals remain fragile, but a covered frame protects them and keeps the feel of the project calm.
Storing or Reusing This Project
Keep the finished heart in a shallow jar or on a tray away from heavy handling.
The crystals are delicate and will lose their luster if you rub them hard.
If you want to preserve the look for longer, place the heart in a display case or small shadow box.
Avoid storing it where humidity changes a lot because moisture can soften the crystals over time.
Reuse the strained solution within a day by topping it with warm water and stirring.
Do not reuse an old, cloudy solution from many days earlier. Freshness helps the crystals form neatly.
Clean tools right away with warm water and a quick scrub.
Tweezers, bowls, and spoons rinse clean. This keeps future attempts free of stray grains.
FAQs About The Quiet Joy of Making Turquoise Crystal Heart
Will this project make a big mess on my counters?
It usually stays tidy if you use a tray or paper towel under the jar. You might get a few drops when you pour, and those dry to a light powder that wipes away easily. I recommend a small towel under your work area and rinsing tools right after.
Is this safe for younger kids to help with?
Yes, with supervision. Kids can stir, watch the heart, and help with cloth drying. An adult should heat the water, handle the dye, and lower the heart into the solution. If you keep chores simple, everyone can join without risk.
Can I skip distilled water and use tap water?
You can try, but distilled water often gives cleaner crystal growth because it has fewer minerals. If you only have tap water, the results still work but may look a little cloudier. I have used tap water in a pinch and got pretty crystals, though not as clear.
What if the crystals look small or patchy after three days?
That happens sometimes. It may mean the solution was too thin or the heart spent time touching the container wall. Make a slightly stronger mixture, strain it, and try again on a fresh heart if possible. Small, patient tweaks usually fix it.
How long will the finished heart last?
If you store it somewhere dry and out of heavy handling, the crystals keep their look for many months. Avoid rubbing the surface and keep it away from humid spots. Treat it like a delicate decorative object rather than a toy.
A Final Helpful Note
This project rewards quiet attention more than perfect technique. Small spills and soft patches of crystals do not ruin the charm; they add character. Give yourself permission to take it slow, make one modest heart, and celebrate the little, sparkly result.
If you want more step-by-step, family-friendly experiments and crafts, you can explore other ideas and tweak this one as you learn. Trust the simple steps, enjoy the small moments of watching crystals form, and know that even a tiny heart can feel like a little achievement.
Conclusion
If you are curious about the types of stones and how they behave in crafts like this, the The Sheryl Lowe Gemstone Guide gives helpful notes on similar materials. For colorful, short activities that pair well with a longer-growing project, check out our take on a bright salad plate of quick ideas to spark more family fun.
PrintThe Quiet Joy of Making Turquoise Crystal Heart

A simple craft project to make a beautiful turquoise crystal heart using baking soda and a few household items.
- Prep Time: 20 minutes
- Cook Time: 4320 minutes
- Total Time: 4340 minutes
- Yield: 1 crystal heart
- Category: Craft
- Method: Crafting
- Cuisine: N/A
- Diet: N/A
Ingredients
- Turquoise howlite or dyed howlite heart blank (about 40 to 50 mm)
- Baking soda powder (2 tablespoons)
- Warm distilled water
- A few drops of turquoise or blue-green dye (optional)
- Cotton gloves or clean hands
- A small glass or ceramic bowl
- A spoon for stirring
- Fine mesh strainer or coffee filter (optional)
- Tweezers
- Drying rack or shallow tray lined with paper towel
- A thermometer (optional)
- A shallow jar or container for storage
Instructions
- Prepare your workspace and wash your hands or put on gloves.
- Heat the distilled water to just warm, about body temperature.
- Measure two tablespoons of baking soda into the bowl and add a small pour of warm water, stirring until the mixture becomes a cloudy liquid.
- Continue adding warm water slowly until the baking soda dissolves fully, aiming for a thin syrup consistency.
- Strain the liquid if needed to remove undissolved grains.
- Add a drop or two of turquoise dye into the solution, if desired, and stir gently.
- Hold the heart gently with tweezers and lower it into the solution, then cover the container loosely.
- Check the heart after six to twelve hours, and top up with more solution if needed.
- Let the crystals grow for one to three days, then lift the heart out with tweezers and place it on a towel to dry.
- Once dry, softly polish the surface with a clean, dry cloth.
Notes
Adult supervision is required for heating water and handling dye. The crystals are delicate and should be handled with care.
Nutrition
- Serving Size: 1 heart
- Calories: 0
- Sugar: 0g
- Sodium: 0mg
- Fat: 0g
- Saturated Fat: 0g
- Unsaturated Fat: 0g
- Trans Fat: 0g
- Carbohydrates: 0g
- Fiber: 0g
- Protein: 0g
- Cholesterol: 0mg