

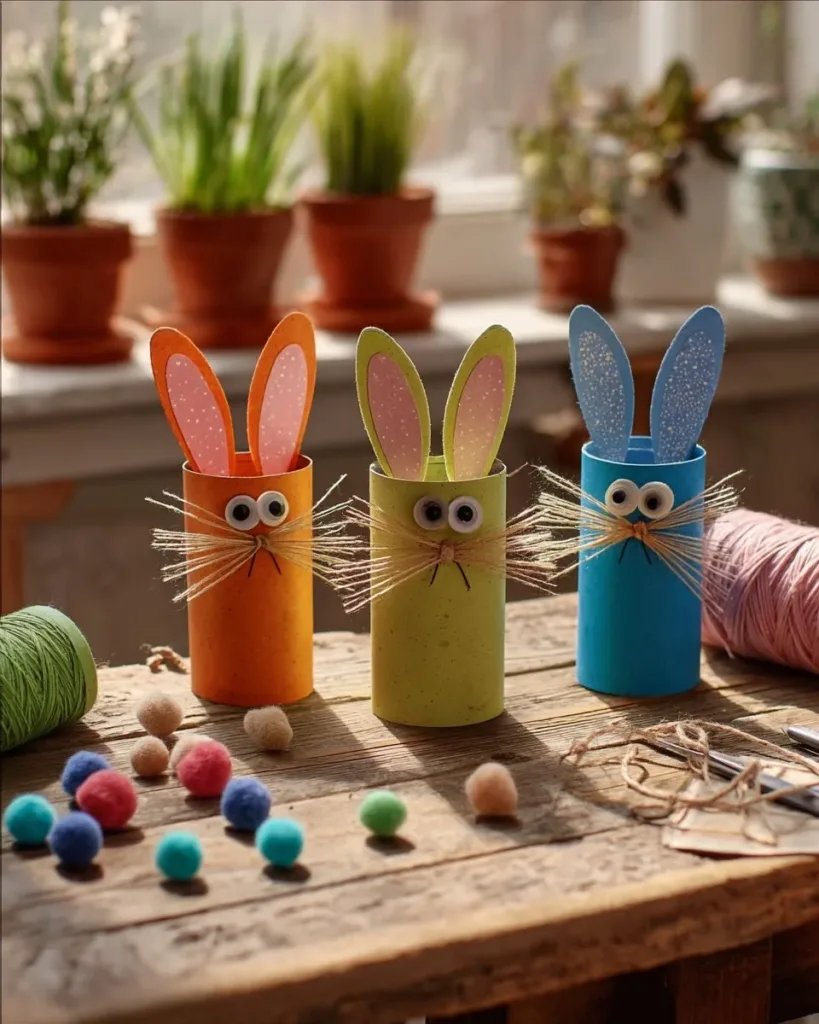
I pulled a stack of paper towels across the kitchen table on a busy afternoon when my kids announced they wanted to make something right now. The pantry had a few empty cardboard tubes and a quick thought came to mind: Vibrant Fuzzy-Whiskered Bunnies. We set up paint, pipe cleaners, googly eyes, and pompoms and started in ten minutes. The room filled with bright color, a little paint on the table, and happy giggles as each child bent ears and fanned whiskers. This craft feels like a rescue plan for short windows of time and leaves you with a small, proud keepsake.
I like how little prep this takes and how well it fits into odd pockets of time. If your afternoon looks like ours did, you can get started the moment everyone sits down. For another project that pairs well with colorful paper crafts, try the playful sun catchers I mentioned before in this post about diy vibrant bioplastic suncatchers when the kids want more hands-on color play.
Why You’ll Love Making Vibrant Fuzzy-Whiskered Bunnies

This craft works because it cuts through common roadblocks: little time, limited supplies, and short attention spans. Cardboard tubes transform quickly with a coat of paint or a simple wrap of colored paper. The materials match well; pipe cleaners bend into whiskers and ears, making assembly fast and forgiving.
You see real progress fast. That matters for kids and busy adults. The steps stay short and visual, and they give a little win at each stage. If you need a calm but lively activity, this one fits the bill. It also scales easily. Make one for a quick quiet moment or ten for a classroom craft exchange. The bright colors help keep the mood light and the mess small.
A Quick Look Before You Begin
You can expect about 20 to 40 minutes from start to finish for one bunny if you paint, or 10 to 20 minutes if you wrap with paper. Paint will add drying time, so keep that in mind for small helpers. Set aside a covered surface and a small cup of water for brushes if you paint.
The mess stays tidy if you use a protective table covering and an apron or an old T-shirt for kids. Glue can be picky. A precision-tip craft glue helps place small bits without a puddle. Plan a short drying break after assembly so the whiskers hold their shape. An adult can help with the hot glue alternative, but you do not need hot glue for this project.
This activity links nicely to other colorful crafts. If you want a follow-up activity that uses bright paper and color mixing, check the related guide on vibrant eco-friendly bioplastic suncatchers for ideas that extend the play.
Materials You’ll Need
Empty Cardboard Tubes (1 per bunny)
Vibrant Paint or Paper (Bright Orange, Cyan Blue, Lime Green)
Fuzzy Pipe Cleaners (2 per bunny, matching the body color)
Googly Eyes
Small Pompoms (matching the body color for the nose)
Fine-tip Black Marker (for the mouth)
Cardboard Scraps (for the ears)
Craft Glue (A Precision tip is best)
Scissors
Notes: Empty cardboard tubes are a common household item. Bright paint or paper gives that joyful pop and you can use thin wrapping paper as an easy substitute. Matching pipe cleaners and pompoms make the bunnies look cohesive but you can mix colors for a playful look. Precision craft glue keeps small parts in place and reduces mess.
Step-by-Step Directions

- Start by painting your cardboard tubes in bright colors or wrapping them in colored paper.
Paint one even coat and let it dry, or wrap the tube and smooth any air bubbles. The surface should feel dry and stable before you add pieces. - Cut strips from your cardboard scraps for the ears, bend them, and glue them to the top of the tube.
Make two ear shapes and crease them gently where they will meet the tube. Press and hold for a few seconds so the glue grabs. - Cut pipe cleaners into segments, creating a starburst pattern for whiskers, and glue them to the tube.
Trim each pipe cleaner into several short pieces, arrange them in a small cluster, and glue the center point to the tube where the nose will sit. Keep them close so they fan neatly. - Add a matching pompom for the nose, stick on the googly eyes, and draw a sweet mouth with the marker.
Place the pompom in the center of the whisker cluster. Press the googly eyes above the nose and use the marker to draw a simple smiling mouth. - Once the glue has dried, gently fan out the whiskers.
Give each whisker a little bend so the bunny looks lively. Set the finished bunny somewhere safe to finish drying.
The Learning Behind This DIY

This simple build teaches fine motor skills, spatial thinking, and cause and effect. Cutting ears and trimming pipe cleaners help kids practice a controlled snip and steady hand. Gluing small parts and waiting for them to set introduces patience and a basic sense of timing.
You also get a gentle introduction to color mixing and visual balance. Choosing matching pompoms and pipe cleaners or pairing contrasting colors is a quick exercise in design that feels playful rather than strict. Watching paint dry or glue set lets kids notice small changes over time and learn that some results need a short wait.
Troubleshooting Common Issues
If the paint peels or bubbles, it usually means the tube was damp or the paint was too thick. Lightly sand the area or let the tube dry fully, then apply thinner coats.
If ears flop forward, add a narrow strip of cardboard behind each ear as a small brace and glue it in place. Wait until the glue sets before moving the bunny.
If the pipe cleaners fall off, add a dab of glue where each cluster meets the tube or glue the pompom over the glue spot to lock the center. Use the precision tip to keep the glue small and tidy.
If googly eyes do not stick well to paint, roughen the paint surface just a touch with the scissors tip or a fingernail and then glue. Let the glue set under a light weight such as a paperback book for a few minutes.
Easy Variations to Try
Try a duo-tone bunny by painting the lower half one color and the upper half another. The sharp color split looks intentional and fun.
Add a tiny paper bow tie or collar from scraps to change the character. Use patterned paper for a festive look around holidays.
Make a whole family by using different sizes of tubes or by shortening some tubes for small bunnies. Kids love naming the crew and arranging them in a little display.
Seasonal swap: use pastel colors for spring or bold neon for a summer craft table. Change the nose color for a silly twist.
Storing or Reusing This Project
These cardboard bunnies last best on a shelf away from damp spots and direct sunlight. If you want to store them for a season, place them in a shallow box with tissue paper between each so the whiskers do not bend.
You can turn old bunnies into new crafts by removing the decorations and repainting the tube. The tubes withstand a couple of makeovers before they weaken.
Keep leftover pipe cleaners and small pompoms in a clear jar for future crafts. A small tray or muffin tin works well for sorting bits during cleanup, which cuts down on spills and lost pieces.
FAQs About Vibrant Fuzzy-Whiskered Bunnies
Will this craft be too messy for my kitchen table?
I get this question a lot. A single layer of newspaper or an old sheet under your work area keeps paint and glue off the table. The real mess tends to be ping-pong sized small drops of paint and a few loose fuzz bits. That cleans up with a damp cloth and a quick sweep. If you worry about paint on clothes, use an apron or an old shirt and keep a small cup of water and a towel nearby. The glue I suggest dries fairly quickly, so you will not sit with sticky pieces for long.
Is this safe for little kids?
I have done this with kids as young as three with close supervision. Scissors and small parts need a grown-up nearby. Use child-safe scissors for preschoolers and avoid very small pompoms if choking might be a concern. If you have a younger child, cut the pieces ahead of time and let them glue and decorate the tube. Watch for sharp pipe cleaner ends and tuck them into the glue so they do not poke.
Can I substitute materials if I do not have matching pompoms or pipe cleaners?
Yes, you can use small bits of crumpled paper for a nose or short strips of fabric for whiskers, but keep in mind that the tactile look changes. Pipe cleaners bend and hold shape with little effort, so they give that fuzzy, starburst whisker effect. If you use paper whiskers, crease them so they stand out. I prefer pipe cleaners for ease and durability.
My glue is pooling or not holding. What now?
Pooling happens when too much glue hits a small area. Use the precision-tip craft glue to place tiny dots instead of large blobs. If something separates after drying, add a small drop of glue behind the piece, press, and let it rest under a light weight for a few minutes. If the surface is very smooth, rough it slightly so glue has texture to bite into.
A Final Helpful Note
Give yourself permission to keep this low key. The bright colors and simple features create charm without perfection. If a whisker sits a bit crooked or a pompom shifts, that adds character. These bunnies do not need to be exact to be loved. Let the kids lead and keep your role gentle and steady. Little helpers gain confidence when they see joy in imperfect work.
Conclusion
If you want a quiet resource for pet safety or local care while planning crafts at home, you may find a helpful local reference like Attentive Pet Urgent Care In Diamond Springs, CA useful for emergencies that can interrupt a craft session. For a touch of nature inspiration and to enjoy a close-up look at wildlife textures you can mimic in craft fur, see this photography piece on The Elusive Ermine – Shaun Terhune Photography.
This project fits into busy days and into slow ones. It moves from start to finish in a short block of time, uses things you likely already have, and gives kids a clear, satisfying outcome. Keep the materials handy, expect a little glue and paint, and enjoy the bright bunnies that come out of it.
PrintVibrant Fuzzy-Whiskered Bunnies

A fun and colorful craft for kids, creating adorable bunnies using cardboard tubes, paint, and simple materials.
- Prep Time: 10 minutes
- Cook Time: 20 minutes
- Total Time: 30 minutes
- Yield: 1 bunny
- Category: Craft
- Method: Crafting
Ingredients
- Empty Cardboard Tubes (1 per bunny)
- Vibrant Paint or Paper (Bright Orange, Cyan Blue, Lime Green)
- Fuzzy Pipe Cleaners (2 per bunny, matching the body color)
- Googly Eyes
- Small Pompoms (matching the body color for the nose)
- Fine-tip Black Marker (for the mouth)
- Cardboard Scraps (for the ears)
- Craft Glue (A Precision tip is best)
- Scissors
Instructions
- Start by painting your cardboard tubes in bright colors or wrapping them in colored paper.
- Paint one even coat and let it dry, or wrap the tube and smooth any air bubbles.
- Cut strips from your cardboard scraps for the ears, bend them, and glue them to the top of the tube.
- Make two ear shapes and crease them gently where they will meet the tube.
- Press and hold for a few seconds so the glue grabs.
- Cut pipe cleaners into segments and glue them to the tube.
- Trim each pipe cleaner into several short pieces, arrange them, and glue to the tube.
- Add a matching pompom for the nose and stick on the googly eyes.
- Draw a simple mouth with the marker.
- Once the glue has dried, gently fan out the whiskers.
Notes
For best results, use a precision-tip craft glue to minimize mess. An adult can assist with hot glue if needed. This craft can be done quickly and is adaptable for various ages. Consider varying colors for a fun twist.
Nutrition
- Serving Size: 1 bunny
- Calories: N/A
- Sugar: N/A
- Sodium: N/A
- Fat: N/A
- Saturated Fat: N/A
- Unsaturated Fat: N/A
- Trans Fat: N/A
- Carbohydrates: N/A
- Fiber: N/A
- Protein: N/A
- Cholesterol: N/A