


Creating holiday crafts like painting clear ornaments can be one of those moments when you find yourself with a busy afternoon, kids eager to make something, and the last-minute desire to add a personal touch to your festive decorations. Painting clear plastic ornaments is not only an easy and fun way to spend that time, but it also results in stunning decorations that capture the spirit of the season. With minimal preparation and just a few simple materials, you can start a delightful project that everyone will love. This guide will walk you through how to paint clear plastic ornaments, ensuring a mess-free and enjoyable creative experience. You may also find How To Create A Rainbow Baking Soda Crystal Forest useful.
Why This How to Paint Clear Plastic Ornaments Works So Well

You may also find How To Make Flower Hearts Using Clear Glue useful.
This project is appealing due to its low-prep nature. You don’t need elaborate supplies or a lengthy setup. Painting clear plastic ornaments is both approachable and reliable, making it perfect for families with busy schedules. In just a short time, you can transform plain ornaments into vibrant, personalized decorations that your family will cherish for years. The next time you find yourself in need of a quick and engaging activity, consider this fun craft that yields real results. You may also find How To Make Flower Hearts With Clear Glue useful.
A Quick Look Before You Begin
Before you dive into the fun of painting, it’s helpful to know what the setup and cleanup will look like. This project typically takes about 30-45 minutes, including drying time, depending on how detailed you want to get. The mess level is manageable, so covering your workspace with newspaper or a tablecloth is a good idea. Adult involvement is minimal unless you want to assist younger children with more intricate designs. Overall, the process feels relaxed and enjoyable, allowing for creativity to flourish. You may also find How To Make Rainbow Salt Painting Jellyfish useful.
Materials You’ll Need
To get started on this delightful craft, gather the following materials:
- Clear plastic ornaments (common household item)
- Acrylic paint (budget-friendly)
- Paintbrushes (optional, but helpful)
- Ribbons or string for hanging (optional)
- Gloves (optional for easy cleanup)
- Water for rinsing brushes (easy substitute)
With these supplies at hand, you’re ready to bring your creative vision to life!
Step-by-Step Directions
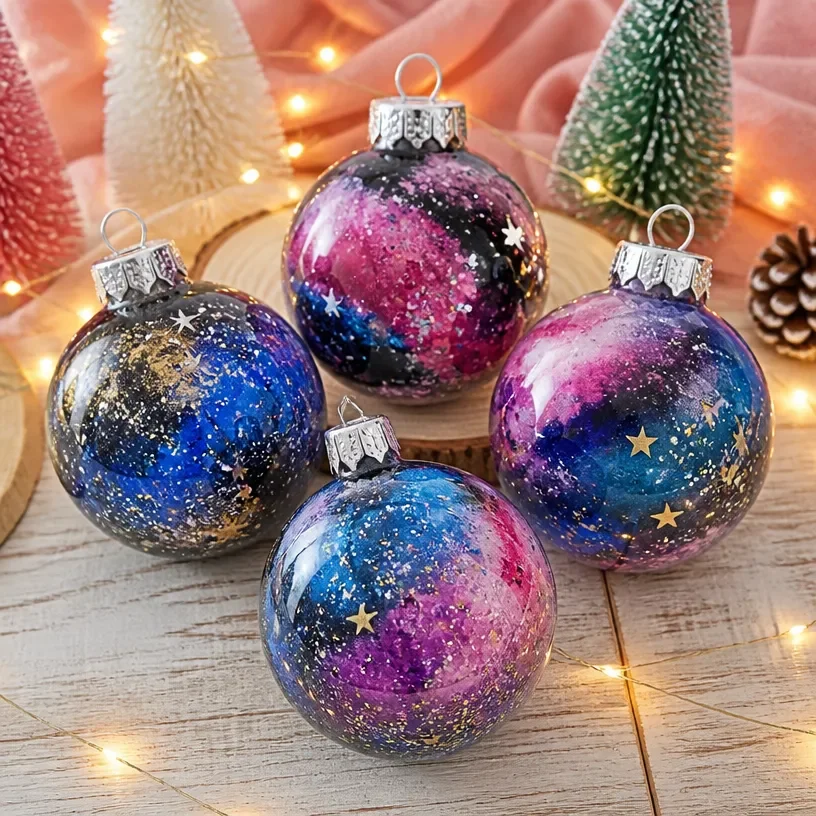
Prepare Your Workspace: Cover your table with newspaper or a plastic tablecloth to catch any paint spills. This will help keep cleanup easy and efficient.
Choose Your Colors: Decide on the colors you want for your ornaments. Acrylic paint comes in a variety of hues, so pick your favorites to create eye-catching combinations.
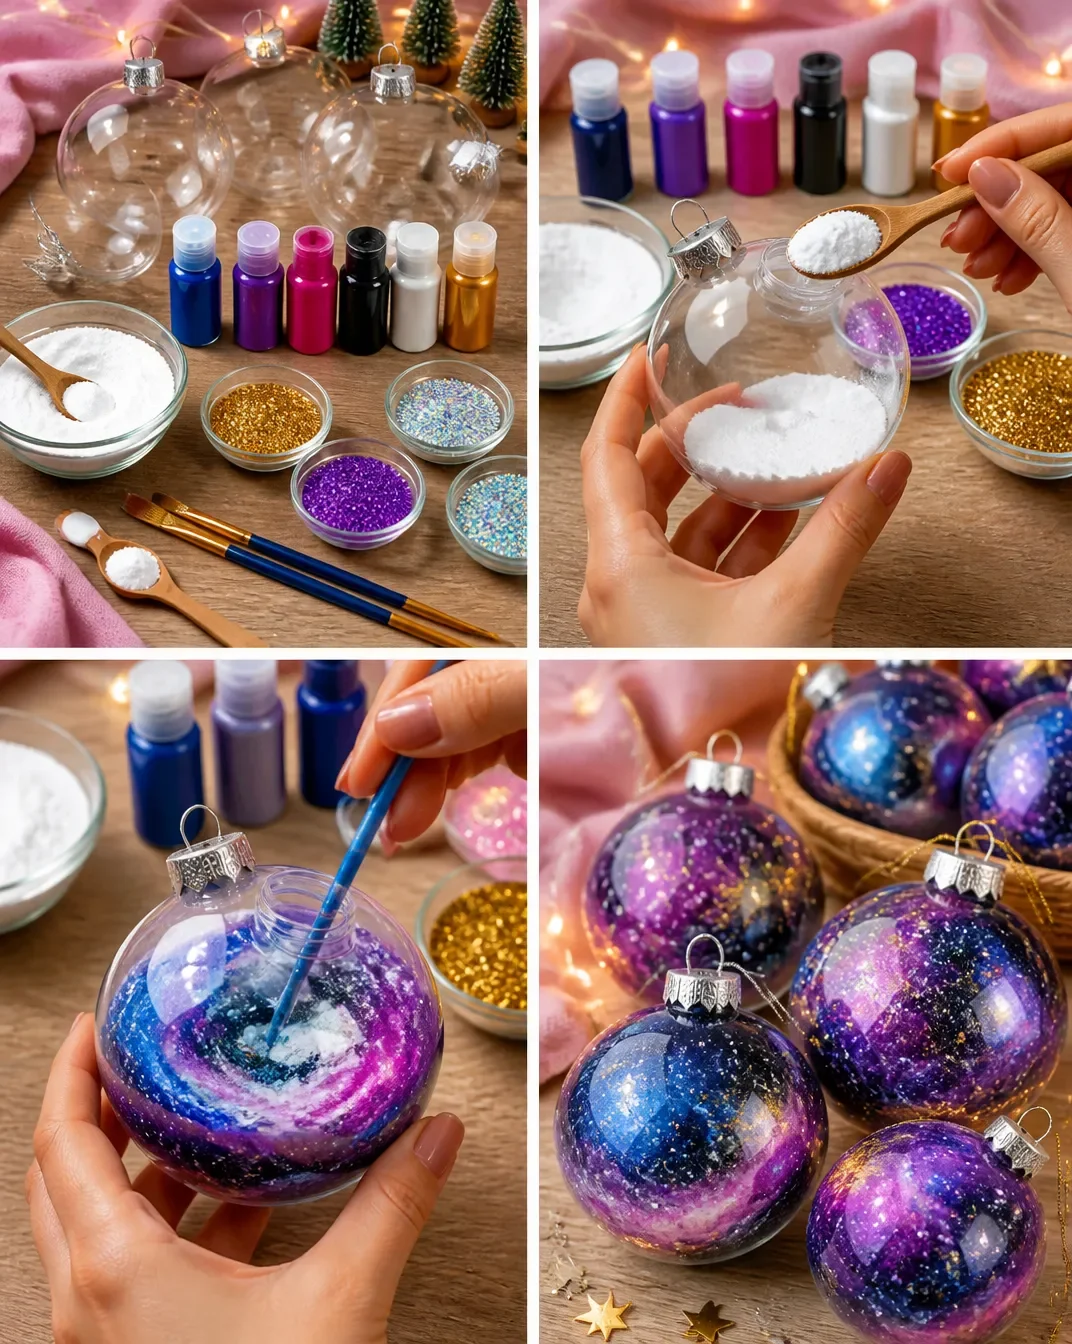
Add Paint to the Ornaments: If using multiple colors, pour a small amount of paint into each ornament. Swirl the paint around by tilting the ornament, ensuring that the paint covers all areas.
Drying: Once covered, place the ornaments upside down in a cup or on a paper towel to let excess paint drain out. This cautious approach helps avoid a mess.
Finishing Touches: Once dry, you can add additional layers of paint or even use brushes for fine details. Let your creativity guide you!
Add Ribbons or Strings: If desired, attach ribbons or strings to hang your finished ornaments on the tree or around the house.
Clean Up: Use soap and water to clean any brushes and the workspace. You can dispose of the newspaper or save it for your next crafting adventure!
The Learning Behind This DIY
While your kids might simply see painting as a fun activity, there are valuable skills at play. This project helps develop fine motor skills as they manipulate brushes and ornaments. It also promotes hand-eye coordination as they aim for specific areas on the ornaments. Moreover, working with colors and mixing paints enhances their understanding of color theory. Each step in this creative process allows for an exploration of cause and effect, fostering a hands-on learning environment while unleashing their artistic potential.
Troubleshooting Common Issues
If you encounter any bumps along the way, here are some common problems and their solutions. If the paint doesn’t stick well, ensure the ornaments have been cleaned and dried thoroughly beforehand. If the colors turn out too dull, try adding another layer of paint once the first layer has dried. Remember to have fun with the process; even unexpected results can lead to new creative ideas!
Easy Variations to Try
Get creative with these fun variations to make your ornament crafting even more exciting:
- Glitter Additions: Mix glitter into the paint for sparkly ornaments.
- Nature-Inspired Designs: Use leaf imprints or flowers to give a natural touch.
- Theme-Based Ornaments: Select colors based on holidays or family celebrations.
- Personalized Touches: Write names or dates on the ornaments with paint pens.
These variations can help tailor the project to suit different occasions or preferences, making the crafting experience even more enjoyable.
Storing or Reusing This Project
Once your ornaments are dry and beautifully painted, think about where you’ll put them. Store them carefully in a box with tissue paper to prevent breakage. If you want to reuse the ornaments, simply peel off the paint and start the process over, or create a beautiful keepsake for each holiday season, making cherished memories each year.
FAQs About How to Paint Clear Plastic Ornaments
Is this a messy activity?
It can be, but with some simple prep like covering your workspace, cleanup becomes much more manageable!
What ages is this activity suitable for?
Kids of all ages can enjoy this project with adult supervision, particularly younger children who might need help with details.
Can I substitute acrylic paint with something else?
Yes! You could use washable paint if you prefer something easier to clean up, but keep in mind the finish might not be as vibrant.
Will the paint stay on the ornaments?
As long as the paint is applied correctly and allowed to dry, it should stay on well. Additional layers can enhance durability as well.
What can I do with leftover materials?
You can save the paint and brushes for future crafts or use the plastic ornaments for other decorations!
Conclusion
Creating painted ornaments is a delightful way to foster creativity and family bonding during the holiday season. Not only do these ornaments add a personal touch to your decorations, but they also allow for quality time together. For additional ornament crafting ideas, consider exploring Pour Painted Christmas Ornaments or try your hand at DIY Ornament Balls with a Paint Swirl. Happy crafting!
PrintHow to Paint Clear Plastic Ornaments

A fun and easy guide to painting clear plastic ornaments for festive decorations with your kids.
- Prep Time: 15 minutes
- Cook Time: 30 minutes
- Total Time: 45 minutes
- Yield: 4 ornaments
- Category: Craft
- Method: Decorating
- Cuisine: N/A
- Diet: N/A
Ingredients
- Clear plastic ornaments
- Acrylic paint
- Paintbrushes (optional)
- Ribbons or string for hanging (optional)
- Gloves (optional)
- Water for rinsing brushes
Instructions
- Prepare your workspace: Cover your table with newspaper or a plastic tablecloth.
- Choose your colors: Decide on the colors you want for your ornaments.
- Add paint to the ornaments: Pour a small amount of paint into each ornament and swirl around.
- Drying: Place the ornaments upside down to let excess paint drain out.
- Finishing touches: Add additional layers or fine details as desired.
- Add ribbons or strings for hanging.
- Clean up: Use soap and water for cleanup.
Notes
This activity fosters creativity while developing fine motor skills and understanding of color theory.
Nutrition
- Serving Size: 1 ornament
- Calories: 0
- Sugar: 0g
- Sodium: 0mg
- Fat: 0g
- Saturated Fat: 0g
- Unsaturated Fat: 0g
- Trans Fat: 0g
- Carbohydrates: 0g
- Fiber: 0g
- Protein: 0g
- Cholesterol: 0mg