

The afternoon sun was beginning to set, and the kids were buzzing with creative energy, eager to fill the space around them with magic. You know those moments when time seems fleeting, and fun projects are the perfect solution? This is when making Glowing Flowers comes in clutch. With a handful of household materials, you can turn natural blooms or flower prints into stunning, illuminated decorations that are sure to impress. Let’s dive into this fun and simple project! You may also find Broken Crayons Glowing Rainbow Flowers 2 useful.

Why This Glowing Flowers Works So Well

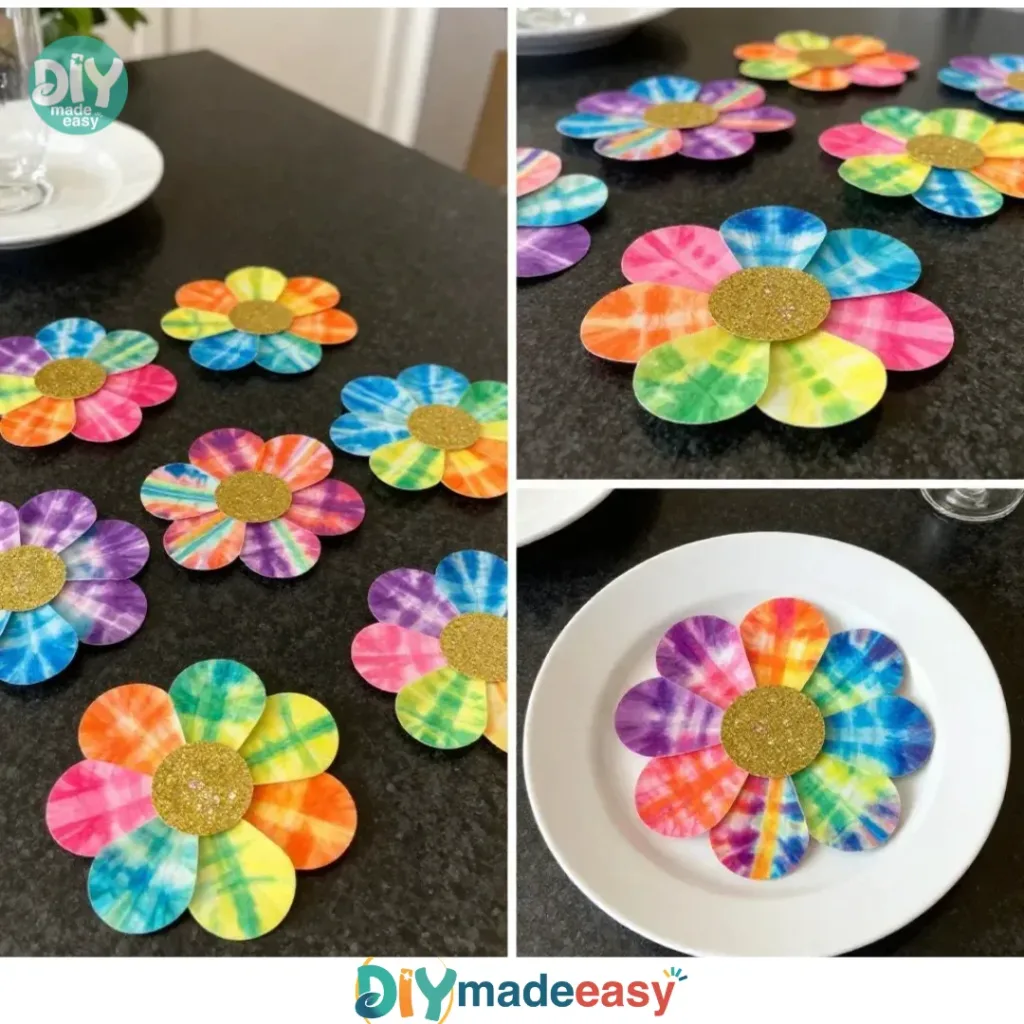
You may also find Broken Crayons Glowing Rainbow Flowers useful.
Creating glowing flowers is one of those projects that combines creativity with science, making it an exciting idea for both kids and adults. It’s low-prep and requires minimal supplies. Because it uses glow-in-the-dark pigment, the end result is not only beautiful but also a little magical. There’s something incredibly fulfilling about mixing colors and watching simple materials come together to create something enchanting. Plus, it fits seamlessly into any busy schedule, as you can complete it in just a couple of hours. You may also find Glowing Flowers Diy useful.
A Quick Look Before You Begin
Engaging in this DIY project is straightforward. You’ll need a few minutes to set up your workspace and gather the materials, but once everything is in place, the creative flow is easy. The mess level is quite manageable, so cleanup won’t be a huge hassle afterward. If you have younger kids helping out, an adult should be involved, especially when it comes to using scissors and applying the adhesive. Overall, this is a project that provides an enjoyable experience with minimal fuss. You may also find Beautiful Bioplastic Suncatchers Flowers useful.
Materials You’ll Need
- Transparency sheets (common household item)
- Glow-in-the-dark pigment powder (available online or at craft stores)
- Water-based adhesives (easy to clean up)
- Natural flowers or flower prints (press real flowers for a unique touch)
- Scissors (for cutting shapes)
- A clean workspace (essential for crafting)
These materials are easy to obtain and budget-friendly, ensuring that you have everything you need right at your fingertips.
Step-by-Step Directions
Creating glowing flowers is an exciting process, and it unfolds in these clear steps:
-
Gather all your materials on a clean, flat surface. Enjoy the colors and textures before starting. The vibrant hues of the flowers and the glow-in-the-dark powder will inspire your creativity.
-
Choose the natural flowers or flower prints you want to use. If using real flowers, consider pressing them first. This step helps to preserve their shape and beauty, making them more suitable for crafting.
-
Cut the transparency sheets into flower shapes with variations in size and petal shape. Don’t hesitate to get creative—different shapes will create a more dynamic final piece.
-
Mix the glow-in-the-dark pigment powder with the water-based adhesive until smooth. This mixture creates the magical effect that will help your flowers shine in the dark.
-
Apply a layer of the glowing mixture onto one side of the transparency flowers and allow to dry completely. As you do this, notice the way the colors blend and how they adhere to the sheet.
-
Once dry, gently peel off any excess adhesive. This will help keep your flowers looking clean and professional.
-
Assemble the flowers by layering different sized petals and secure with more adhesive. Play around with the arrangement until you’re happy with how they look.
-
Display your glowing flowers in a dim light setting and enjoy their illumination. It’s a satisfying moment when you see how your hard work pays off with a glow!
The Learning Behind This DIY

While making glowing flowers, kids practice several essential skills. They engage in fine motor activities through cutting and layering, helping to strengthen their coordination. Additionally, they learn about mixing materials and how different combinations can lead to unique results—this fosters basic scientific understanding around color mixing and chemical reactions, albeit in a fun, hands-on way.
Troubleshooting Common Issues
Sometimes, projects don’t go exactly as planned. A common issue with the flowers may be the adhesive not drying properly or the glow-in-the-dark effect being weaker than expected. If your flowers look a bit cloudy, this can often be fixed by applying a thinner layer of adhesive next time. Ensure you’re allowing enough drying time before handling, and don’t worry if some flowers turn out better than others; it’s all part of the learning experience!
Easy Variations to Try
If you want to switch things up with your glowing flowers, consider these ideas:
- Use seasonal flowers or foliage to reflect the time of year.
- Experiment with different glow-in-the-dark colors to create a variety of effects.
- Try adding glitter to the adhesive mixture for sparkly flowers that dazzle in the light.
- Layer the petals in different orders for a unique look.
- Create flower prints on paper using this same glowing mixture for more art options.
Storing or Reusing This Project
After enjoying your glowing flowers, think about how to store or reuse them. They can easily be kept in a dry, cool place if you want to save them for later. If you plan to clean up, be sure to dispose of any leftover adhesive and the transparency sheets properly to minimize waste. With some planning, you can repurpose materials creatively in future projects!
FAQs About Glowing Flowers
Will this project be too messy for my kids?
The mess from this activity is quite manageable; just have some paper towels or wipes handy during cleanup.
Is the glow-in-the-dark powder safe for kids?
Yes, the glow-in-the-dark pigment powder is generally safe when used as directed, but it’s always a good idea to supervise younger children during crafting activities.
What if I don’t have natural flowers?
If real flowers aren’t available, flower prints will work beautifully. You can even draw your flower shapes on paper and follow the same steps.
Can we reuse the transparency sheets?
Definitely! If you have leftover sheets with no permanent adhesive or remnants, simply clean them off, and they can be reused for future projects.
What do I do if my flowers won’t glow?
If they aren’t glowing as expected, make sure they’re exposed to enough light to charge the glow-in-the-dark feature. Also, check to see if the mixture was applied evenly and allowed to dry completely.
Conclusion
Creating glowing flowers is an enjoyable and rewarding DIY project for all ages. It combines creativity and a little science, giving kids a chance to express themselves while learning about cool concepts. To explore more fun ideas, check out this engaging resource from Tyler Thrasher, or find more flower-related science activities at this dedicated DIY site. With glowing flowers, you will undoubtedly end up with a lovely display that lights up any space!
PrintGlowing Flowers

Create stunning illuminated decorations using glow-in-the-dark pigment and natural flowers or flower prints in this fun DIY project.
- Prep Time: 10 minutes
- Cook Time: 120 minutes
- Total Time: 130 minutes
- Yield: Multiple decorations
- Category: DIY Project
- Method: Crafting
- Cuisine: N/A
- Diet: N/A
Ingredients
- Transparency sheets
- Glow-in-the-dark pigment powder
- Water-based adhesives
- Natural flowers or flower prints
- Scissors
- A clean workspace
Instructions
- Gather all your materials on a clean, flat surface.
- Choose the natural flowers or flower prints you want to use.
- Cut the transparency sheets into flower shapes.
- Mix the glow-in-the-dark pigment powder with the water-based adhesive.
- Apply a layer of the glowing mixture onto one side of the transparency flowers.
- Once dry, gently peel off any excess adhesive.
- Assemble the flowers by layering different sized petals.
- Display your glowing flowers in a dim light setting and enjoy their illumination.
Notes
Supervise younger kids when handling scissors and adhesives.
Nutrition
- Serving Size: 1 decoration
- Calories: N/A
- Sugar: N/A
- Sodium: N/A
- Fat: N/A
- Saturated Fat: N/A
- Unsaturated Fat: N/A
- Trans Fat: N/A
- Carbohydrates: N/A
- Fiber: N/A
- Protein: N/A
- Cholesterol: N/A