

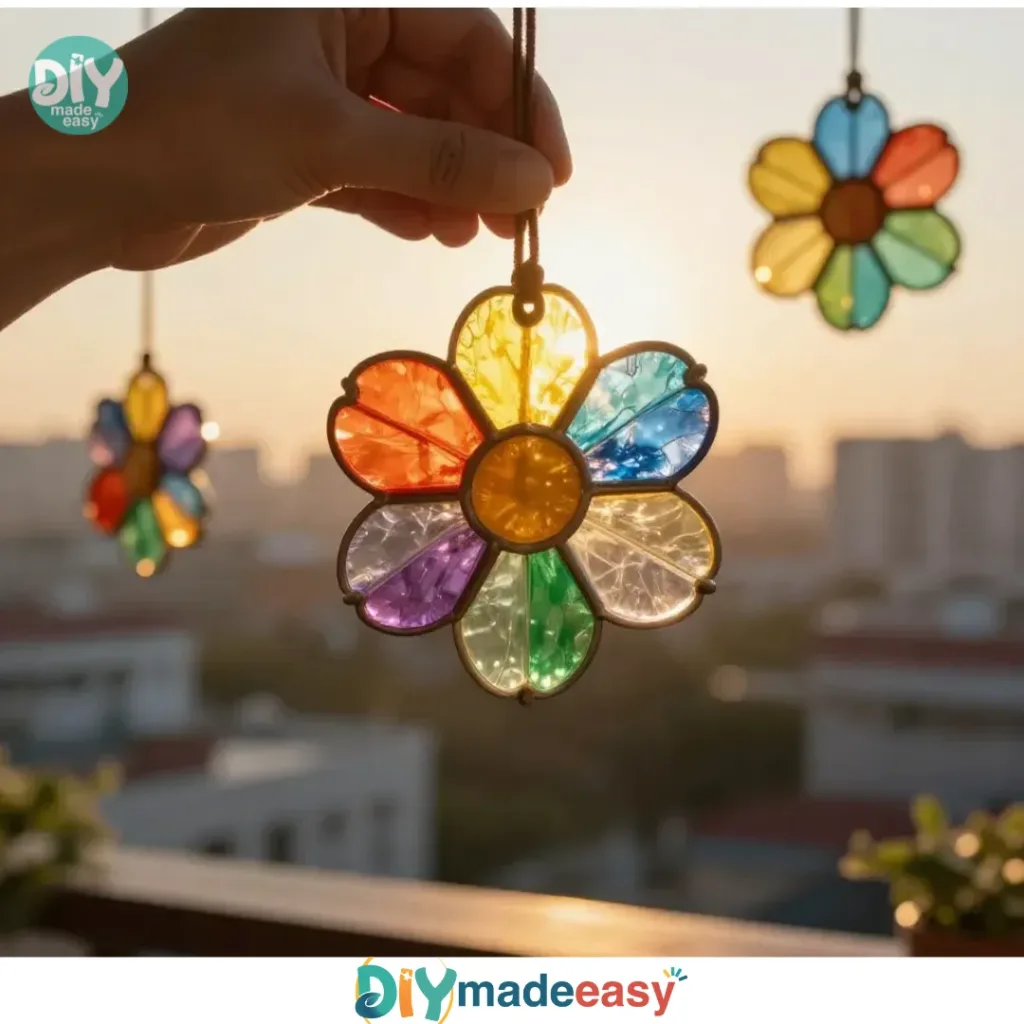
It’s a busy afternoon, and the kids are restless, asking for something creative to do. You look around and spot a pile of broken crayons sitting in the corner of the art table. Instead of tossing them out, why not turn them into something beautiful? That’s right—broken crayons can transform into glowing rainbow flowers that brighten any space. This fun project is perfect for those times when inspiration strikes, but you need something quick and easy to keep the little ones engaged. These colorful flowers not only recycle old crayons but also add a cheerful touch to your home.

Why You’ll Love Making Broken Crayons Turned Into Glowing Rainbow Flowers

Creating broken crayons turned into glowing rainbow flowers works so well for several reasons. First, it requires minimal preparation. You can gather the materials in just a few minutes. Second, it’s an approachable project that encourages creativity without the risk of overwhelming mess. Families with busy schedules can enjoy this activity, as it doesn’t take much time to complete.
Also, this project gives results that are reliable and visually stunning. The kids will love watching the crayons melt and transform into beautiful flowers, which enhances their understanding of change and creativity. It’s truly rewarding to see their excitement when they see their work come to life, and the simple steps make it enjoyable for all ages.
The Flow of Making Broken Crayons Turned Into Glowing Rainbow Flowers
You may be wondering how this DIY fits into your busy day. The process is straightforward and can usually be finished in about an hour, including prep time. All you need to do is set the oven to a low temperature, and your hands-on involvement mainly occurs at the start and end of the process.
Plan for some adult involvement, especially when melting the crayons or removing them from molds. The mess level is low, especially compared to many other crafts that require paint or glue. All this makes it a fantastic choice for families looking for low-prep yet engaging activities.
Materials You’ll Need
- Broken crayons: These are the star of the show! You can use any colors, as mixing will create vibrant flowers.
- Wax paper or molds: If you opt for wax paper, you can make flower shapes easily. Molds are great for more detailed designs.
- String for hanging: Use any string or ribbon you have around the house to make them easy to display.
- Scissors: A must for cutting string and any flower shapes if you go that route.
- Flower-shaped template: This optional item helps make your flowers look extra special if you decide to cut shapes from the wax paper.
Step-by-Step Directions
- Gather your broken crayons and remove any wrappers. Start by collecting all those broken pieces from around the house. Make sure to remove any paper wrappers, as they can burn in the oven.
- If using molds, break the crayons into smaller pieces and fill the molds. For this step, you can use your hands to snap the crayons or even a mallet if you want tiny pieces. Aim for small chunks, so they melt evenly.
- Place the molds on a baking sheet and melt in a low oven (about 200°F) until fully melted. This should take around 10–15 minutes, but keep an eye on them to avoid over-melting. You want them to become a beautifully blended puddle of color.
- Allow to cool slightly, then carefully remove from the molds and cut into flower shapes if using wax paper. After taking the molds out, let them sit for a few minutes to harden slightly before you touch them. If you used wax paper, this is where you can transform your sheets into lovely flower shapes.
- Use scissors to cut the string and attach it to the flower for hanging. Tie the string securely to your flower creations. Feel free to make the lengths different to add a playful touch to your displays.
Discover Easy Kids Activities
Looking for simple, fun ideas for kids? Explore our Low Prep Kids Activities and find quick projects that spark creativity without long prep time.
The Simple Science or Skills at Work

While this project seems purely artistic, it incorporates important skills and concepts. First, melting crayons introduces children to the concept of states of matter. Seeing the transition from solid to liquid provides a real-world example of melting.
Kids also practice fine motor skills while breaking the crayons, positioning the molds, and tying the string. These tasks help strengthen their coordination. Finally, there’s a clear cause and effect relationship visible throughout the melting process, connecting their actions with the outcome.
Troubleshooting Common Issues
Sometimes, things don’t go exactly as planned. If your melted crayons aren’t blending well, they may need a little more time in the oven. Just monitor carefully to prevent them from burning. If they come out with a rough texture, allow them to melt longer since uneven melting can happen with unevenly cut pieces.
In case the flowers stick to the molds, a little spray oil on the molds beforehand can help prevent sticking in future projects. If you’re using wax paper and it gets too warm, they may become too soft. Always keep an eye on them as they cool to prevent this.
Easy Variations to Try
Here are a few simple twists to make the project even more exciting:
- Seasonal Colors: Use specific color palettes for different holidays or seasons, like reds and greens for Christmas or pastels for Easter.
- Mixing Crayon Colors: Encourage kids to mix their crayon pieces in the molds for unexpected color combinations.
- Decorative Touches: Add glitter or other embellishments into the melted crayons for an extra glimmer.
- Different Shapes: Use various templates to create butterflies, stars, or other fun shapes. This can make for a great themed display.
- Crafty Gift Ideas: Turn this idea into a homemade gift. Create a set of flowers using color combinations that a friend or family member would love.
Storing or Reusing This Project
After your kids have enjoyed their glowing flowers, consider how best to keep them. If made correctly, they can last quite a while. Store them in a cool place to avoid melting again. You can save the leftover crayon pieces for future projects or additional crafting endeavors.
Encouraging children to think about reuse is another great lesson. Once the flowers serve their decorative purpose, they can be melted down again to create new designs—truly a green approach.
FAQs About Broken Crayons Turned Into Glowing Rainbow Flowers
Will this project make a mess?
It’s quite a clean activity! Your biggest concern will be crumbs from the broken crayons, but have a little tray or bowl ready for easy cleanup.
Are there any safety concerns I should know about before we start?
Using the oven means keeping a close eye, especially with younger kids around. They should not handle hot molds or stay near the oven unsupervised.
Can I use other types of wax for this project?
While standard crayons work best, you can experiment with different wax colors, but they might melt at different rates.
How do I clean up if something spills?
Should any crayon wax spill in the oven, let it cool, and gently scrape it off. It comes off fairly well if you act fast.
Can we reuse the materials later?
Absolutely! Broken crayons can be used as new art supplies. The flowers can be remelted and reused for another crafting adventure.
A Final Helpful Note
As you embark on this fun project, remember that the joy lies in the process—not just the outcome. Don’t worry if everything isn’t perfect. Each step offers a chance for creativity, exploration, and learning. Enjoy making these glowing rainbow flowers with your kids, and foster their imagination. Celebrate the fun, messy, and spontaneous moments, and let creativity blossom naturally.
PrintBroken Crayons Turned Into Glowing Rainbow Flowers

Transform broken crayons into beautiful glowing rainbow flowers with this fun and easy DIY project, perfect for engaging kids in creativity.
- Prep Time: 10 minutes
- Cook Time: 15 minutes
- Total Time: 25 minutes
- Yield: Multiple flowers
- Category: Craft
- Method: Crafting
- Cuisine: N/A
- Diet: N/A
Ingredients
- Broken crayons
- Wax paper or molds
- String or ribbon for hanging
- Scissors
- Flower-shaped template (optional)
Instructions
- Gather your broken crayons and remove any wrappers.
- Break the crayons into smaller pieces if using molds.
- Place the molds on a baking sheet and melt in a low oven at 200°F for 10-15 minutes.
- Allow to cool slightly before removing from molds or cutting into shapes.
- Use scissors to cut the string and attach it to the flowers for hanging.
Notes
Ensure adult supervision when using the oven. Mold preparation can prevent sticking.
Nutrition
- Serving Size: 1 flower
- Calories: 0
- Sugar: 0g
- Sodium: 0mg
- Fat: 0g
- Saturated Fat: 0g
- Unsaturated Fat: 0g
- Trans Fat: 0g
- Carbohydrates: 0g
- Fiber: 0g
- Protein: 0g
- Cholesterol: 0mg