DIY Aquarium Tin Can Planters
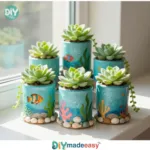
A fun and engaging DIY project for kids to create their own aquarium tin can planters, combining crafting and gardening.
- Prep Time: 10 minutes
- Cook Time: 60 minutes
- Total Time: 70 minutes
- Yield: 4 planters
- Category: Craft
- Method: Crafting
- Diet: Vegetarian
Ingredients
- Empty tin cans (washed and dried)
- Sharp scissors or a can opener
- Paint (non-toxic and water-resistant)
- Brushes and sponges for applying paint
- Soil (potting soil works best)
- Seeds or small plants (herbs, succulents, etc.)
- Optional: decorative elements like beads, glitter, or stickers
Instructions
- Prepare your cans: Begin by carefully removing the top of the tin can. Use a can opener for safety, and smooth any sharp edges.
- Clean and decorate: Wash the can to remove any residue and dry it thoroughly. Let your kids paint the can with non-toxic paint.
- Drill drainage holes: Once the paint is dry, poke small holes in the bottom for drainage.
- Add soil: Fill the can about three-quarters full with potting soil, pressing it down gently.
- Plant your seeds or plants: Make small holes, place your seeds or plants, and cover lightly.
- Water: Gently water the plants, keeping the soil moist.
- Find a cozy spot: Display the planters in a bright location for sunlight.
Notes
Ensure adult supervision is given when using sharp tools. Clean up spills with washable paints.
Nutrition
- Serving Size: 1 planter
- Calories: 0
- Sugar: 0g
- Sodium: 0mg
- Fat: 0g
- Saturated Fat: 0g
- Unsaturated Fat: 0g
- Trans Fat: 0g
- Carbohydrates: 0g
- Fiber: 0g
- Protein: 0g
- Cholesterol: 0mg
Find it online: https://www.diymadeeasy.com/diy-aquarium-tin-can-planters/