Crystal-Clear Bubble Ball
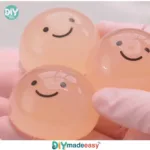
Create beautiful, crystal-clear bubble balls with ease using simple materials and epoxy resin.
- Prep Time: 30 minutes
- Cook Time: 120 minutes
- Total Time: 150 minutes
- Yield: 1 bubble ball
- Category: Craft
- Method: Crafting
- Cuisine: N/A
- Diet: N/A
Ingredients
- Clear epoxy resin and slow hardener
- Silicone sphere mold
- Mixing cups and sticks
- Nitrile gloves and respirator
- Thermometer (optional)
- Isopropyl alcohol, 91% or higher
- Mini torch or heat gun
- Toothpicks and silicone-tipped tools
- Clear polish compound or fine sandpaper (600 to 2000)
- Small drill with diamond bit (optional)
- Soft cloths and cotton swabs
- Clean, dust-free workspace
Instructions
- Prepare your space and tools. Start by finding a clean, dust-free area to work in. Lay down some protective covering for your surfaces to catch any spills.
- Put on gloves and respirator. Safety comes first. Wearing gloves and a respirator protects your skin and lungs from the chemicals in the resin.
- Cover your surface and arrange everything within reach. Gather all your supplies, placing them close at hand.
- Measure and mix the resin slowly. Carefully measure out equal parts resin and hardener. Mix slowly to avoid introducing unnecessary bubbles.
- Warm the mixed resin a little if allowed. This can help in mixing, but be cautious and follow the manufacturer’s guidelines.
- Pour a thin base layer into the sphere mold. Just enough to coat the bottom.
- Add a controlled inner inclusion or let a single bubble form.
- Allow the first layer to reach a tacky stage. Wait until the resin is tacky to the touch.
- Pour the remaining resin in gentle layers. Slowly pour more resin into the mold.
- Use isopropyl alcohol to clear small surface bubbles.
- Let the piece fully cure in a dust-free spot.
- Demold gently once cured.
- Sand and polish for crystal clarity.
- Add a hanging eye or mount if desired.
Notes
Ensure to work in a well-ventilated area and follow the safety instructions on the epoxy resin packaging.
Nutrition
- Serving Size: 1 bubble ball
- Calories: 0
- Sugar: 0g
- Sodium: 0mg
- Fat: 0g
- Saturated Fat: 0g
- Unsaturated Fat: 0g
- Trans Fat: 0g
- Carbohydrates: 0g
- Fiber: 0g
- Protein: 0g
- Cholesterol: 0mg
Find it online: https://www.diymadeeasy.com/crystal-clear-bubble-ball/