

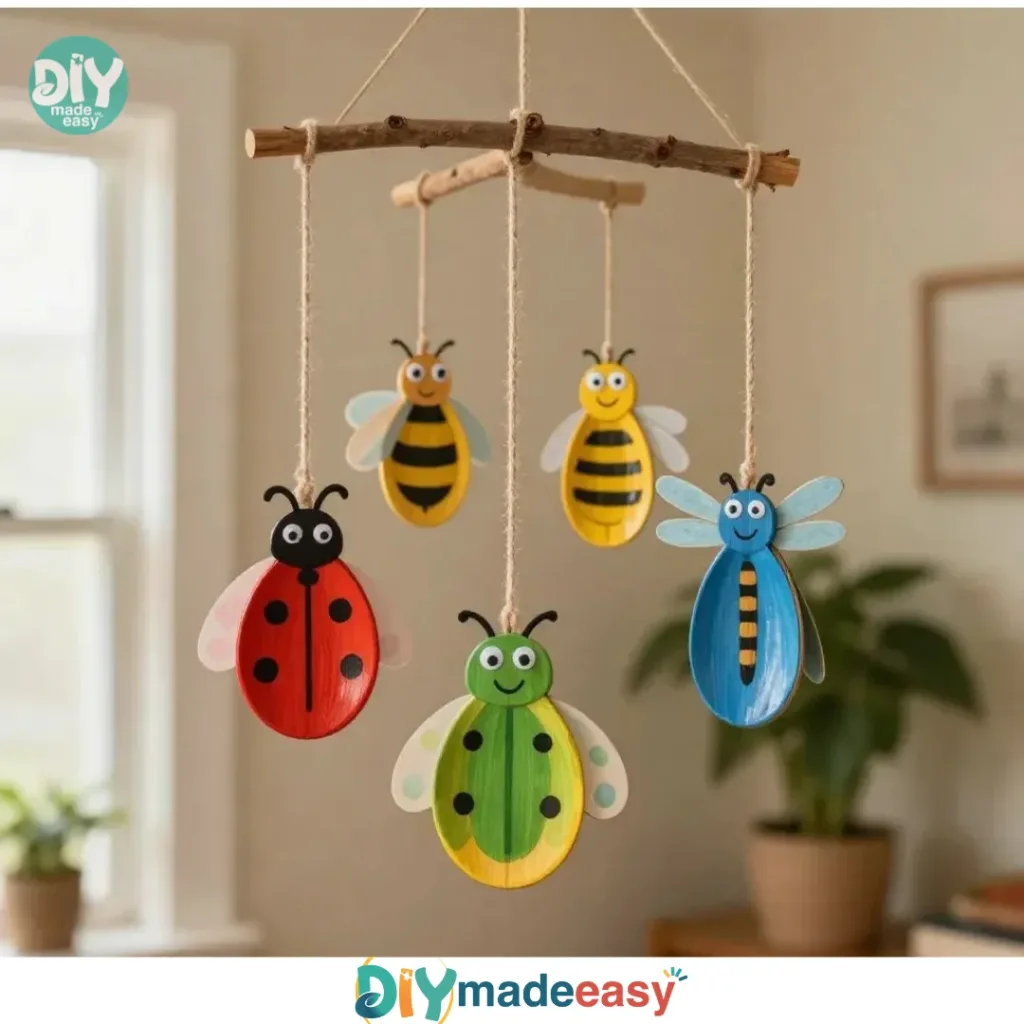
Making a DIY project with kids can turn an ordinary afternoon into something magical. Picture a busy day when the kids are bubbling with energy and ideas. Just when you think you’re out of options, the Colorful Spoon Bug Mobile comes to the rescue. It’s an engaging and fun activity that requires minimal prep yet yields delightful results. With just a few materials and steps, you’ll soon have a whimsical mobile that dances gently in the breeze, adding a splash of color and creativity to your home. You may also find Colorful Baking Soda And Vinegar Reaction useful.

Why This Colorful Spoon Bug Mobile Works So Well

You may also find Colorful Bouncy Ball useful.
One of the best aspects of the Colorful Spoon Bug Mobile is its simplicity. This project requires only a handful of materials that are likely already in your home, ensuring you can start anytime without a trip to the store. Kids can engage with non-toxic paint, which is safe and vibrant, and enjoy the hands-on experience of painting wooden spoons to create their bugs. This makes it perfect for busy schedules, as it doesn’t demand hours of your time. You may also find Colorful Chromatography Coffee Butterflies useful.
Additionally, this DIY offers a reliable way to spark creativity. Each child can personalize their creation, leading to unique results that display their personal style. Plus, the act of painting enhances fine motor skills and allows ample room for imaginative expression. Families can bond over the joy of creating something special together, making it not only a project but a memorable experience. You may also find Colorful Crystal Egg useful.
A Quick Look Before You Begin
Before diving into the creative process, it’s helpful to understand what you’re getting into. The Colorful Spoon Bug Mobile can typically be completed in less than two hours, depending on drying times and how many bugs your little artists want to make. Set up is a breeze: just cover your workspace with newspaper or a plastic sheet, which also makes for easy cleanup later.
Expect a moderate level of mess, mainly with paint. But that’s part of the fun! If you prepare well by putting down protective layers, you won’t have to stress about minor spills. Lastly, while kids can lead the charge in creativity, a bit of adult oversight can keep things moving smoothly and ensure safety during painting.
Materials You’ll Need
- Wooden spoons (one for each bug)
- Non-toxic paint in various colors
- Paintbrushes (soft and smooth bristles)
- Natural twine or string (for hanging)
- Googly eyes or small buttons
- Scissors (for cutting twine)
- Optional: beads or paper for additional decorations
This list encompasses simple, common items you likely have at home. The non-toxic paint is budget-friendly and easy to clean up. Plus, the optional items like beads or paper can elevate your design, should creativity strike!
Step-By-Step Directions
-
Prepare your work area by laying down protective covering, like newspaper or a plastic sheet. This will make cleanup easier while letting the kids express their creativity without worry.
-
Paint the spoons with chosen colors and allow them to dry. Give the children a palette of colors, encouraging them to be adventurous in their choices. Watch as they create beautiful designs! Make sure the spoons are fully dry before proceeding to avoid smudging.
-
Once the paint dries, add googly eyes or buttons to embellish the spoons. This step adds life to your colorful bugs. Children can select where to place the eyes, fostering the design aspect of their project.
-
Cut lengths of twine for spacing between each spoon. Consider how far apart you want the bugs to hang. It’s a good opportunity for kids to practice measuring, yet another skill they’ll enhance through this DIY.
-
Assemble the mobile by tying each spoon onto the twine. Position the spoons in a way that appeals to your child’s aesthetic. This also allows them to understand how items can be balanced and grouped visually.
-
Hang your creation in a suitable spot and enjoy its gentle movements. This final step is rewarding as the bugs come to life, swaying gently when hung. Celebrate the effort, admire the creativity, and feel proud of what you’ve accomplished together!
What Kids Practice While Making This

Engaging in the Colorful Spoon Bug Mobile project is more than just creating a piece of art; it facilitates various learning opportunities. Through painting, children develop their fine motor skills and hand-eye coordination. Each brushstroke requires them to control their movements, which translates to other activities like writing or crafting.
Moreover, they learn about color mixing and selection, experimenting with hues and contrasts. This project also introduces basic science concepts, like drying times for paint and the cause-and-effect relationship between actions and outcomes. Observing how their designs turn out reinforces creative thinking and problem-solving.
Troubleshooting Common Issues
If something doesn’t go as planned, don’t fret. One common issue might be the paint not drying fast enough. If the weather is humid or there’s a lot of moisture in the air, consider placing the painted spoons in a warmer, dryer location to speed up the drying process.
Kids may also get excited and want to add too much paint or embellishment. If the design looks too cluttered, you can humor their creative impulses but gently guide them towards balance—remind them sometimes less is more!
Easy Variations to Try
For those feeling adventurous or if the kids want to spice things up, consider these variations:
- Use glow-in-the-dark paint for a nighttime mobile.
- Incorporate seasonal decorations, like leaves in autumn or flowers in spring.
- Use paper instead of wooden spoons for a lighter, quicker option—perfect for younger kids.
- Try making themed mobiles, like ocean creatures or garden bugs, to expand the educational aspect.
- Experiment with different shapes and materials to provide a wider array of sensory experiences.
Storing or Reusing This Project
When the creative moment has passed, think about how to store your Colorful Spoon Bug Mobile. If it’s sturdy enough, consider hanging it as part of your home decor. Alternatively, take it apart carefully, and save the spoons and other components for future crafts. Clean the items properly to reduce waste and encourage repeated use of materials whenever possible.
FAQs About Colorful Spoon Bug Mobile
Q: How messy will this project be?
A: Expect some mess, mainly with paint. Laying down a protective sheet makes it manageable. Clean-up can be as simple as wiping down surfaces and washing brushes, so no stress there!
Q: Is this project safe for younger children?
A: Absolutely! Just ensure they use non-toxic materials and have adult supervision, especially when cutting twine or using scissors.
Q: Can we use other materials if we don’t have googly eyes?
A: Yes, you can use buttons, beads, or even draw eyes with markers. Reusing materials helps kids learn creativity in problem-solving.
Q: How can we store the finished mobiles?
A: If you wish to keep them, hang them as decor, or disassemble carefully for future crafts to reduce waste.
Q: What are realistic results for this DIY?
A: Expect each creation to be unique! The final look may vary, especially with kids’ interpretations. Each piece is a reflection of their personality.
A Final Helpful Note
It’s important to embrace the creative process wholeheartedly, keeping in mind that the goal is to enjoy making while spending time together. Flexibility is key, and sometimes the best results come from unexpected turns during the project. Celebrate creativity, and feel free to adapt this project as you see fit—after all, it’s all about having fun and letting your imagination soar!
Conclusion
Creating a Colorful Spoon Bug Mobile is an enjoyable way to spend an afternoon with kids, engaging their creativity while working on skills that will benefit them in many areas of life. For a deeper look into DIY gardening solutions, check out Squash Bugs: How to Battle These Nasty Pests in the Garden!. Plus, if you want to keep your gardening organized, don’t forget to download the Seed to Spoon – Garden Planner app from the App Store. Enjoy crafting!
PrintColorful Spoon Bug Mobile

Create a whimsical mobile using painted wooden spoons that’s fun for kids and adds color to your home.
- Prep Time: 10 minutes
- Cook Time: 90 minutes
- Total Time: 100 minutes
- Yield: Varies based on the number of bugs created
- Category: Craft
- Method: DIY
- Cuisine: N/A
- Diet: N/A
Ingredients
- Wooden spoons (one for each bug)
- Non-toxic paint in various colors
- Paintbrushes (soft and smooth bristles)
- Natural twine or string (for hanging)
- Googly eyes or small buttons
- Scissors (for cutting twine)
- Optional: beads or paper for additional decorations
Instructions
- Prepare your work area by laying down protective covering, like newspaper or a plastic sheet.
- Paint the spoons with chosen colors and allow them to dry.
- Once the paint dries, add googly eyes or buttons to embellish the spoons.
- Cut lengths of twine for spacing between each spoon.
- Assemble the mobile by tying each spoon onto the twine.
- Hang your creation in a suitable spot and enjoy its gentle movements.
Notes
Incorporate glow-in-the-dark paint for a nighttime mobile or use different materials to expand creative options.
Nutrition
- Serving Size: 1 mobile
- Calories: 0
- Sugar: 0g
- Sodium: 0mg
- Fat: 0g
- Saturated Fat: 0g
- Unsaturated Fat: 0g
- Trans Fat: 0g
- Carbohydrates: 0g
- Fiber: 0g
- Protein: 0g
- Cholesterol: 0mg