

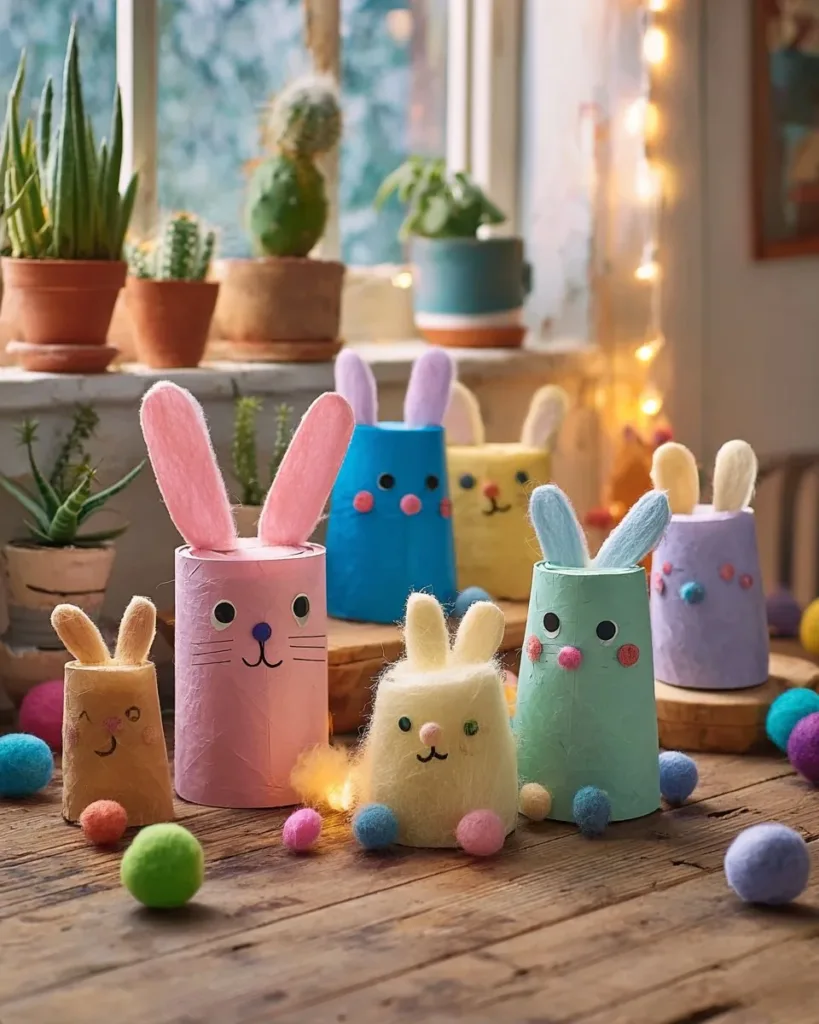
A busy afternoon, a kitchen island scattered with art scraps, and three pairs of little hands asking for something to make now often become the exact moment a quick craft wins the day. Upcycled Toilet Paper Roll Bunnies fit that moment perfectly.
You grab a painted roll, a scrap of white paper for ears, a couple of pom-poms and some googly eyes, and you have a sweet, simple result in under an hour. If you like quick wins that use things you already have, this project slides right into any short stretch of free time and leaves the family with something cute to display or gift. For another low-prep, hands-on afternoon idea that uses simple household items, try our pretty wax paper suncatchers to pair with these bunnies on a sunny windowsill.
Why You’ll Love Making Upcycled Toilet Paper Roll Bunnies

This craft works because it keeps everything small and simple. One empty toilet paper roll becomes a friendly, three-dimensional bunny with only a few additions. You do not need elaborate supplies or long prep. The paint dries fast, the glue sets quickly, and small hands can take part in most of the work.
This project fits real-life schedules. You can paint the rolls while dinner simmers, let them dry while you clean up, and finish assembling at bedtime. You can make one in ten minutes or ten over an afternoon. The materials are easy to store and inexpensive to replace when you run low.
This project stays approachable. The parts fit together in an obvious way. If the eyes sit a little crooked or the whiskers are longer than you planned, the bunny still looks charming. That makes this craft reliable for mixed-age groups and last-minute plans.
This craft also feels satisfying. There is a clear start and finish. The bunnies dry solidly and stand on their own. Kids can hand them to friends or line them up on a shelf. That quick, visible result builds confidence and invites another round of creative play.
A Quick Look Before You Begin
Plan for about 30 to 45 minutes per small group when you include paint drying time. If you split the project into two sessions you keep the mood relaxed: paint first, decorate second.
Set a washable surface or an old towel on your table. Paint can drip and pom-poms shed a little fluff. A paper plate or small tray works for holding supplies where kids can reach them.
Expect some adult involvement with hot glue if you choose that faster option. For younger children, plain craft glue works fine but you will wait a bit longer for hold. Hands-on cues help: paint should feel smooth, not gloopy, and the glue tack should feel slightly sticky before you press pieces together.
The mess level is low to moderate. Acrylic paint rinses from skin easily with soap, and pom-poms brush off most fabrics if you catch them quickly. Keep a damp cloth and a small bin for trash nearby. A relaxed setup helps the project feel easy instead of rushed.
Materials You’ll Need
Empty toilet paper rolls (one per bunny) common household item, free to upcycle.
Acrylic craft paint (various spring colors: pink, blue, green, yellow, purple, brown) dries fast and covers cardboard well.
White construction paper (for the inner ears and some bodies) easy to cut and glue.
Small pom-poms (for noses and tails – pink and white) adds texture and a fluffy finish.
Googly eyes fun and forgiving if placement is off-center.
Pipe cleaners (white or matching the body color, for whiskers) bendable and easy for small hands to handle.
Black fine-tip marker (for the smile) adds expression with minimal effort.
Craft glue (or a glue gun for faster assembly) glue gun bonds faster; craft glue is safer for young kids.
Scissors use child-safe scissors for little ones and keep adult scissors nearby for precise cuts.
If you want a longer craft session, pair this project with a short craft cleanup routine like wiping paint dishes and grouping leftover rolls for the next day. You can also revisit the glue and paint tips in our wax paper suncatchers guide to simplify setup and cleanup.
Step-by-Step Directions

- Start by painting each empty toilet paper roll in your chosen color and set them aside to dry completely.
Apply thin coats so the paint dries without runs. Turn the roll gently so the surface dries evenly; the roll should feel dry to the touch before the next step. - Cut out two ‘pointed petal’ shapes for the ears from the construction paper and glue them to the inside top rim of the roll.
Press each ear into place and hold for a few seconds so the glue grabs. If the ears flop, add a small strip of paper behind them inside the roll for extra support. - Attach googly eyes, glue a small pom-pom for the nose, and cut the pipe cleaner into small pieces for the whiskers.
Place the eyes just above the center line and press gently; use short whisker pieces so they stay neat. If glue seeps out, dab it quickly with a dry fingertip. - Finally, glue a small pom-pom at the bottom-front center for a fluffy tail.
Let the glued pieces rest in a dry spot for 10 to 15 minutes to set. Use a fine-tip marker to draw a small smile once the glue feels set but not sticky.
What Kids Practice While Making This

This simple craft supports fine motor skills in a real way. Cutting the ear shapes and trimming pipe cleaners gives children hand control, while pressing small pom-poms and aligning eyes builds precise finger movements.
Children also practice planning and sequencing. They learn to paint, wait for drying, and then add details. That pattern helps with patience and understanding steps that build on each other.
The project offers a gentle introduction to cause and effect. When paint is thick, it takes longer to dry. When glue needs time to set, decorations can shift. These small lessons happen hands-on, with immediate feedback.
Kids practice color choices as well. Letting them pick paint colors and combinations encourages taste-making and confidence. You can talk about spring colors while they paint to connect craft to observation and language.
Finally, the craft supports cooperation. If several children share a tray of materials, they learn to pass glue and hand over a pom-pom without tension. That social practice makes crafting more enjoyable for everyone.
Troubleshooting Common Issues
If the paint bubbles or peels, the coat was probably too thick or not fully dry between layers. Let the roll rest longer and apply a thinner layer next time. A smooth second coat usually fixes texture issues.
If the ears fold or droop, they need more glue surface inside the roll. Add a small strip of leftover paper behind each ear and glue that strip inside the roll for backing. That gives the ear something to press against.
If googly eyes or pom-poms fall off later, the glue did not bond fully. Use a small dab of a stronger glue option if kids are older and you supervise, or let craft glue sit longer before handling. Press pieces together and wait rather than tugging at them right away.
If whiskers look uneven, trim them while they are in place. Pipe cleaners cut easily with scissors. If they poke out too far and bother little ones, bend the ends inward so they sit flatter against the bunny.
If the rolls wobble when standing, flatten a small area on the bottom by pressing the roll gently on a flat surface until it settles. You can also glue a tiny paper circle inside the base to add weight and stability.
Easy Variations to Try
Turn the bunnies into a mini parade by painting each roll a different spring color and arranging them in size order on a shelf. This idea keeps the same steps but invites pattern and color play.
Make decorated bellies by cutting a small oval from white construction paper and gluing it to the front before adding the face. The white patch adds a classic bunny look and gives a place to add stickers or simple doodles.
Use the bunnies as place settings for a spring table by writing names on small paper tags and tucking them into a slit in the top. This simple tweak makes them useful as well as decorative.
Experiment with scales for different ages. Let toddlers use large pom-poms and felt glued on with parental help. For older kids, try painting patterns or using markers for fur texture. You can also make a matching craft afternoon by pairing this with our wax paper suncatchers for a coordinated display.
Storing or Reusing This Project
Store finished bunnies in a shallow box lined with tissue to avoid smudging paint or flattening pom-poms. Keep them out of direct sunlight to preserve paint color.
Leftover rolls make a great stash for future projects. Stack them in a small container and label it for quick access on busy days. Pom-poms, googly eyes, and pipe cleaners also store well in small jars.
If a bunny gets dusty, gently wipe with a dry soft brush or a clean cloth. Avoid water on glued pieces; it can loosen the glue. If a pom-pom detaches, a quick glue touch-up brings the bunny back to life.
When a roll gets too worn, recycle it. The craft uses fewer new materials and gives one last life to a common household item. That makes cleanup feel purposeful rather than wasteful.
FAQs About Upcycled Toilet Paper Roll Bunnies
Will this craft be too messy for my kitchen table?
I ask this often because parents worry about paint on surfaces. The paint can drip if you over-apply it, so use thin layers and place the rolls on a disposable plate or scrap paper. Keep a damp cloth nearby so you can wipe spills quickly. The overall mess level stays low and usually clears up in a few minutes.
Is this safe for toddlers?
I have made these with three-year-olds and older. Toddlers need supervision for small parts like pom-poms and googly eyes. Use craft glue rather than a hot glue gun for little hands, and guide scissors work well for cutting. If you want more independence, set up a decorating station with help nearby.
What if I do not have matching pipe cleaners or pom-poms?
I have reached for uneven supplies many times. The bunnies still turn out cute with mismatched materials. Try using white for whiskers even if the body is colored, or trim a larger pom-pom down to size. Part of the charm comes from being resourceful, not perfect.
How long do they last and can kids play with them?
They last as long as you treat them gently. These bunnies make great shelf buddies and light play props. If children use them roughly, a glued piece might need reattaching later. That repair moment is a good chance to teach simple mending skills.
Can I make these with a class of kids?
I have taught small groups and found they work well with stations. Set up painting, ear-cutting, and decorating areas so kids rotate. Assign one adult to glue for younger children if you plan to use a hot glue gun. The project scales easily when you keep the steps clear.
A Final Helpful Note
This craft thrives on being forgiving. If paint smudges a little or a whisker sits wonkily, it still reads as a bunny and that harmless imperfection feels human. Take small pauses between steps so kids learn pacing and get a sense of completion.
Trust the process: paint, dry, add details, and let everything set. Keep supplies simple and nearby, and let the whole family chip in. The little bunnies will add a warm, handmade touch to your home and give everyone a reason to smile.
Conclusion
If you want a slightly different take on toilet paper roll bunnies that also holds an egg for a simple centerpiece, see the TP Roll Bunny Egg Holders – Maker Mama for inspiration and adaptations. For a quick reference with step photos and another easy method, check out this Quick Toilet Paper Roll Bunnies – East Crafts for Kids – Red Ted Art guide.
PrintUpcycled Toilet Paper Roll Bunnies

Create adorable bunnies using empty toilet paper rolls and simple craft materials in under an hour.
- Prep Time: 10 minutes
- Cook Time: 30 minutes
- Total Time: 40 minutes
- Yield: 1 bunny per roll
- Category: Craft
- Method: Crafting
- Cuisine: N/A
- Diet: N/A
Ingredients
- Empty toilet paper rolls (one per bunny)
- Acrylic craft paint (various spring colors)
- White construction paper (for ears)
- Small pom-poms (for noses and tails)
- Googly eyes
- Pipe cleaners (for whiskers)
- Black fine-tip marker (for the smile)
- Craft glue (or a glue gun)
- Scissors
Instructions
- Start by painting each empty toilet paper roll in your chosen color and set them aside to dry completely.
- Apply thin coats so the paint dries without runs.
- Cut out two ‘pointed petal’ shapes for the ears from the construction paper and glue them to the inside top rim of the roll.
- Press each ear into place and hold for a few seconds so the glue grabs.
- Attach googly eyes, glue a small pom-pom for the nose, and cut the pipe cleaner into small pieces for the whiskers.
- Place the eyes just above the center line and press gently.
- Finally, glue a small pom-pom at the bottom-front center for a fluffy tail.
- Let the glued pieces rest in a dry spot for 10 to 15 minutes to set.
- Use a fine-tip marker to draw a small smile once the glue feels set but not sticky.
Notes
This craft is great for kids of various ages and supports fine motor skills and creativity. Adjust materials based on what you have available.
Nutrition
- Serving Size: 1 bunny
- Calories: 50
- Sugar: 0g
- Sodium: 0mg
- Fat: 1g
- Saturated Fat: 0g
- Unsaturated Fat: 0g
- Trans Fat: 0g
- Carbohydrates: 10g
- Fiber: 0g
- Protein: 1g
- Cholesterol: 0mg