String Art Wheels
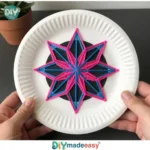
Create beautiful string art wheels with your kids for a fun and engaging crafting experience.
- Prep Time: 15 minutes
- Cook Time: 45 minutes
- Total Time: 60 minutes
- Yield: 1 string art wheel 1x
- Category: Craft
- Method: Crafting
- Cuisine: N/A
- Diet: N/A
Ingredients
Scale
- 1 wooden wheel
- Colorful embroidery floss or string
- 1 sharp needle
- 1 pair of scissors
- 1 ruler
- Optional: beads or sequins for embellishments
Instructions
- Prepare the wheel: Start your project by ensuring your wooden wheel is clean and smooth.
- Plan your design: Consider the patterns you want to create before you start.
- Thread the needle: Cut a length of string and thread it through the sharp needle.
- Start wrapping: Begin wrapping the string around the outer edge of the wheel evenly.
- Change colors: If you’re using multiple colors, knot the end of one string to attach another.
- Secure the end: Once you finish wrapping, tie off the end of the string at the back.
- Add embellishments: Sew or glue beads or sequins onto your finished wheel if desired.
- Hang and display your creation in a suitable spot.
Notes
This DIY project is suitable for all ages but may require adult supervision for younger children.
Nutrition
- Serving Size: 1 wheel
- Calories: 0
- Sugar: 0g
- Sodium: 0mg
- Fat: 0g
- Saturated Fat: 0g
- Unsaturated Fat: 0g
- Trans Fat: 0g
- Carbohydrates: 0g
- Fiber: 0g
- Protein: 0g
- Cholesterol: 0mg
Find it online: https://www.diymadeeasy.com/string-art-wheels/