Rainbow Crystal Urchins
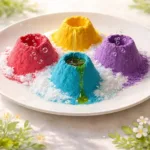
A fun and engaging project to create beautiful Rainbow Crystal Urchins using simple materials and a bit of patience.
- Prep Time: 20 minutes
- Cook Time: 0 minutes
- Total Time: 240 minutes
- Yield: 4-6 urchins
- Category: Craft
- Method: DIY Craft
- Cuisine: N/A
- Diet: N/A
Ingredients
- Air-dry clay or lightweight salt dough
- Thin wooden skewers or toothpicks
- Fine sand or a textured stamp (optional)
- Table salt, Epsom salts, or borax
- Warm water
- Food coloring or liquid watercolors (optional)
- Clear glue or PVA (optional)
- Small jars or shallow dishes
- Tweezers and small paintbrush
- A fine sieve or coffee filter
- Paper towels and a tray
- Protective gloves and goggles (recommended if using borax)
Instructions
- Prepare your base by rolling a small ball of air-dry clay until smooth and pressing one side flat.
- Mark where spikes will go using a skewer.
- Insert spikes by pushing toothpicks or skewers into the holes.
- Let the base dry until firm, which may take 12 to 48 hours.
- Mix your crystal solution based on the method chosen.
- Optionally color the solution with food coloring.
- Dip the urchin in the crystal solution.
- Wait and watch the crystals form, checking periodically.
- Rinse the urchin if using borax or Epsom salt and let it dry completely.
- Finish by optionally brushing a thin layer of clear glue over the crystals for extra shine.
- Display your Rainbow Crystal Urchins in a bright spot to enjoy their beauty.
Notes
Adult supervision is recommended when handling hot water and borax. Always prioritize safety when crafting with children.
Nutrition
- Serving Size: 1 urchin
- Calories: N/A
- Sugar: N/A
- Sodium: N/A
- Fat: N/A
- Saturated Fat: N/A
- Unsaturated Fat: N/A
- Trans Fat: N/A
- Carbohydrates: N/A
- Fiber: N/A
- Protein: N/A
- Cholesterol: N/A
Find it online: https://www.diymadeeasy.com/rainbow-crystal-urchins/