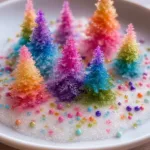
Rainbow Crystal Trees
A fun and hands-on craft for kids to create colorful crystal trees using simple household materials.
- Prep Time: 30 minutes
- Cook Time: 0 minutes
- Total Time: 60 minutes
- Yield: 1 crystal tree
- Category: Craft
- Method: Crafting
- Cuisine: N/A
- Diet: N/A
Ingredients
- Thin craft wire or copper wire (20 to 26 gauge)
- Small jar or glass container (clear)
- Baking soda
- Hot water (about 1 cup per jar)
- Clear tape or a small cork (optional)
- Food coloring (1 to 3 drops per jar)
- Pliers
- Wire cutters
- Small pebbles or a clay base
- Tray or towel to catch drips
- Gloves (optional)
Instructions
- Prepare your space and lay down a towel or tray to catch spills.
- Cut several lengths of wire (6 to 8 inches) and twist them together at one end to form a trunk, fanning the upper ends into branches.
- Bend the branch tips gently into small curves or loops. Balance the tree so it stands upright.
- Secure the trunk in a small mound of clay or pebbles to keep it centered in the jar.
- Boil fresh water, let it cool slightly, and use about 1 cup per jar.
- Add 3 to 4 tablespoons of baking soda to the hot water and stir until most grains dissolve.
- Drop 1 to 3 drops of food coloring into the solution and stir gently.
- Center the trunk in the jar and pour the solution in until the base covers the tree trunk.
- Place the jar in a quiet area away from sunlight and drafts to allow crystals to grow.
- After 1 hour, check the growth of crystals in two-hour blocks.
- If growth slows, warm and add more solution if needed.
- When satisfied with the look, lift the tree from the jar and let it dry on a tray.
- Trim stray wires and display your finished tree.
Notes
This project combines simple chemistry with hands-on crafting. Great for kids ages 6 and up with adult supervision for handling hot water.
Nutrition
- Serving Size: 1 tree
- Calories: 0
- Sugar: 0g
- Sodium: 0mg
- Fat: 0g
- Saturated Fat: 0g
- Unsaturated Fat: 0g
- Trans Fat: 0g
- Carbohydrates: 0g
- Fiber: 0g
- Protein: 0g
- Cholesterol: 0mg
Find it online: https://www.diymadeeasy.com/rainbow-crystal-trees/