

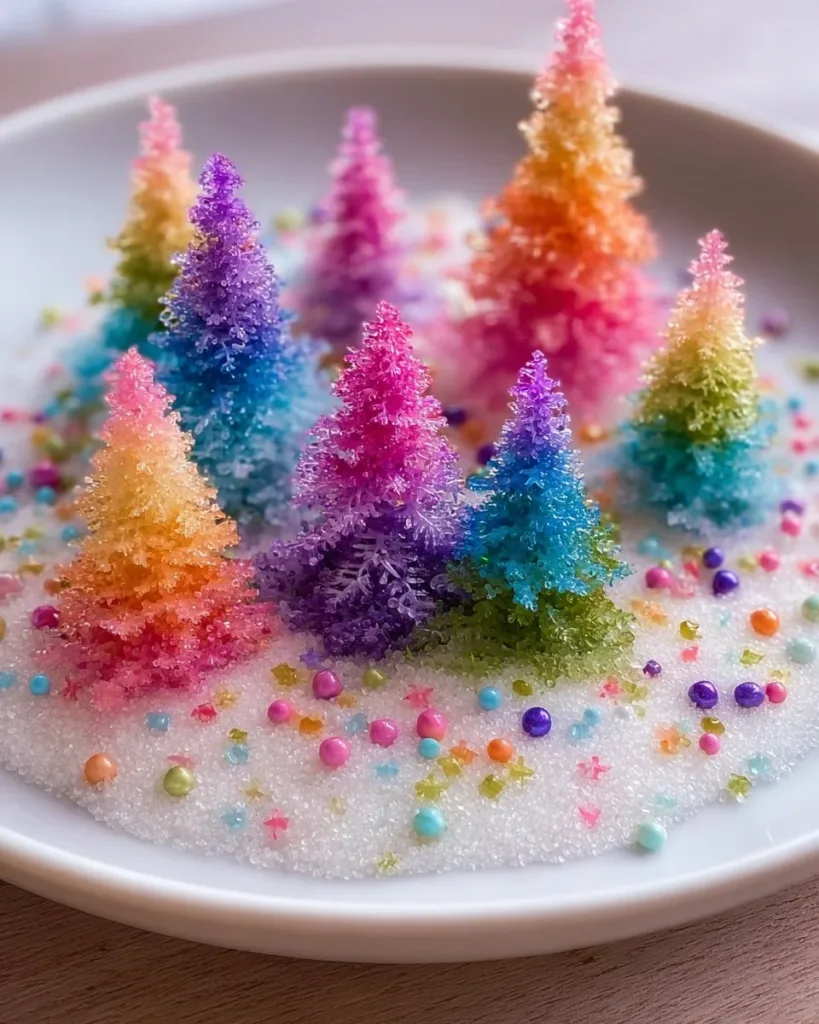
A busy afternoon stretched out, the kids asking for something hands-on right now, and the kitchen cleared for a quick, low-mess craft. Rainbow Crystal Trees fit that moment perfectly. They ask for a short setup, a little waiting, and then a quiet reveal that feels almost like a tiny kitchen miracle. You can make one in about an hour of active time and watch colorful crystals bloom over the next day. If your family likes bright, simple science projects, this pairs well with other light-and-color activities like our rainbow light show craft, and it gives the same kind of joyful, hands-on payoff with everyday supplies.
Why You’ll Love Making Rainbow Crystal Trees

This project works well because it keeps prep short and payoff big. You do a few small, clear actions and then let the jar do the rest. The materials are common and inexpensive, and you can do the whole thing on the kitchen counter with just a towel underneath. That makes it perfect for afternoons when time is short but you still want something creative.
Parents like this activity because it involves minimal setup, little adult intervention after the first pour, and a reliable result. Kids get to shape the wire into branches and watch real crystals form, and that gentle waiting builds excitement. It also fits real life: you can start it after dinner and check the tree the next morning without any frantic tending.
A Quick Look Before You Begin
Plan on about 15 to 30 minutes of hands-on work, mainly for shaping the tree and making the hot solution. Then expect crystal growth over several hours and up to a day. Most families check the jars in short blocks so curiosity stays satisfied without constant poking.
Setup is simple. Lay down a towel or tray, gather the wire and jar, and boil water just before you start. The mess level stays low if you keep the powder and colors at the table and clean up spills quickly. Adults should handle the hot water, but older kids can help pour and stir once the water is safe to touch.
You will need a quiet, undisturbed corner for the jars while crystals grow. Strong sunlight or drafts can slow or change the crystal formation, so aim for a shelf or countertop away from windows. If you want another color experiment after this one, try our playful candy explosions for a different kind of kitchen science fun with a similar wow factor here.
Materials You’ll Need
Thin craft wire or copper wire (20 to 26 gauge)
common, easy to bend but sturdy enough to hold shape
Small jar or glass container (clear)
clear so you can watch crystals form; jam jars or small mason jars work
Baking soda
a kitchen staple that dissolves in hot water to form the crystal solution
Hot water
boiled and cooled slightly; about 1 cup per jar
Clear tape or a small cork (optional)
to help hold the trunk in place if needed
Food coloring
1 to 3 drops per jar to make rainbow branches
Pliers
for twisting and shaping wire cleanly
Wire cutters
for cutting lengths of wire safely
Small pebbles or a clay base
to secure the trunk inside the jar so it stays centered
Tray or towel to catch drips
protect your surface and make cleanup easy
Gloves (optional)
if you prefer not to handle the baking soda solution directly
STEP-BY-STEP DIRECTIONS

- Prepare your space and lay down a towel or tray to catch spills.
Set the jar, tools, and ingredients within reach so you don’t need to leave the hot water unattended. - Cut several lengths of wire (6 to 8 inches) and twist them together at one end to form a trunk, fanning the upper ends into branches.
Use pliers to get a neat twist; leave enough un-twisted wire at the top to spread into branches. - Bend the branch tips gently into small curves or loops. Balance the tree so it stands upright.
Small loops catch crystals better and give the tree a delicate look; adjust the base so it sits steady. - Secure the trunk in a small mound of clay or pebbles to keep it centered in the jar.
Push the base down so the trunk stays upright and centered; clear tape or a tiny cork can help if the trunk tilts. - Boil fresh water, let it cool slightly, and use about 1 cup per jar.
You want it hot but not scalding when you stir in the baking soda; the heat helps dissolve more powder. - Add 3 to 4 tablespoons of baking soda to the hot water and stir until most grains dissolve.
Stir gently and watch the mix go from cloudy to mostly dissolved; a few grains left is okay. - Drop 1 to 3 drops of food coloring into the solution and stir gently.
For rainbow branches, use different jars for different colors or change colors in stages as crystals grow. - Center the trunk in the jar and pour the solution in until the base covers the tree trunk.
Pour slowly so the wire stays centered; stop when the solution reaches just above the base of the trunk. - Place the jar in a quiet area away from sunlight and drafts to allow crystals to grow.
A stable spot helps uniform growth; sudden movement or breezes can disturb forming crystals. - After 1 hour, check the growth of crystals in two-hour blocks.
Look for small, sparkly clusters forming on the loops and along the trunk; patience pays off. - If growth slows, warm and add more solution if needed.
Reheat a little solution or make a fresh batch and pour in carefully to encourage more crystals without breaking delicate formations. - When satisfied with the look, lift the tree from the jar and let it dry on a tray.
Lift slowly so you don’t dislodge clusters; lay it on a paper towel or tray to dry fully. - Trim stray wires and display your finished tree.
Use wire cutters to tidy up ends and pliers to bend any sharp tips inward; place the finished tree on a shelf or in a clear dish.
The Simple Science or Skills at Work

This activity pairs simple chemistry with hands-on making. Baking soda dissolves in hot water and creates a saturated solution that wants to come out of the liquid and form a solid. The wire loops and rough spots act as tiny scaffolding where the dissolved material can lock in and become visible crystal clusters.
Kids practice fine motor skills while twisting wire, using pliers, and looping branch tips. They also gain a quiet kind of patience by checking the jars and noting small changes over time. When crystals appear, the cause and effect becomes real: warmer water dissolves more baking soda, and a rough surface helps crystals form. That observation teaches a helpful lesson about how materials and conditions interact.
Troubleshooting Common Issues
If crystals barely appear, the solution may not have been hot enough or rich enough in baking soda. Try dissolving a little more powder in freshly boiled water, then let it cool briefly before pouring.
If crystals form mainly on the jar glass and not on the tree, the wire might be too smooth or the branches too close to the jar wall. Gently move the tree so branches sit away from the glass and give them small loops to encourage catch points.
If the tree falls over in the jar, the base probably needs more support. Remove the tree gently, add a larger mound of pebbles or more clay at the trunk, then re-center and pour the solution. Clear tape wrapped around the trunk and stuck to the jar bottom can help during the first hour.
If colors bleed together and you wanted distinct bands, keep jars separate for each color or let one color finish growing before switching. For multi-colored trees in one jar, add colors in stages and allow each color to form a good base first.
If the solution becomes cloudy with floating bits, that usually comes from undissolved grains or from sudden cooling. Stir gently to help dissolve, or pour the clearer top layer into a fresh jar gently to leave sediment behind.
Easy Variations to Try
Try single-color trees in small jars and arrange them like a tiny forest. Using several jars with different colors makes an impressive display.
Make a tall, thin tree by twisting more wire into a longer trunk and fewer branches. This creates a slim silhouette with long crystal spines.
Use small glass dishes and build bonsai-style low trees that form wide, flat crystal mats instead of tall trees. These look great in groups on a tray.
Let a child design abstract shapes with wire spirals, hearts, or stars and watch how crystals cling differently to curves and loops.
For an advanced trial, try layering color: let the tree grow in one color for several hours, then carefully replace some solution with a new color. The transitions look like sunrise stripes.
Storing or Reusing This Project
You can keep your finished crystal trees as a short-term display. Over weeks the crystals may slowly degrade if touched often or left in humid places. For longer life, keep them in a closed display case or on a shelf away from frequent handling.
Reuse the wire frames by soaking them in warm water and gently brushing off old crystals. Once clean and dry, you can reuse the frames for another round. Recycling jars and pebbles is easy: rinse and return to kitchen use.
Leftover baking soda solution is fine to pour down the sink with plenty of water. If you want to save extra solution in a jar, cover it and keep it in a cool place; you can warm and reuse it later to revive crystal growth.
Keep the work area wiped and the towel folded for reuse. Store small tools like pliers and wire cutters in a labeled bin so you can start again quickly.
FAQs About Rainbow Crystal Trees
Will this make a big mess?
I worry about cleanup. It usually stays tidy if you lay down a towel and keep the powder in a bowl. A few drips happen when pouring, but they wipe up easily with water. If kids help, give them aprons and keep a small bucket of warm water and a sponge nearby. That way cleanup becomes part of the activity and does not feel burdensome.
Is it safe for younger kids?
What age do you recommend? This activity needs adult supervision because of hot water and sharp wire ends. Ages 6 and up can enjoy shaping branches and choosing colors with an adult handling boiling and pouring. For preschoolers, have an adult prep the jars and let them watch the transformation or do the stirring after the water cools.
Can I substitute something for baking soda?
Baking soda gives reliable, sparkly crystals at home without strong chemicals. There are other crystal experiments that use salt or alum, but do not swap in anything unless you know it is food-grade and safe for kids. We suggest sticking with baking soda here because it is safe and works well.
How long will it take before I see color?
You should see tiny crystal flecks within an hour. Most dramatic growth happens over 6 to 12 hours. Check gently in two-hour blocks so you do not disturb fragile forming crystals. If growth seems slow, a little fresh warm solution can help.
Can I keep the trees on display permanently?
The crystals hold well for a few weeks if treated gently, but they will slowly dull with time and humidity. If you want a long-term keepsake, photograph the tree at its best and consider preserving a small, crystal-covered branch in a closed glass ornament.
A Final Helpful Note
If you feel unsure at first, remember that this project rewards small, steady steps rather than perfection. The first tree never looks exactly like the pictures, and that is fine. Encourage kids to experiment gently, take photos of each stage, and enjoy the quiet build-up of color and texture. Most of all, have fun watching the little things that happen when chemistry meets creativity.
Conclusion
For a step-by-step alternative approach and extra tips, see this helpful guide on How to Grow Your Own Magic Crystal Tree! – Parenting Chaos which offers clear photos and variations to inspire your next batch. If you want to see ready-made inspiration or gift-ready versions, browse handmade examples like Rainbow Crystal Tree – Etsy to spark ideas for display and color combinations.
PrintRainbow Crystal Trees

A fun and hands-on craft for kids to create colorful crystal trees using simple household materials.
- Prep Time: 30 minutes
- Cook Time: 0 minutes
- Total Time: 60 minutes
- Yield: 1 crystal tree
- Category: Craft
- Method: Crafting
- Cuisine: N/A
- Diet: N/A
Ingredients
- Thin craft wire or copper wire (20 to 26 gauge)
- Small jar or glass container (clear)
- Baking soda
- Hot water (about 1 cup per jar)
- Clear tape or a small cork (optional)
- Food coloring (1 to 3 drops per jar)
- Pliers
- Wire cutters
- Small pebbles or a clay base
- Tray or towel to catch drips
- Gloves (optional)
Instructions
- Prepare your space and lay down a towel or tray to catch spills.
- Cut several lengths of wire (6 to 8 inches) and twist them together at one end to form a trunk, fanning the upper ends into branches.
- Bend the branch tips gently into small curves or loops. Balance the tree so it stands upright.
- Secure the trunk in a small mound of clay or pebbles to keep it centered in the jar.
- Boil fresh water, let it cool slightly, and use about 1 cup per jar.
- Add 3 to 4 tablespoons of baking soda to the hot water and stir until most grains dissolve.
- Drop 1 to 3 drops of food coloring into the solution and stir gently.
- Center the trunk in the jar and pour the solution in until the base covers the tree trunk.
- Place the jar in a quiet area away from sunlight and drafts to allow crystals to grow.
- After 1 hour, check the growth of crystals in two-hour blocks.
- If growth slows, warm and add more solution if needed.
- When satisfied with the look, lift the tree from the jar and let it dry on a tray.
- Trim stray wires and display your finished tree.
Notes
This project combines simple chemistry with hands-on crafting. Great for kids ages 6 and up with adult supervision for handling hot water.
Nutrition
- Serving Size: 1 tree
- Calories: 0
- Sugar: 0g
- Sodium: 0mg
- Fat: 0g
- Saturated Fat: 0g
- Unsaturated Fat: 0g
- Trans Fat: 0g
- Carbohydrates: 0g
- Fiber: 0g
- Protein: 0g
- Cholesterol: 0mg