Make Your Own Aroma Stones
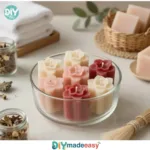
Create delightful aroma stones at home with this simple DIY project that enhances your living space with your favorite scents.
- Prep Time: 15 minutes
- Cook Time: 2880 minutes
- Total Time: 2880 minutes
- Yield: 10 aroma stones
- Category: Crafts
- Method: Crafting
- Cuisine: N/A
- Diet: N/A
Ingredients
- Plaster of Paris or white clay powder
- Water
- Small mixing bowl
- Spoon or spatula
- Silicone molds or small ramekins
- Essential oils of your choice
- Measuring spoons
- Fine sandpaper or nail file
- Small scale or cups (optional)
- Plastic wrap or damp cloth
- Gloves (optional)
- Small tray or rack
Instructions
- Prepare your space and materials by laying a towel or paper down and gathering bowl, spoon, molds, and essential oils.
- Measure 1 part powder into the bowl and 0.5 parts water. Stir gently until the mixture begins to combine.
- Fold the mixture until it holds together like soft dough. This consistency should not be too sticky or too dry.
- Press a small amount into your chosen mold. A quick tip is to use your fingers to create a smooth surface as you go.
- Tap the mold lightly on the table to release trapped air, which can hinder the stone’s structural integrity.
- Smooth the top with the spoon edge or a moistened finger for a polished finish.
- Cover the molds with a damp cloth and let them rest for 24 to 48 hours. Patience is key here!
- Gently pop the stones out of the mold and file edges if rough.
- Add scent to the stones by placing 3 to 5 drops of essential oil on each stone. Experiment with different oils for varied scents.
- Let the stones cure for another 24 hours on a tray in a dry place.
- To enjoy your creation, test a small stone in your chosen spot and watch how it gradually releases pleasant scents.
Notes
This project is suitable for all ages and can be adapted with different scents and designs. Remember to supervise younger children.
Nutrition
- Serving Size: 1 aroma stone
- Calories: 10
- Sugar: 0g
- Sodium: 5mg
- Fat: 0g
- Saturated Fat: 0g
- Unsaturated Fat: 0g
- Trans Fat: 0g
- Carbohydrates: 2g
- Fiber: 0g
- Protein: 0g
- Cholesterol: 0mg
Find it online: https://www.diymadeeasy.com/make-your-own-aroma-stones-at-home/