

A busy afternoon, a sink full of lunch dishes, and suddenly the kids ask, “Can we make something cool right now?” That exact moment is where Magic Treasure Rocks fit perfectly. These sparkly little rocks take just a handful of pantry items, a little hands-on time, and they dry into treasures the kids will love to hunt for and trade. I lean on this simple recipe on hectic days because it clears the “need something now” moment fast and leaves everyone smiling. If you want another quick, kitchen-friendly craft to keep in your back pocket, try our glow-in-the-dark moon rocks recipe for a different and equally fun twist.
Why This Magic Treasure Rocks Works So Well

This project feels easy because it really is easy. The materials come from the pantry and craft box. You do not need special molds or long prep time. Kids can join in at almost every step, and adults only need to supervise, not do the whole job.
The process fits short windows of time. You mix the dough in minutes, shape for another five to fifteen minutes, and then let the rocks sit while you do other things. That makes it a great afterschool activity or a fill-in for a rainy afternoon.
It stays tidy if you manage expectations. The mixture is soft and crumbly at first, then holds shape like a soft clay. That texture makes the activity approachable for younger kids while still fun for older ones who like making detailed shapes.
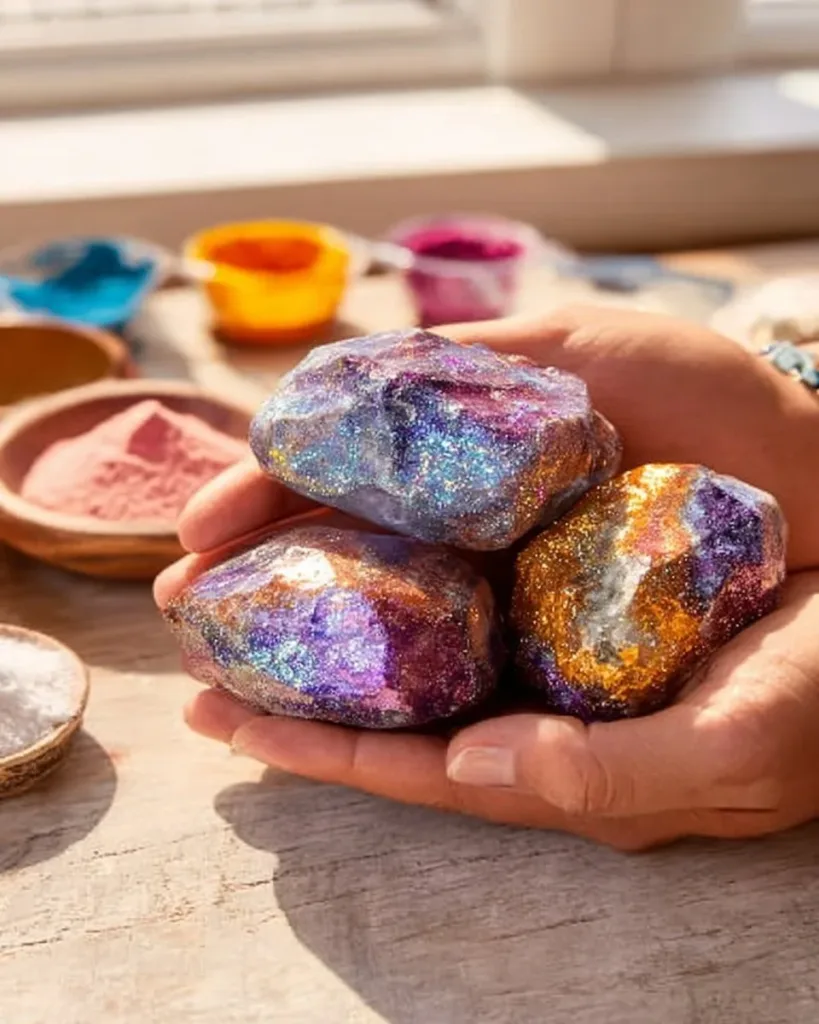
The result feels real and rewarding. These rocks dry to a hard, glittery surface that looks like little treasures. They do not always look perfect, and that is okay. Imperfections give each rock character and make them more “treasure” than factory-made.
How This DIY Comes Together
Start with a short setup and a calm plan. Gather your four items, clear a small work surface, and have a tray or paper towel ready for drying. The actual hands-on time runs short. You will mix, color, shape, and then wait for them to dry.
Timing stays predictable. Mixing takes only a minute or two. Coloring and glitter take another minute. Shaping takes between five and twenty minutes, depending on how many rocks you want and who is helping. Drying adds a day or two, and that is where the project shifts from active to passive.
Mess stays manageable. The main clean-up is stray glitter and a few baking soda dusts. A quick wipe with a damp cloth clears the table. If glitter gets on clothes, a quick shake outside and a regular wash handles most of it.
Adult involvement varies by age. Little hands will need guiding and more supervision around glitter. Older kids can mostly work alone and will enjoy making sets of different colors. If you want to add a little science chat, mention that mixing baking soda and water creates a paste that sets up as it dries.
Materials You’ll Need
1 cup baking soda common household item, cheap and easy to measure
1/4 cup water common household item, use a measuring cup if you have one
food coloring common kitchen item, a few drops give big color
glitter optional for sparkle, small amounts go a long way
STEP-BY-STEP DIRECTIONS

- In a bowl, mix the baking soda with water. Stir until well combined.
Stir with a spoon or your fingers until the mixture looks like damp sand and holds together when pressed. - Add a few drops of food coloring and a sprinkle of glitter. Mix again!
Start with one or two drops of color. You can add more for deeper shades. Mix until the color looks even. - Shape the mixture into small rocks using your hands.
Press, roll, and pinch until the pieces look like little stones. Make different sizes for variety. - Let them dry for a day or two and watch them sparkle!
Place your rocks on a tray or paper towel in a warm, dry spot. Turn them once if the bottoms feel damp.
The Simple Science or Skills at Work

This project practices simple science along with finger skills. When you mix baking soda and water, you create a paste that dries by losing moisture to the air. As the water evaporates, the paste firms up and turns into a hard, chalky rock.
Kids practice measuring, mixing, and judging texture. They learn to watch the mixture as a cue: when it holds together, it is ready to shape. That tactile feedback teaches cause and effect without needing charts or tests.
Shaping the rocks builds fine motor skills. Rolling and pinching encourages hand strength and coordination. If you encourage kids to make different sizes and shapes, they use planning and creativity too.
You can pair this activity with simple science talk about solids and liquids or with sensory play. For a related sensory science activity that fizzes and surprises, try our magic milk experiment.
Troubleshooting Common Issues
If the mixture feels too dry and crumbles, you likely need just a splash more water. Add water one drop at a time and press until it holds. Too much water will make the paste runny, so add slowly.
If the paste feels sticky, you may have added too much color or water. Sprinkle a little extra baking soda and press it in. That pulls moisture back and firms up the mix.
If the colors look muddy, that usually means mixing different colors in one bowl. Clean your spoon or use separate bowls for each color to keep tones bright.
If glitter spreads everywhere, keep a small tray or shallow box nearby to catch excess. Work slowly and tap the glitter onto the mix rather than dumping it. A little goes a long way.
If rocks crack while drying, that happens when they dry too fast or were shaped too thin. Move them to a slightly more humid spot, or press the cracks gently and smooth them with a damp finger. Thicker shapes dry more evenly.
Easy Variations to Try
Try a two-color swirl by mixing a small amount of two shades lightly. Press them together without fully blending. You get marbled rocks that look more jewel-like.
Use different amounts of glitter in each batch. One batch can be subtle, another super sparkly. Let kids pick which look they prefer.
Make themed treasure hunts. Hide rocks in a backyard or around the house and give kids a small map. Each color can represent a different prize.
Try making matching sets. Kids often enjoy making “treasure collections” with a few rocks that match by color and size. That adds a goal to the shaping step.
Seasonal twist: pick holiday colors for themed rock hunts. Small changes in color make this activity fit any season.
Storing or Reusing This Project
Store finished rocks in a breathable container. A cardboard box or paper bag works well. Plastic containers can trap moisture and soften the rocks over time.
If a rock breaks during play, glue works well to fix it. White glue or craft glue holds the pieces together and dries clear. Press the pieces gently and let them cure before returning to play.
Reuse leftover dry baking soda by keeping it in a sealed bag for other recipes or clean-up jobs. If you have colored scraps, press them into a thin sheet and let that dry for decorative pieces.
To reduce waste, make smaller rocks to match how many kids will play. That keeps the leftover bits from piling up.
FAQs About Magic Treasure Rocks
Will this make a big mess?
I worry about glitter and powder. It will make some mess, but it stays manageable. The baking soda mixes into a paste quickly, so it does not float into the air if you add the water slowly. Glitter can spread, but using small amounts and working over a tray or newspaper keeps cleanup simple. A damp cloth wipes most residue from the table. If glitter gets on clothes, give them a quick shake outside before laundering.
Is this safe for little kids?
This recipe uses pantry items and common craft supplies. It stays non-toxic, but it is not food, so keep it away from mouths. Supervise young children, especially with glitter and food coloring. If a child tastes a bit, it is not likely to hurt, but avoid letting them eat the mixture. Washing hands after play is a good habit to keep the mess and color off skin and furniture.
Can I swap the baking soda or change the measurements?
The success comes from the balance of one cup baking soda to a quarter cup water. Those amounts give the right texture for shaping. I do not recommend swapping ingredients or changing quantities. Small tweaks to food coloring or glitter amount work fine, but the base measurements are reliable and simple to follow.
How long will the rocks last?
Properly dried rocks last for months if you store them in a dry place. They will hold up to light play and display. If they get wet, they can soften and crumble. Encourage kids to keep them dry and to use a small container to keep treasures together.
What if the color fades or looks uneven?
Color looks best when you add only a few drops and mix fully. If a batch dries with streaks, it still looks nice and unique. For stronger color, add another tiny drop and mix, but go slowly. Uneven or soft color happens sometimes and that gives each rock character.
A Final Helpful Note
This project shines when you keep expectations flexible. Not every rock will look like a polished gem and that is fine. Kids love the hunt and the making more than perfection. Let them choose colors, make mistakes, and fix what breaks. The simple process and the proud show-and-tell moment at the end make this an easy win on busy days. If you want a glue-based, window-hung craft to try another day, our guide to glue suncatcher magic walks through an equally relaxed project for sunny afternoons.
Conclusion
If you want to compare the idea with other versions or see how different people make these rocks, this classic write-up shows a hands-on example: Magic Treasure Rocks – Growing A Jeweled Rose. For a local community take and extra tips, this short guide also explains the basic steps and uses similar pantry items: Magic Treasure Rocks – KC Parent.
PrintMagic Treasure Rocks

Create sparkly Magic Treasure Rocks with simple pantry ingredients for a fun kids’ craft activity.
- Prep Time: 5 minutes
- Cook Time: 0 minutes
- Total Time: 2880 minutes
- Yield: Varies
- Category: Craft
- Method: Mixing and Shaping
- Cuisine: N/A
- Diet: Non-food craft
Ingredients
- 1 cup baking soda
- 1/4 cup water
- Food coloring
- Glitter (optional)
Instructions
- In a bowl, mix the baking soda with water. Stir until well combined.
- Stir with a spoon or your fingers until the mixture looks like damp sand and holds together when pressed.
- Add a few drops of food coloring and a sprinkle of glitter. Mix again!
- Shape the mixture into small rocks using your hands.
- Let them dry for a day or two and watch them sparkle!
Notes
Store finished rocks in a breathable container. Supervise young kids, especially with glitter.
Nutrition
- Serving Size: 1 rock
- Calories: 0
- Sugar: 0g
- Sodium: 0mg
- Fat: 0g
- Saturated Fat: 0g
- Unsaturated Fat: 0g
- Trans Fat: 0g
- Carbohydrates: 0g
- Fiber: 0g
- Protein: 0g
- Cholesterol: 0mg