

Creating engaging projects with your kids can sometimes feel like a daunting task, especially during those busy afternoons when the kids come rushing to you with bursts of energy and creativity. If you’ve ever found yourself scrambling for a last-minute activity that’s exciting yet simple, then making Homemade Bouncing Balls might be just the solution. It’s a hands-on project that’s not only fun but also educational. You get to engage with your kids, allowing them to explore their creativity as they mix, knead, and bounce their own creations. Plus, you’ll end up with a delightful distraction that keeps them entertained for hours.
Why This Homemade Bouncing Balls Works So Well

The beauty of making Homemade Bouncing Balls lies in its simplicity. You don’t need to track down a laundry list of supplies. Most of the items are common household staples, so you’re likely to have everything on hand. This DIY project is low-prep, making it a perfect choice for those times when you need something that’s quick yet engaging.
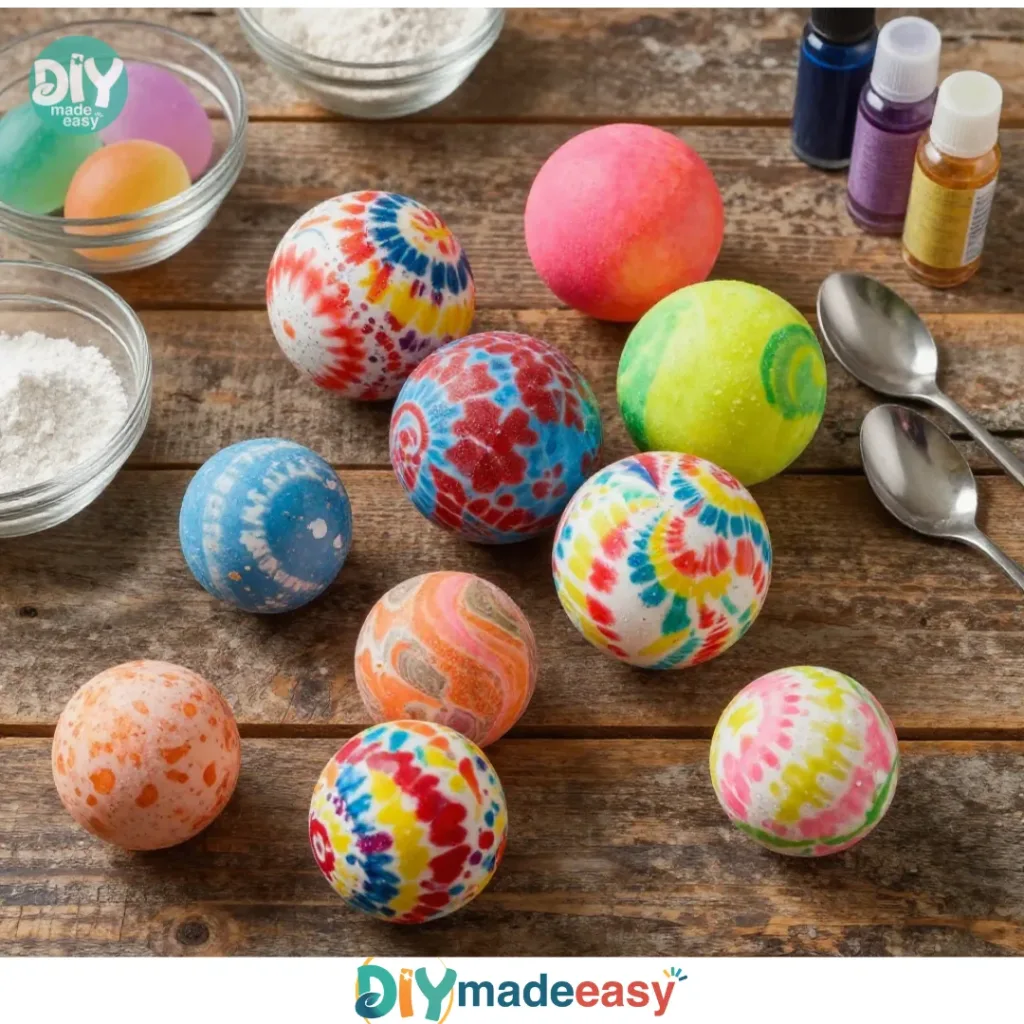
The materials required are straightforward: white school glue, liquid starch, and a bit of cornstarch or flour. Add food coloring if you want a colorful twist. The process of creating the balls is approachable, giving kids the chance to experiment with mixing and kneading. Most importantly, it’s reliable. With just a bit of patience, you’ll end up with bouncy, springy balls that you can enjoy playing with afterward.
A Quick Look Before You Begin
Before diving into the making of these bouncing balls, it’s good to take a moment to set the tone for the experience. You can expect the entire process to take about an hour from start to finish, though the actual hands-on time is much less. Cleanup is fairly simple as well; since the ingredients are water-soluble, most can be easily washed away with soap and water.
For adult involvement, you’ll be there to supervise the mixing and kneading, but your kids will love getting their hands on the gooey mixture. Letting them lead the creative process boosts their confidence and excitement. With everything ready, this project can seamlessly fit into a busy afternoon routine.
Discover Easy Kids Activities
Looking for simple, fun ideas for kids? Explore our Low Prep Kids Activities and find quick projects that spark creativity without long prep time.
Materials You’ll Need
- 1 cup white school glue (a common craft item)
- 1 cup liquid starch (easy to find in the grocery aisle)
- Food coloring (optional for fun hues)
- 1 tablespoon cornstarch or flour (for texture)
- Mixing bowl (any large bowl will do)
- Spoon or spatula (to mix the ingredients)
- Measuring cups (to ensure accuracy)
- Wax paper or silicone mat (to rest the balls on)
These materials are budget-friendly and straightforward. You probably already have most of these supplies in your home, making it even easier to get started.
Step-by-Step Directions

- Measure and pour 1 cup of white glue into a mixing bowl. The texture should be smooth and thick just inviting enough for little hands to dive in.
- Add 1 cup of liquid starch and mix thoroughly until thick. You’ll feel the consistency changing as you stir, transitioning from a liquid to a more solid form.
- If desired, add food coloring and mix to achieve the desired color. This step allows the kids to personalize their balls, creating vibrant hues that match their moods.
- Sprinkle in 1 tablespoon of cornstarch or flour and stir carefully. You’ll notice how this small addition affects the mixture’s stickiness.
- Knead the mixture with your hands to form a ball shape. This is the fun part! Get your hands in there, and don’t be afraid to get a little messy.
- Continue kneading until the ball feels firm but still soft; add more cornstarch if it’s too sticky. The kids will enjoy the sensation of the mixture transforming in their hands.
- Place the ball on wax paper or a silicone mat and let it rest for about 1 hour. This resting period helps the ball maintain its shape and enhances its bounce.
- After resting, give the ball a gentle bounce to enjoy its springiness. Observe how it flies into the air and back down, providing giggles and excitement.
The Simple Science or Skills at Work

While making Homemade Bouncing Balls is entertaining, it also offers some intriguing science concepts. The glue and starch combine to form a polymer, which is a long chain of molecules that gives the ball its unique bouncy properties.
Engaging in this project supports fine motor skills, as kids manipulate the sticky mixture. They will also practice coordination when kneading the dough and rolling it into a ball. Understanding cause and effect comes into play when they test how different amounts of starch or cornstarch alter the texture and bounce of their creations.
It’s not just about fun; it’s a gentle introduction to basic chemistry that happens in the kitchen!
Troubleshooting Common Issues
Sometimes, things may not go as planned. If your bouncy ball turns out overly sticky, don’t worry. Simply sprinkle a bit more cornstarch or flour into the mix and knead it in.
If the ball doesn’t bounce well, you might have missed the right ratio of glue to starch. This project welcomes adjustments, so feel free to experiment until you get the desired consistency.
Cleanup is a breeze as well; most of the mixture washes off easily with soap and water. It’s nice to know that you’re not dealing with messes that require hours of scrubbing.
Easy Variations to Try
If you want to add a fun twist to your Homemade Bouncing Balls:
- Glittery Balls: Mix some non-toxic glitter into your ball for a shimmering effect.
- Scented Balls: Add a few drops of essential oil or simple vanilla extract for a delightful aroma.
- Themed Colors: Create seasonal balls in red and green for Christmas, or pastel shades for spring.
Feel free to mix and match these ideas based on holidays or your kids’ interests.
Storing or Reusing This Project
Once you’ve made your bouncing balls, you have a couple of options. If they’re still in good condition, store them in a sealable plastic bag or an airtight container to keep them fresh. They can last for weeks if kept away from moisture.
If they become too flat or don’t bounce well, consider reusing the materials for another project. The cornstarch or flour can always be repurposed in baking or other crafts.
By being mindful of how you store and reuse these materials, you help reduce waste and encourage sustainability.
FAQs About Homemade Bouncing Balls
One question might be, “Will this project make a mess in my kitchen?
” It’s understandable to worry. The ingredients are water-soluble and can be easily cleaned up with a damp cloth or sponge. Just be prepared for some sticky fingers!
Another might be, “What age is suitable for this activity?
” Generally, kids aged four and older can enjoy this project with some supervision. Younger ones can participate with help.
If you are considering ingredient substitutions, know that liquid starch is key for this recipe. However, you could experiment with other types of glue.
You may also wonder, “How do we store these balls for later use?
” Keeping them in a plastic bag or airtight container can extend their life.
Lastly, it’s natural to wonder, “What if our balls don’t bounce?
” This project is forgiving. Don’t hesitate to tweak the ratios or knead in more cornstarch until you find the right consistency.
Conclusion
Making Homemade Bouncing Balls is a delightful way to engage with your children in a creative and educational activity. It’s simple enough for all ages and offers fantastic results with just a few common ingredients. For those looking to elevate their understanding of the fun behind bouncing balls, you might want to check out detailed resources like How to Make a Bouncy Ball and Make Your Own Super Bouncy Balls – Lifes Carousel. Remember, the goal is to have fun while experimenting and learning together. Enjoy your time creating memorable moments with your kids!
PrintHomemade Bouncing Balls

Engage your kids in a fun and educational DIY project by making homemade bouncing balls with simple ingredients.
- Prep Time: 10 minutes
- Cook Time: 0 minutes
- Total Time: 60 minutes
- Yield: 4–6 balls 1x
- Category: Craft
- Method: Mixing
- Cuisine: N/A
- Diet: N/A
Ingredients
- 1 cup white school glue
- 1 cup liquid starch
- 1 tablespoon cornstarch or flour
- Food coloring (optional)
- Mixing bowl
- Spoon or spatula
- Measuring cups
- Wax paper or silicone mat
Instructions
- Measure and pour 1 cup of white glue into a mixing bowl.
- Add 1 cup of liquid starch and mix thoroughly until thick.
- If desired, add food coloring and mix to achieve the desired color.
- Sprinkle in 1 tablespoon of cornstarch or flour and stir carefully.
- Knead the mixture with your hands to form a ball shape.
- Continue kneading until the ball feels firm but still soft; add more cornstarch if it’s too sticky.
- Place the ball on wax paper or a silicone mat and let it rest for about 60 minutes.
- After resting, give the ball a gentle bounce to enjoy its springiness.
Notes
Cleanup is simple with soap and water. This project allows kids to explore basic science concepts while having fun.
Nutrition
- Serving Size: 1 ball
- Calories: 40
- Sugar: 0g
- Sodium: 20mg
- Fat: 0g
- Saturated Fat: 0g
- Unsaturated Fat: 0g
- Trans Fat: 0g
- Carbohydrates: 10g
- Fiber: 0g
- Protein: 0g
- Cholesterol: 0mg