

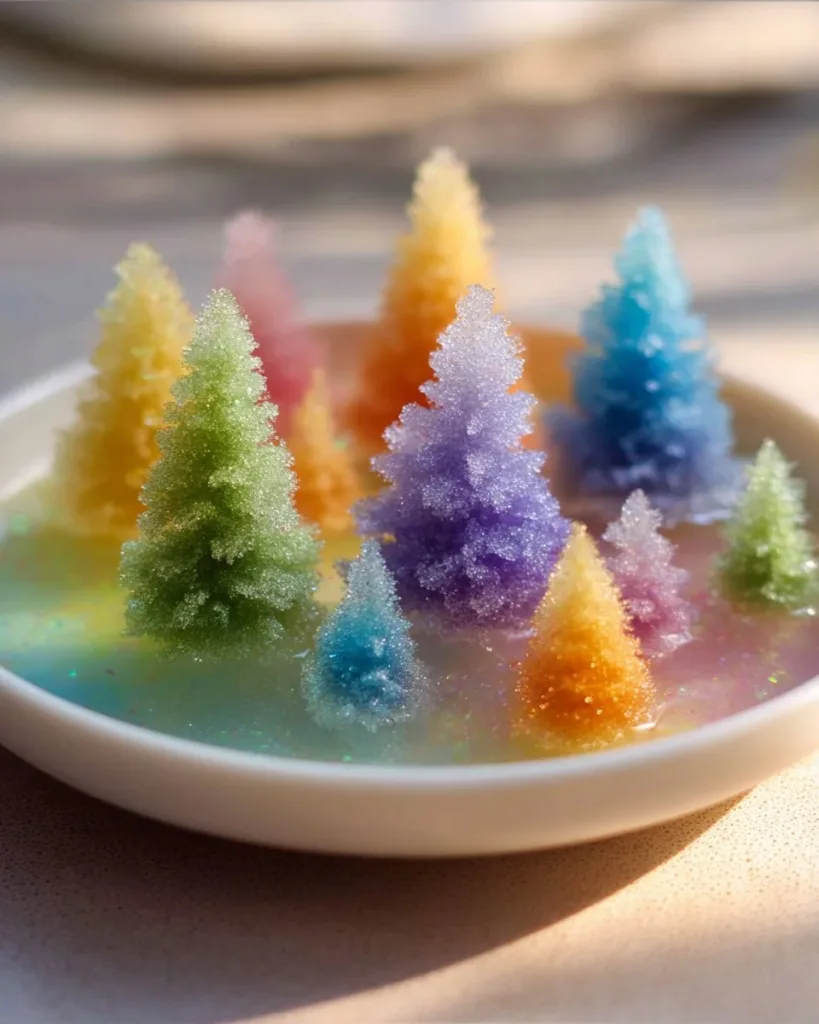
A busy afternoon, two kids asking for something to make right now, and only a handful of things from the kitchen on the counter. That’s where the Growing Baking Soda Forest fits in perfectly. You set up a few cardboard trees, mix a simple baking soda solution, add a few drops of food coloring, and wait as tiny, colorful crystals climb the trees and for https://www.diymadeeasy.com/easy-growing-crystal-ornaments/m delicate, frosty patterns.
It feels special because it takes almost no prep, it keeps hands busy for a long time, and the slow, visible change makes everyone lean in. If you want a quick, calm activity that still looks like real magic, this is it; I pulled it out on an afternoon when I needed something low-key and it saved the day. If you want a slightly different take later, try the related project I used to pair with this one: our baking soda growing tree guide for another way to play with the same simple chemistry.
Why This Growing Baking Soda Forest Works So Well

This project stays low-prep because you use things you likely already have. Baking soda, water, and food coloring live in most kitchens. Cardboard from a cereal box or thick paper works fine for the trees. The bowl that holds the setup can be shallow and simple. You do not need special tools or timed steps, so you can start between snacks or while dinner simmers.
It feels approachable because kids can help with safe parts like cutting simple tree shapes or dropping in color. The mixing step uses warm water and baking soda, a safe and familiar combo. Nothing melts, burns, or stains wildly, and adults can guide without hovering.
The method proves reliable in my kitchen. The crystals grow slowly, which helps when real life interrupts. If the oven timer rings or somebody needs a hand, the activity pauses without losing the effect. Older children get precise drops of color, while younger children love the sensory feel of the milky solution and the way color spreads.
This project suits real schedules because you can set it up quickly and step away. It gives a long payoff from a small investment of time. If you need another idea to pair it with later that uses the same ingredients, check the rainbow crystal forest page I tested alongside this activity: baking soda rainbow crystal forest.
A Quick Look Before You Begin
You will need about 10 to 20 minutes for setup. The actual growing takes longer, usually a few hours to a day for the most interesting crystal growth. Plan for this as a slow reveal, not an instant show.
Setup takes place on a protected surface. Put down a thin towel or a sheet of paper under the bowl if you worry about drips. The mess level stays low; the main cleanup is wiping up a few colored drops and rinsing the shallow dish.
Adults should help with cutting the cardboard trees and with pouring the solution. Kids can mix the baking soda and water, add color, and watch the growth. This gives a safe balance of adult involvement and child-led curiosity.
Materials You’ll Need
Baking soda
- Common household item. You likely already have a box in the pantry.
Water
- Warm tap water works best. Easy substitute: slightly warmer or cooler water will still work, but warm speeds mixing.
Food coloring (different colors)
- Typical grocery-store droppers. Using a few colors makes the forest more interesting.
Cardboard or thick paper
- Cereal boxes, leftover packaging, or heavy craft paper work well.
Shallow bowl or dish
- A wide, shallow container helps the trees stand and lets crystals climb. Budget-friendly: a disposable pie tin or a shallow plastic dish.
Step-by-Step Directions

- Cut cardboard into tree shapes and place them upright in the bowl.
Lay the cardboard flat and trace simple tree silhouettes. Cut with scissors and test each tree so it stands without toppling.
Arrange the trees in the shallow dish close enough that crystals can bridge them but not so tight the dish overflows. - Mix baking soda with warm water until you get a thick, milky solution.
Start with about two tablespoons of baking soda and add warm water slowly until the mix looks like thin white milk.
Stir until smooth; you should feel a slight slipperiness and see no large lumps. - Carefully pour the mixture into the bowl (don’t submerge the trees fully).
Tilt the bowl slightly and pour near the base of the trees so the cardboard soaks at the bottom but the tops stay dry.
Pour slowly and watch the cardboard absorb a little so the solution wicks up the trunk areas. - Add drops of food coloring at the base of each tree.
Use one or two drops of a single color per tree or mix colors for a layered look.
Drop the color directly where the cardboard meets the solution so the dye travels up with the crystals. - Leave it undisturbed and watch as colorful crystals slowly climb and grow.
Place the bowl where it won’t be bumped and check every 30 minutes for the first few hours.
Expect small changes at first and bigger, more dramatic crystals after several hours or overnight.
The Simple Science or Skills at Work

This activity mixes simple cause and effect with gentle chemistry. The baking soda solution soaks into the cardboard and then begins to evaporate. As the water dries, dissolved baking soda comes out of the solution and forms little solid crystals on the surface. The food coloring travels with the solution, so the crystals pick up color as they form.
Kids practice fine motor skills by cutting shapes and dropping food coloring. They learn about patient observation as they check growth over time. They also get a hands-on feel for absorption how cardboard drinks up liquid and how evaporation changes things slowly.
On a simple level, this project teaches cause and effect: you add a drop of color at the base, and a while later you see color climbing up. Keep your explanations simple: liquid moves, it dries, and it leaves crystals behind.
Troubleshooting Common Issues
If crystals barely appear, the solution might be too thin. Add a little more baking soda and stir until it looks thicker and milky. Warm water helps dissolve the soda better, so try slightly warmer water next time.
If colors run together too much, space the trees further apart or use just one drop per base. Strong color can overwhelm thin crystals, so lighter drops sometimes look more delicate.
If the cardboard top gets wet and soggy, you may have poured too high. Carefully tip the bowl and let the liquid settle lower, or remove and replace trees that fully soaked through. For future attempts, use shorter trees or a shallower pour.
If the dish gets knocked or moved, the fragile crystals might collapse. Move the bowl to a safe spot after setup a low shelf or a quiet corner and consider using a piece of tape under the base to steady the cardboard if it tips easily.
Easy Variations to Try
Create a snowy forest by using pale blue and white food coloring for a cool, frosty look. Use tiny stars or animals cut from cardboard for a scene that feels like a tiny diorama.
Make a gradual rainbow by placing drops of different colors on trees in a sequence from one side of the dish to the other. The colors will meet and create soft blends where their crystal paths cross.
Try different tree shapes and heights. Tall skinny trees make spiry crystal growth, while stubby trees make thick, frosty clusters near the base. Let older kids design dramatic shapes and younger kids handle the color drops.
For a seasonal twist, cut pumpkins or ghosts from cardboard and use fall or pastel colors to match holidays. The same basic method works and gives a fresh theme for each season.
Storing or Reusing This Project
You can keep the finished forest as a temporary table decoration for a few days. Crystals may continue to change as the air dries. Keep it away from heat sources or direct sunlight to slow further evaporation if you like the look.
If you want to reuse materials, scrape loose crystals into the trash and rinse the dish. Cardboard that soaked through will not stand up a second time, so save the dry leftover pieces for a collage or compost small cardboard scraps if your local rules allow it.
Clean up food coloring from counters and the shallow dish with warm water and a little dish soap. Baking soda residue rinses clean easily. If drops stain a porous surface, a damp cloth with a little dish soap usually lifts color.
FAQs About Growing Baking Soda Forest
Will this make a big mess on my table?
I worry about stains.
You might get small drips when you add color, but the setup itself stays fairly tidy. Put a sheet of paper or a cloth under the bowl and use a dropper over the dish to catch stray drops. If food coloring gets on countertops, wipe it up right away with a damp cloth and mild soap. I have wiped up more spills than I can count, and quick action usually removes color cleanly.
Is this safe for younger kids?
Yes, the ingredients are safe, but supervise young children when they handle scissors or when you pour the solution. Food coloring can stain hands and clothing, so have smocks or old shirts ready. I usually let toddlers help with color drops while an older child or adult does the cutting and pouring.
Can I substitute something for baking soda or food coloring?
Stick with baking soda and food coloring for this particular effect. Baking powder and other powders do not create the same crystal growth. If you want different colors, try mixing food coloring drops rather than using a dye substitute. Be honest: changing the core ingredients will change the result, and I recommend trying the classic version first.
How long does it take to see the crystals grow?
You will notice tiny crystals within an hour, but the most striking growth appears after several hours or overnight. The process rewards patience. If you peek too often, you might not see much change in the first 30 minutes. I like to check every hour at first and then leave it overnight for the best photos.
Can I save the finished trees?
You can keep them on display for a day or two, but they are fragile. If they break, gently remove and clean the area, and use the dry cardboard for other crafts. I have kept small displays for a weekend, but humidity and handling shorten how long they last.
A Final Helpful Note
This project is more about the process than perfection. Expect messy hands, small surprises, and a few experiments that need tweaking. That’s part of the fun. If something goes sideways, take a breath, adjust one variable next time, and try again. The materials are cheap, the setup is quick, and you will get satisfying results with small changes. Trust the slow build; that quiet growing moment is the best reward.
Conclusion
If you want a deeper read on crystal formation and related baking soda experiments, the ARM & HAMMER guide gives a solid background and ideas in their Growing Crystals Experiment | ARM & HAMMER Baking Soda Project. For a step-by-step photo walkthrough with other creative tips, see the Instructables post on Baking Soda Crystals : 10 Steps (with Pictures) – Instructables.
PrintGrowing Baking Soda Forest

An engaging and low-prep project for kids to observe colorful crystals grow on cardboard trees using a simple baking soda solution and food coloring.
- Prep Time: 15 minutes
- Cook Time: 0 minutes
- Total Time: 240 minutes
- Yield: 1 forest
- Category: Activity
- Method: Crafting
- Cuisine: N/A
- Diet: N/A
Ingredients
- Baking soda
- Water (warm)
- Food coloring (various colors)
- Cardboard or thick paper
- Shallow bowl or dish
Instructions
- Cut cardboard into tree shapes and place them upright in the bowl.
- Mix baking soda with warm water until you get a thick, milky solution.
- Carefully pour the mixture into the bowl (don’t submerge the trees fully).
- Add drops of food coloring at the base of each tree.
- Leave it undisturbed and watch as colorful crystals slowly climb and grow.
Notes
Keep a towel under the bowl to protect surfaces from drips. The process involves simple chemistry and is a great introduction to cause and effect.
Nutrition
- Serving Size: 1 forest display
- Calories: 0
- Sugar: 0g
- Sodium: 0mg
- Fat: 0g
- Saturated Fat: 0g
- Unsaturated Fat: 0g
- Trans Fat: 0g
- Carbohydrates: 0g
- Fiber: 0g
- Protein: 0g
- Cholesterol: 0mg