

It was one of those busy afternoons when the kids wanted to make something now, not later, and the kitchen table still held yesterday’s homework and a tipped-over juice cup. I pulled out a few pantry staples and set up a small tray, and in less than an hour we had bright, slightly wobbly Colorful Eco-Friendly Bioplastic Suncatchers drying in the sun. They felt like a tiny victory: simple to start, colorful, and something the whole family could hang in a window by bedtime. If you want the printed recipe and a quick reference as you work, check the bioplastic suncatcher recipe for an easy one-page guide to take to the table.
Why You’ll Love Making Colorful Eco-Friendly Bioplastic Suncatchers

This craft works well on a cramped afternoon because it uses things you already have at home and needs little prep. Cornstarch and water mix smoothly in one bowl, and a little heat turns them into something that looks like clear glue but feels more like a soft plastic once dry. Kids can stir, color, and place tiny decorations, while an adult watches the stovetop for the gentle thickening step.
It is approachable because it does not need special tools. Cookie cutters and parchment make clean shapes, and a straw or skewer gives a neat hanging hole. The process stays calm: quick setup, short active time, and a longer hands-off drying period that fits right into naptime or dinner prep.
This project is reliable for real-life schedules. You will do the active bits in 20 to 30 minutes and then let the pieces dry. They may take longer in cool or humid weather, but they still turn out. If you want more background and a fuller how-to with tips for grown-ups, take a look at our detailed full how-to page for ideas that make setup even faster.
A Quick Look Before You Begin
The whole session fits a normal afternoon. Plan on about 20 to 40 minutes of active time and several hours to fully dry, depending on sunlight and humidity. If you use a low oven the dry time shrinks, but the gentle sun method gives the clearest, most even finish.
Setup stays tidy if you use a small baking tray lined with baking parchment or a silicone mat. Keep paper towels and a damp cloth handy for quick spills. You will need an adult for the low heat step, but children can do the pouring, smoothing, and decorating.
Expect a little stickiness while you work. The heated mixture will go from runny to glossy and thick. When it’s ready to divide into colors it will feel smooth and slightly like a thick syrup. If the mixture bubbles too much or looks grainy, that gives you a clue to slow the heat or stir more evenly.
If you have done small kitchen experiments before, you will find this familiar and calm. For a related quick kitchen science idea that kids love, we also like the baking soda and vinegar reaction for a short, exciting distraction while suncatchers dry.
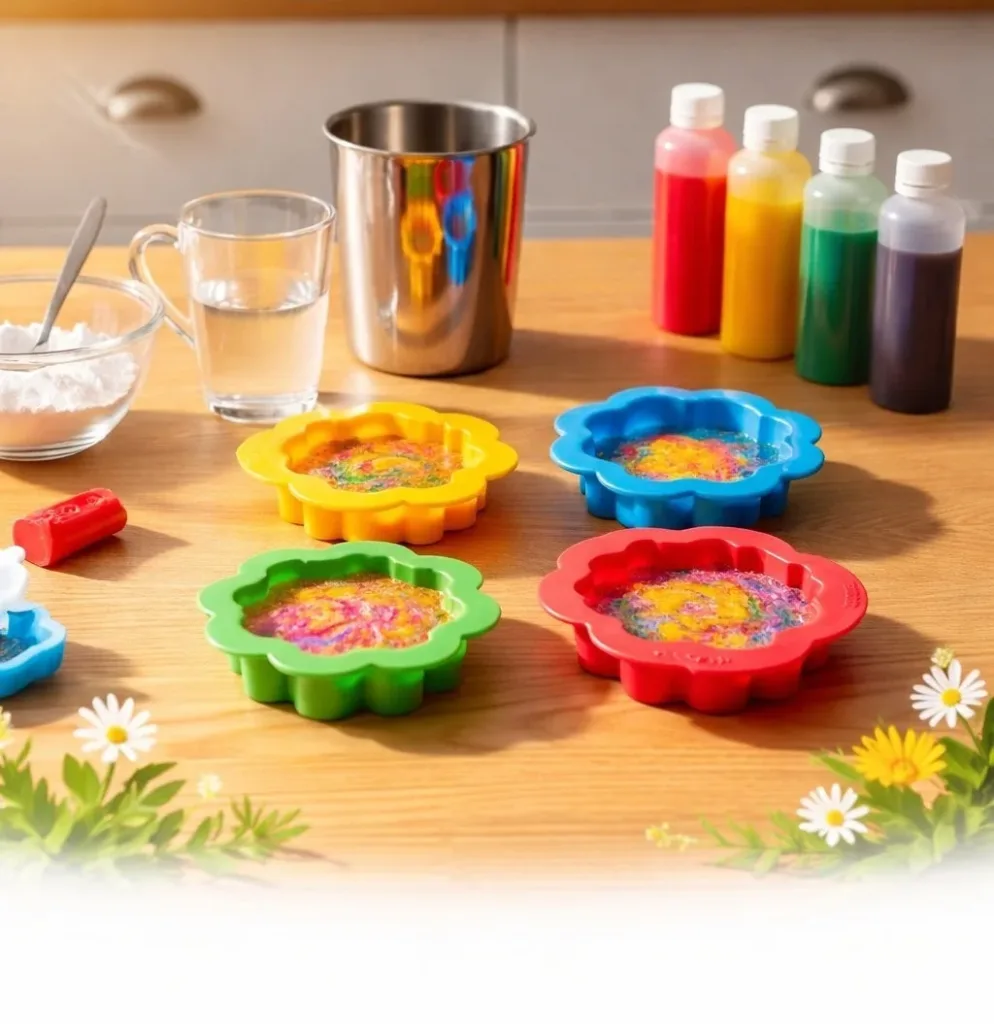
Materials You’ll Need
Cornstarch
- Common pantry ingredient.
Water
- Tap water is fine.
Glycerin (optional)
- Adds flexibility; optional if you do not have it.
White vinegar or lemon juice
- Small amount helps stability.
Natural or food-safe colorants (powdered pigments, concentrated food coloring, or plant dyes)
- Safe, household-friendly color options.
Baking parchment or silicone mat
- Nonstick surface for easy release.
Cookie cutters or templates
- Cookie cutters make quick shapes; printed templates work too.
Straw or skewer
- For making the hanging hole while the suncatcher is soft.
Hole punch or sharp needle
- For making or widening holes after drying.
Tweezers
- Helpful for placing small flowers or leaves.
Small baking tray or flat plate
- To hold your work area and carry pieces to sun or oven.
Optional: pressed flowers, thin leaves, tissue paper, or metallic foil bits
- Extra decoration; optional and safe for adding inside the suncatcher.
Step-by-Step Directions

- Measure cornstarch and water and mix off the heat until smooth.
- Stir in a small saucepan or bowl until no lumps remain and the mix looks milky.
- The texture should be smooth, not grainy; that tells you it will heat evenly.
- Add glycerin and vinegar, then heat the mixture over low heat, stirring continuously until it thickens.
- Add glycerin if you want softer, slightly stretchy pieces; add vinegar for stability.
- Heat very gently and stir without stopping; it will slowly go glossy and pull away from the pan.
- Divide the mixture into cups and add colorants.
- Spoon small amounts into cups and mix in food coloring, powdered pigments, or plant dyes.
- Stir until the tint is even; a little color goes a long way.
- Lay out parchment and place cookie cutters on it.
- Set cookie cutters flat on your parchment or silicone mat to form molds.
- If you use templates, tape them under the parchment and trace gently.
- Pour the colored mixture into the shapes, smoothing it with a spoon.
- Pour carefully to avoid overfilling; use the back of a spoon to level the surface.
- Keep shapes thin enough to dry about the thickness of a coin works well.
- Add flowers or leaves if desired.
- Use tweezers to place pressed flowers, thin leaves, or small tissue bits into the liquid.
- Press gently so pieces sit flush and do not trap air pockets.
- Allow to dry either in sunlight or a low oven.
- In bright sun, pieces may dry in a few hours; in a warm oven set below 200 F it takes less time.
- Check often and flip if needed for even drying; the suncatcher will feel firm and not tacky when dry.
- Once dry, carefully peel off and punch holes for hanging.
- Peel slowly from the edge; use a hole punch or sharp needle to make or widen the hanging hole.
- Thread string or ribbon and hang in a sunny window where light brings out the colors.
What Kids Practice While Making This

This craft gives small hands a lot of useful practice. Measuring cornstarch and water teaches basic amounts and pouring control. Mixing and stirring builds hand strength and wrist coordination, especially when a child learns to judge the right thickness.
Placing tiny flowers or bits of tissue with tweezers helps fine motor skills and concentration. Smoothing the mix with a spoon asks for careful gestures and simple hand-eye coordination. Making the hanging hole with a straw or skewer gives a safe way to practice focused pressure.
On the thinking side, kids learn cause and effect. They see how heat changes texture, how adding glycerin affects flexibility, and how thin shapes dry faster than thick ones. Noticing these changes trains observation and patience.
The Simple Science or Skills at Work
The main change you will see comes from heating cornstarch mixed with water. Cornstarch has starch molecules that swell and tangle when warmed and stirred. That change thickens the mix into a glossy paste that behaves a bit like a simple, biodegradable plastic when it dries.
Glycerin adds flexibility by holding on to a small amount of water in the dried piece. That makes finished suncatchers less brittle and less likely to crack in the sun. Vinegar or lemon juice can help by slightly changing the mixture’s acidity, which stabilizes the starch network while it sets.
Colorants simply mix into the glossy paste and show vibrantly when the pieces dry clear. Pressed flowers or thin leaves float inside the thin sheet and keep their shape because the paste sets around them.
Troubleshooting Common Issues
If the mixture stays grainy after heating, it probably did not cook long enough or the heat was uneven. Move the pan to a slightly higher burner setting but keep stirring. The graininess will smooth out as the starch fully gelatinizes.
If bubbles form while you heat, lower the temperature and stir gently. Small bubbles are normal at first, but too many or big bubbles mean the heat is too high. You want a glossy surface, not foam.
If your suncatchers crack when dry, they are likely too thick or they dried too fast. Try making thinner pieces next time and dry them in steady sun or a warm oven, not too hot. If you skipped glycerin, try adding a small amount next time for more flexibility.
If decorations float and bunch up, place them once the color layer is partially set but still soft. Tweezers help a lot. Alternatively, press the decorations gently into the poured mix right away so air does not get trapped under them.
Easy Variations to Try
Try layered colors by pouring one thin color, letting it set a bit, then adding a second color on top. The result looks like stained glass.
Make seasonal shapes and add small metallic foil bits for sparkle. Thin foil pieces tuck under the surface and catch light.
Use plant dyes from beet juice, spinach water, or turmeric mixed into tiny amounts for natural tones. Test a small sample first to see how the color holds when dry.
Let older kids draw patterns with concentrated food coloring and a toothpick before the mix fully sets. The tiny marbling creates an artisanal look.
Make tiny charms by pouring into small, simple shapes and threading through with thin ribbon for gifts or mobiles.
Storing or Reusing This Project
Store finished suncatchers flat in a cool, dry place. Lay them between sheets of parchment or tissue paper so they do not stick together. Avoid heavy stacking that might bend thin pieces.
If a piece chips, keep the scraps. You can press small bits into a fresh batch as decorative inclusions or use them as confetti for cards. The leftover starch mixture cleans up with warm water; wipe tools and pans before the paste fully hardens.
Keep unused color cups covered and reuse them for future batches if they have not fully dried. If your work area gets sticky, a warm damp cloth usually removes residue. Wash hands with soap to remove colorants if they stain slightly.
FAQs About Colorful Eco-Friendly Bioplastic Suncatchers
Will this make a mess and will it stain clothes?
It can get a little messy, like any kitchen craft, but it cleans up easily. Lay down parchment or an old placemat and wear aprons. Food coloring can stain fabric, so use old clothes or aprons. If a spill reaches countertops, wipe it up while warm with a damp cloth and mild soap. I have wiped up small drips this way many times and never had a permanent mark when I acted quickly.
Is it safe for my preschooler to help?
Yes, with supervision for the hot step. Children can do most tasks safely: stirring cooled portions, adding color, and placing decorations. Keep an adult in charge of the low heat phase and the oven if you use it. Small parts like pressed flowers and tiny foil bits are choking hazards for very young children, so use them with older kids or under careful supervision.
Can I skip glycerin or replace vinegar with something else?
You can skip glycerin. The suncatchers will be stiffer and may crack more easily, especially in direct sun. Glycerin makes them more flexible and forgiving. White vinegar or lemon juice acts as a stabilizer in small amounts. I do not recommend replacing them with an unlisted ingredient, but a teaspoon of lemon juice works similarly to a teaspoon of white vinegar in small recipes.
What should I expect my finished pieces to look like?
They will look a little like clear plastic with a soft, glassy shine. Colors become brighter as the pieces dry. They may bow a little while drying; thin shapes stay flat. They will not look exactly like commercial acrylic, but they will catch light, show color, and feel special. Embrace the small quirks; they add character.
How long will they last?
With gentle handling and indoor hanging away from direct harsh sunlight for long stretches, they can look good for months. They are not as long-lived as commercial plastics, but they offer a biodegradable, hands-on charm. If one fades or cracks, use the pieces as a template to make a new one with slight tweaks.
A Final Helpful Note
Start small and keep the first batch thin. A thin trial shape helps you learn how quickly your kitchen setup thickens and dries in your home conditions. Keep a small bowl of water for tools and fast cleanup, and set expectations with kids about waiting while pieces finish drying. When things go a bit wrong, remember that colorful scraps often become part of the next project. This craft plays well with patience and playfulness, and that makes it feel easy.
Conclusion
If you want more visuals and another take on the process, this clear, kid-friendly guide shows step-by-step photos in a fun chemistry-for-kids style at How To Make A Bioplastic Suncatcher – Chemistry for Kids. For extra inspiration and a different set of tips, try this creative tutorial with bright photos and variations at DIY Bioplastic Suncatchers: Eco-Friendly Art That Shines Bright!.
PrintColorful Eco-Friendly Bioplastic Suncatchers

A fun and easy craft for kids to create colorful bioplastic suncatchers using simple pantry ingredients.
- Prep Time: 20 minutes
- Cook Time: 30 minutes
- Total Time: 50 minutes
- Yield: 4-6 suncatchers
- Category: Craft
- Method: Crafting
- Cuisine: N/A
- Diet: N/A
Ingredients
- Cornstarch
- Water
- Glycerin (optional)
- White vinegar or lemon juice
- Natural or food-safe colorants (powdered pigments, concentrated food coloring, or plant dyes)
- Baking parchment or silicone mat
- Cookie cutters or templates
- Straw or skewer
- Hole punch or sharp needle
- Tweezers
- Small baking tray or flat plate
- Optional: pressed flowers, thin leaves, tissue paper, or metallic foil bits
Instructions
- Measure cornstarch and water and mix off the heat until smooth.
- Add glycerin and vinegar, then heat the mixture over low heat, stirring continuously until it thickens.
- Divide the mixture into cups and add colorants.
- Lay out parchment and place cookie cutters on it.
- Pour the colored mixture into the shapes, smoothing it with a spoon.
- Add flowers or leaves if desired.
- Allow to dry either in sunlight or a low oven.
- Once dry, carefully peel off and punch holes for hanging.
Notes
This craft allows children to practice measuring, stirring, and decorating while learning about cause and effect.
Nutrition
- Serving Size: 1 suncatcher
- Calories: 0
- Sugar: 0g
- Sodium: 0mg
- Fat: 0g
- Saturated Fat: 0g
- Unsaturated Fat: 0g
- Trans Fat: 0g
- Carbohydrates: 0g
- Fiber: 0g
- Protein: 0g
- Cholesterol: 0mg