

A late-afternoon scramble, two kids at the table asking for something to do, and a sink full of dishes made me reach for a quick, satisfying activity: Fluffy Soap Foam Sensory Play. I set out a few simple ingredients from the cupboard, mixed them right on the kitchen counter, and in under ten minutes we had a cloud of soft foam that begged to be squished. If you like hands-on, low-prep ideas that let kids explore texture and pouring without a big setup, this one fits the bill; it pairs wonderfully with other foam-based activities like our Color Burst Foam Eruption experiment for curious kids who love dramatic sensory moments Color Burst Foam Eruption experiment.
Why This Fluffy Soap Foam Sensory Play Works So Well

This activity stays low-prep because it uses stuff most families already have. Dish soap, warm water, and a little sugar turn into a fluffy, cloud-like foam without any specialty supplies. That makes it fast to pull together when you need an activity right away.
It feels approachable because the steps stay simple. You pour, stir, and whip. Even when kids help, the adult role stays small and steady, which keeps the scene calm and manageable.
This sensory play proves reliable across a few tries. If a batch comes out too thin, a little extra mixing usually fixes it. If it collapses after a while, you can always refresh with a quick re-whip and keep the play going.
A Quick Look Before You Begin
Expect to spend about 10 minutes making the foam and then however long the kids want to explore it. The whipping takes just a few minutes. Overall, plan for a short setup and flexible play time.
Set up on a washable surface or tray. Sensory play feels free and a bit messy, so a tray, cookie sheet, or a waterproof placemat helps a lot. Keep paper towels handy for spills and a small bowl for used utensils.
Mess level sits in the easy-to-manage range. The foam is mostly lightweight and wipes up easily. You might find sudsy footprints or an excited handprint on the table, but those are quick to wipe away with a damp cloth.
Adults usually need to handle the mixing step, especially if you use an immersion blender or hand mixer. Kids can safely scoop, mold, and explore once the foam looks cloud-like and fluffy.
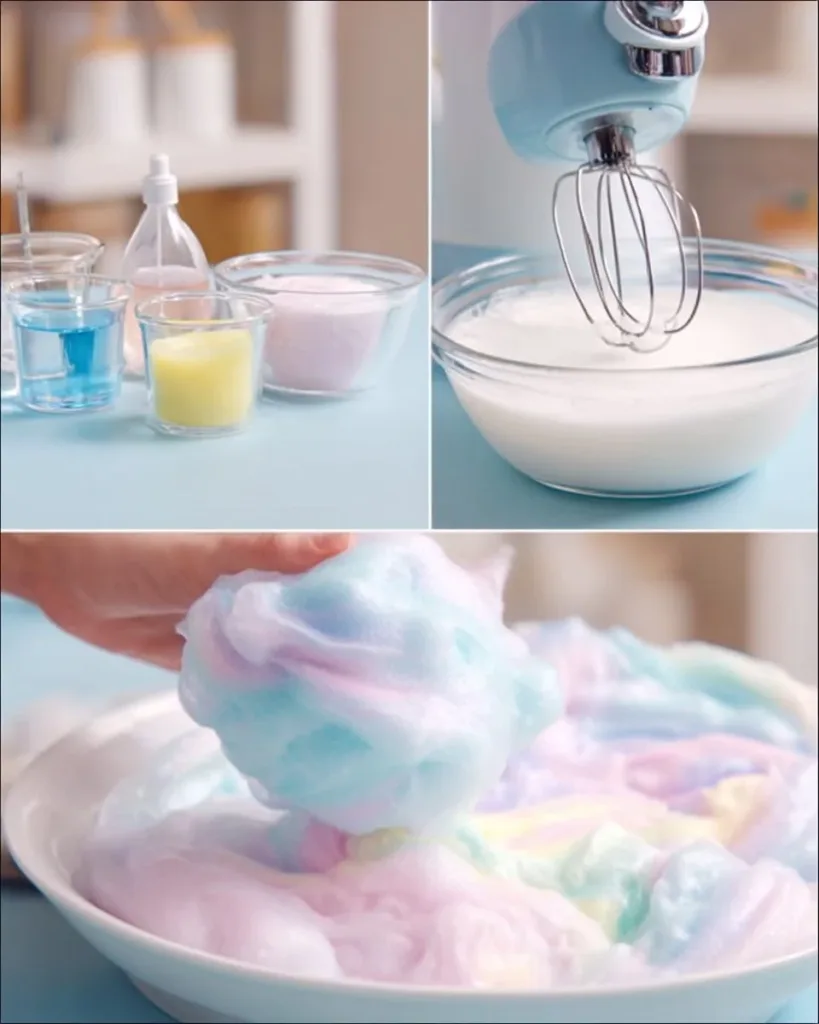
Materials You’ll Need
1/3 cup dish soap
common household item
2/3 cup warm water
easy to measure
3-4 tbsp sugar
helps stabilize the foam
Food coloring (optional)
optional for color fun
Step-by-Step Directions

- Pour 1/3 cup of dish soap into a large bowl.
Use a wide bowl so the mixer has room. You will notice the soap looks thick and glossy at first. - Add 2/3 cup of warm water and 3-4 tablespoons of sugar; stir gently to combine.
Warm water helps dissolve the sugar more easily. Stir until the sugar looks mostly dissolved and the mixture looks blended. - Use a hand mixer, whisk, or immersion blender on high for 2-5 minutes until fluffy and cloud-like.
Start slowly then speed up to high. Watch the texture change from liquid to airy peaks; you will feel it thicken under the mixer. - If you like, add food coloring for a fun rainbow effect.
Drop a couple of drops into the foam and swirl gently for marbling, or stir more for uniform color. A little color goes a long way. - Scoop the fluffy foam into a tray and invite your little ones to squish, mold, and explore!
Give kids scoops, spoons, or cookie cutters and let them dig in. The foam holds gentle shapes and then collapses, which kids find delightful.
What Kids Practice While Making This
This project builds simple hand skills in a playful way. Scooping and pressing the foam strengthens little fingers and improves coordination. Stirring and pouring help with control and timing.
The sensory element helps children name textures. They get words like soft, squishy, airy, and cool as they talk while they play. That language supports early learning and helps them express what they feel.
The mixing step gives a gentle lesson in cause and effect. They see liquid turn into fluff when you add motion. Later, if the foam collapses, they learn that some textures are temporary and that they can make more by mixing again.
There is also a touch of science. Kids notice how sugar changes the foam and how heat from the warm water makes mixing easier. Those simple observations build curiosity without pressure.
Troubleshooting Common Issues
If the foam stays runny, it usually means it needs more whipping. Try another minute or two with your mixer. You should see it thicken and form soft peaks.
If the foam collapses quickly after you make it, the sugar may not have dissolved fully or it may need a fresher mix. Stir in a little warm water to help dissolve any remaining sugar and blend it again briefly.
If your foam looks bubbly but not fluffy, check your mixer speed. A whisk can work but will take longer and more effort. An immersion blender or hand mixer gets the job done fastest.
If the color runs or looks too bright, add only a drop or two at a time. Stir gently so the foam keeps its texture. Less is more with food coloring.
Easy Variations to Try
Try a color-mixing station by making two small bowls of foam in different colors and let kids swirl the colors together. They enjoy watching shades blend and the foam still behaves the same.
Make a themed sensory tray using small toys, cookie cutters, or plastic creatures pressed into the foam. Kids can imagine scenes and then reset the tray easily by mixing the foam back together.
Try adding scent by placing a tiny drop of vanilla extract near the foam for a light smell. Only use a small amount and only if your kids do not put the foam in their mouths.
For older kids, set up a challenge to build a light foam tower using cups and scoops. It encourages planning and careful hands.
For a quieter variation, let kids press tools into the foam to make patterns then gently smooth it back out. That makes a calmer, more focused experience.
Storing or Reusing This Project
You can refresh leftover foam by whipping it again for a minute. It often regains some of its airiness. This works best if you make a bit more than you need so you have extras to refresh play.
If you have a small amount left, you can fold it into more dish soap to create a slightly more stable texture for short-term reuse. The foam will not keep indefinitely, so plan to remake it if play continues later.
Clean up sits in the quick category. The foam rinses away with warm water in the sink. Wipe the table with a damp cloth, then rinse the bowl and mixer attachments.
To reduce waste, use the smallest bowls and trays that suit your play session. Reuse measuring spoons and utensils rather than disposable items. Keep extra foam in a covered bowl for a short time if you plan to return to it within an hour.
FAQs About Fluffy Soap Foam Sensory Play
Can this make a big mess?
It can get sudsy, especially when kids scoop and carry it. I usually put the tray on a washable mat and give kids an apron or an old shirt. The foam cleans up easily with a damp cloth and warm water, so messes feel temporary and manageable.
Is it safe if my child puts it in their mouth?
This foam uses household dish soap, so it is not meant to be eaten. I advise close supervision for toddlers who mouth things and gentle reminders not to taste it. If a small lick happens, rinsing the mouth with water usually solves it. If you worry about any reaction or ingestion, check the dish soap label and call your local poison control for guidance.
Can I skip the sugar or use less?
You can try one tablespoon, but sugar helps give the foam a more stable, cloud-like texture. If you try less sugar, expect softer foam that may collapse sooner. I usually use 3 tablespoons for a good balance, and that works reliably in my kitchen.
How long will the foam last for play?
The foam holds its best for about 20 to 40 minutes of active play. If you see it start to flatten, a quick whip restores some volume. For repeated sessions, make fresh batches; they come together quickly.
What if I only have a whisk and not a mixer?
A whisk works, but it requires more time and elbow grease. You will still get foam, but plan for longer mixing and possibly less volume. An immersion blender or hand mixer gives the fastest, most consistent result.
A Final Helpful Note
You do not need perfect foam to have a great session. The first batch might look too airy or a little flat, and that is okay. The kids will still enjoy the feel and the chance to experiment.
Trust your kitchen tools and your hands. If a batch does not behave, try another with a little extra mixing or a touch more sugar. The process remains simple and forgiving.
Keep things flexible. Set out a few toys, a scooper, and a pair of safe scissors for older kids, and let them lead the play. You will find that 10 minutes of gentle prep often yields a happy, hands-on afternoon.
Conclusion
If you want another take on the same playful medium, this tutorial from Messy Little Monster shows a similar approach and extra ideas for decorating the foam How to make Fluffy Soap Foam for Sensory Play – Messy Little Monster, and Little Bins for Little Hands offers tips on sensory themes and alternatives that pair well with this activity Soap Foam Sensory Play for Kids.
PrintFluffy Soap Foam Sensory Play

A quick and engaging sensory play activity using common household ingredients to create fluffy soap foam.
- Prep Time: 10 minutes
- Cook Time: 0 minutes
- Total Time: 10 minutes
- Yield: Unlimited fun for however long kids want to explore
- Category: Sensory Play
- Method: Mixing
- Cuisine: N/A
- Diet: N/A
Ingredients
- 1/3 cup dish soap
- 2/3 cup warm water
- 3–4 tbsp sugar
- Food coloring (optional)
Instructions
- Pour 1/3 cup of dish soap into a large bowl.
- Add 2/3 cup of warm water and 3-4 tablespoons of sugar; stir gently to combine.
- Use a hand mixer, whisk, or immersion blender on high for 2-5 minutes until fluffy and cloud-like.
- If you like, add food coloring for a fun rainbow effect.
- Scoop the fluffy foam into a tray and invite your little ones to squish, mold, and explore!
Notes
Great for developing hand skills and encouraging creativity in children. Supervision is recommended, especially for younger kids.
Nutrition
- Serving Size: As desired
- Calories: Unknown
- Sugar: 10g
- Sodium: 0mg
- Fat: 0g
- Saturated Fat: 0g
- Unsaturated Fat: 0g
- Trans Fat: 0g
- Carbohydrates: 12g
- Fiber: 0g
- Protein: 0g
- Cholesterol: 0mg