DIY Stained-Glass Mushroom Art
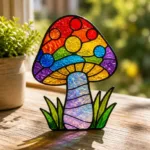
A fun and creative DIY project perfect for families, allowing kids to express their artistic flair while making vibrant stained-glass mushroom art.
- Prep Time: 15 minutes
- Cook Time: 90 minutes
- Total Time: 105 minutes
- Yield: 1 set of mushrooms
- Category: Arts & Crafts
- Method: DIY Crafting
Ingredients
- Clear Plastic Sheets
- Acrylic Paints
- Black Marker
- Glue
- Scissors
- Paintbrushes
- Paper Towels
Instructions
- Prepare Your Workspace: Start by clearing a space where you can work freely without distractions. Lay down newspapers or an old tablecloth to prevent mess.
- Draw Your Design: With the black marker, lightly sketch your mushroom shapes on the clear plastic sheets. Be creative with the size and shape—each one can be unique!
- Cut Out the Shapes: Carefully use the scissors to cut around your drawn designs. This step requires attention to detail, so take your time to ensure clean edges.
- Paint the Pieces: Using the acrylic paints, fill in your mushroom shapes with colors of your choice. Think about blending colors for added depth. Allow them to dry fully.
- Assemble the Mushrooms: Once dry, use the glue to attach your painted sections together, stabilizing them however preferred, whether standing or flat.
- Display Your Art: Find a sunny spot in your home to showcase your new creations. The colors will reflect light beautifully, adding joy to your space.
- Clean Up: Don’t forget to clean your workspace once you’re done. It’s part of the process and helps set up for next time!
Notes
Adult supervision is beneficial while kids can help with various parts of the project. Embrace the uniqueness of each creation.
Nutrition
- Serving Size: N/A
- Calories: N/A
- Sugar: N/A
- Sodium: N/A
- Fat: N/A
- Saturated Fat: N/A
- Unsaturated Fat: N/A
- Trans Fat: N/A
- Carbohydrates: N/A
- Fiber: N/A
- Protein: N/A
- Cholesterol: N/A