DIY Crystal Art: A Beginner’s Guide to Crystal Growth
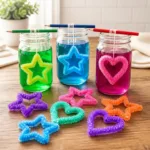
Create stunning crystalline displays using simple household items with this engaging DIY crystal art project.
- Prep Time: 15 minutes
- Cook Time: 0 minutes
- Total Time: 60 minutes
- Yield: 1 batch of crystals
- Category: Craft
- Method: Crafting
- Cuisine: N/A
- Diet: N/A
Ingredients
- Water: Common household item
- Salt: Easy to find in any kitchen
- Heat-resistant container: Optional for reusing what you have
- String or craft sticks: Budget-friendly items for supporting crystals
Instructions
- Prepare the solution: In a pot, bring water to a boil. For every cup of water, you’ll need about three tablespoons of salt. Stir until the salt dissolves completely.
- Cool down: Remove the pot from the heat and allow the solution to cool slightly.
- Set up for crystals: Pour the solution into a heat-resistant container. If using strings, tie them to a stick and suspend them in the solution. Ensure they don’t touch the bottom.
- Wait patiently: Place the container somewhere it won’t be disturbed and let it sit for several hours or overnight.
- Admire your creation: After a day, check on your crystals. If they are sufficiently formed, carefully remove the stick or string and let them dry before displaying.
Notes
Consider adding food coloring for vibrant results or experimenting with sugar instead of salt for unique crystals.
Nutrition
- Serving Size: 1 batch
- Calories: N/A
- Sugar: N/A
- Sodium: N/A
- Fat: N/A
- Saturated Fat: N/A
- Unsaturated Fat: N/A
- Trans Fat: N/A
- Carbohydrates: N/A
- Fiber: N/A
- Protein: N/A
- Cholesterol: N/A