

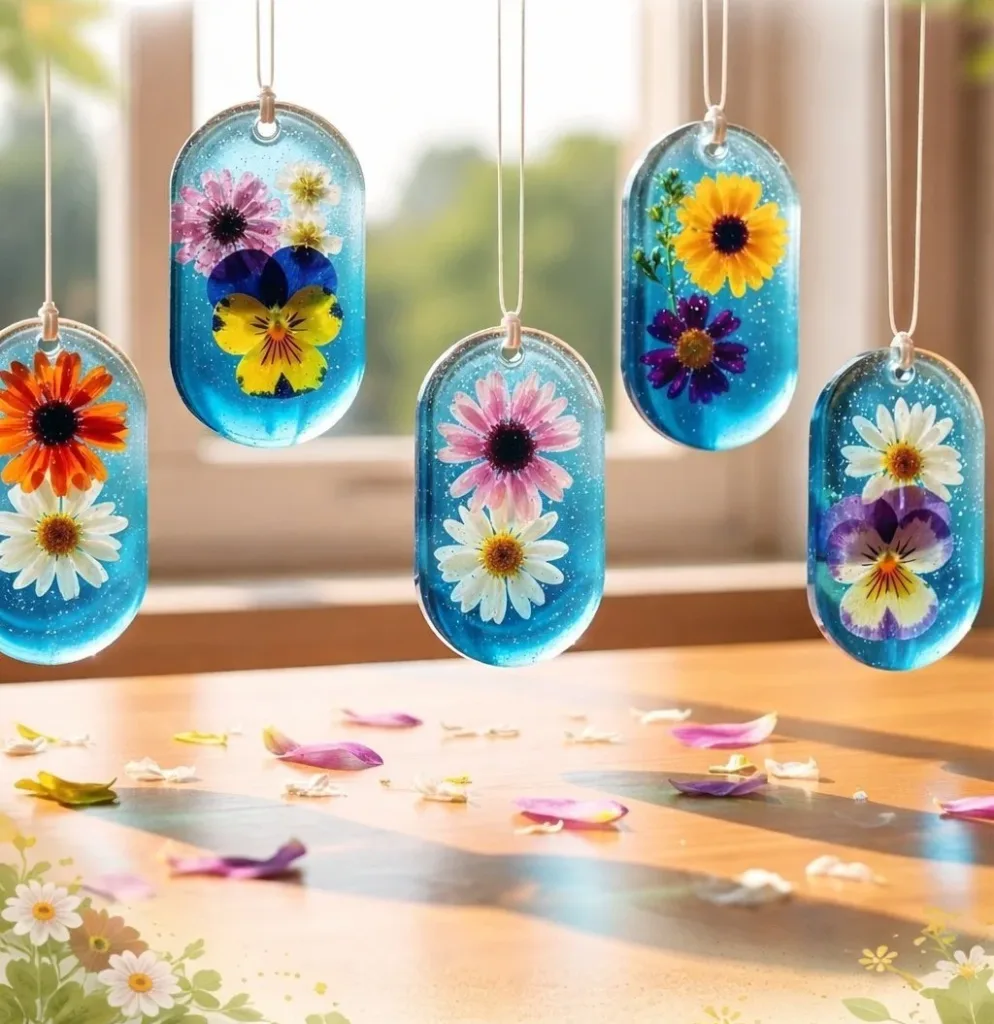
A busy afternoon, a kitchen counter that still smells of toast, and three small voices asking, what can we make now? That is the exact moment DIY Bioplastic Suncatchers became our go-to calm, creative rescue. The setup takes minutes, the mess stays small, and kids can help from start to finish. If you want something bright to hang in the window by bedtime, this project fits perfectly, and you can read a handy recipe reference on our detailed recipe page for more ideas.
Why You’ll Love Making DIY Bioplastic Suncatchers

This idea works on busy days because it needs only a few ingredients and cups you already have at home. You do not need fancy tools or long prep. The gelatin mix sets quickly into a thin, translucent film that catches light and color without a lot of fuss.
It feels approachable because kids can join most of the steps. Little hands can press leaves, older kids can warm the mixture with supervision, and adults only need to keep an eye on temperatures. That shared rhythm makes the project reliable for afternoons when plans change.
It fits real life. You can start in ten minutes and have finished pieces to hang the same day. The materials store easily in a kitchen drawer, and cleanup is mainly warm water and a sponge. That low-friction end-to-end time makes this a repeatable activity you will reach for again.
A Quick Look Before You Begin
Prepare for a calm, 30 to 90 minute window depending on how many suncatchers you make. Actual handling takes about 10 to 20 minutes; most of the time is waiting quietly while films cool and dry.
Setup is a small counter footprint. Parchment or a silicone mat, a shallow dish, a spoon, and your decorations will do. Keep a bowl of cool water handy to test temperature so you do not overheat the gelatin.
Mess stays minimal. Gelatin can drip, but it rinses from counters easily. Keep paper towels and a small dish of warm soapy water nearby for quick cleanup. Adult help matters during warming and pouring. Older kids can do the decorating and trimming with supervision.
If you want more background or another take on this craft, see our quick project guide for tips and photos that match different kitchen setups.
Materials You’ll Need
1 tablespoon gelatin powder
common household pantry item
3 tablespoons warm water
warm tap water is fine
1 teaspoon glycerin (optional)
helps keep the film flexible
Natural dyes or food coloring (optional)
small drops change the look
Small shallow glass or ceramic dishes for casting
mugs, ramekins, or saucers work
Measuring spoons
accurate measures help consistency
Wooden or silicone stirring stick
plastic spoons also work
Parchment paper or silicone mat
keeps pieces from sticking
Non-toxic oil for light greasing (optional)
use a paper towel to apply very lightly
Scissors or small craft punches for shaping
for cutting shapes when dry
Thin twine or fishing line for hanging
clear line is nearly invisible
Pressed leaves, petals, dried herbs, or thin threads for decoration (optional)
pressed botanicals add charm
STEP-BY-STEP DIRECTIONS

- Prepare your workspace and materials.
Lay out parchment paper and your shallow dishes. Keep a bowl of cool water nearby to test temperature. Have your pressed botanicals and twine ready. - Measure and mix ingredients.
Combine 1 tablespoon gelatin with 3 tablespoons warm water and 1 teaspoon glycerin if using. Let it bloom until it looks spongy and absorbs the water. - Warm the mixture slowly.
Heat gently in short bursts or over low heat, stirring until the gelatin turns clear and liquid. Watch for steam and remove before it bubbles. - Add color or scent if desired.
Mix in a few drops of natural dye or food coloring. A little goes a long way. For ideas on color methods, try the color techniques used in our blue crayon suncatchers project as inspiration. - Prepare your casting dish.
Lightly oil the dish or line it with parchment so the film releases easily. A thin coat of oil on a paper towel is usually enough. - Pour the warm gelatin blend into the dish.
Tilt the dish to spread the gelatin into a thin, even layer. Aim for a film no thicker than a few millimeters for best light transmission. - Arrange botanicals or threads atop the gelatin.
Place pressed leaves, petals, dried herbs, or thin threads where you want them. Press gently to help them stick without tearing. - Allow the film to cool and set for at least an hour.
Set the dish somewhere level and undisturbed. You will see the surface change from glossy to matte as it firms. - Lift and trim your suncatcher.
Carefully peel the film from the dish or parchment. Trim edges with scissors or use small punches for shapes. - Create a hanging point.
Poke a small hole near the edge and thread thin twine or fishing line through. A small hole made while the film is still a little soft can be easier, but be gentle. - Let it air dry for a day or two to firm up.
Place your suncatcher flat on parchment to finish drying. Hang where soft sunlight can filter through and enjoy the glow.
The Simple Science or Skills at Work

This craft uses gelatin to make a thin, clear film. Gelatin comes from protein and forms a network when it cools. That network traps water and makes a flexible, see-through sheet.
Glycerin, when used, acts like a tiny conditioner. It helps the film stay softer and less brittle as it dries. You do not need glycerin for the project to work, but a small amount can make pieces less likely to crack.
Kids practice useful skills here. Measuring ingredients builds number sense and careful work. Stirring and watching the mix change gives a simple lesson in cause and effect. Pressing small botanicals helps fine motor control and careful placement.
The sensory cues help a lot. The mixture should feel smooth and warm but not hot. When it turns clear, you know it is ready to pour. When the surface loses its shine, it is usually set enough to lift without stretching.
This project also quietly reinforces patience. Setting and drying take time. Waiting for the film to dismiss its gloss and firm up teaches kids that good things can require a short pause.
Troubleshooting Common Issues
If the gelatin looks lumpy or grainy, it probably did not dissolve fully. Warm it gently and stir until clear. Avoid boiling, which can cause bubbles and a cloudy finish.
If your film sticks to the dish, it may need a lighter oil layer or a parchment lining next time. For glass dishes, a very thin wipe of oil or a parchment disk fixes release problems.
If the piece tears when you try to lift it, it likely needed more setting time. Let it sit a little longer and try again. Thinner pours lift more easily than thick ones.
If the colors look muted after drying, try a slightly stronger dye next time. Natural dyes sometimes fade more than food coloring, so test small amounts before committing to many pieces.
If edges curl as the piece dries, press the edges flat for a few minutes after pouring or flip the film gently onto fresh parchment to dry both sides evenly. A flat, level drying surface helps prevent warping.
Easy Variations to Try
Try layering two thin colors for a gentle ombre. Pour one color, let it set almost fully, then add a second thin layer in a different color. This works best with similar drying times and thin pours.
Make small ornaments for a garland. Cast many small circles and punch a hole while each is still a bit soft. Thread them together after drying for a window garland.
Use clear thread and tiny beads for added sparkle. Stitch a few beads onto thin threads and lay them across the gelatin before it sets for a subtle glint.
Try seasonal botanicals. Tiny holly leaves or dried orange slices change the mood for winter, while bright petals and thin grasses look fresh in spring. Dried items generally work better than fresh ones because they add less moisture to the film.
Make a set and compare. Let kids design one with only petals and another with threads or tiny paper cutouts. Comparing finished pieces builds confidence and invites simple talk about choices.
Storing or Reusing This Project
Keep finished suncatchers out of direct heat and moisture. A cool, dry spot protects them from stretching or becoming sticky. Store flat between sheets of parchment if you keep extras.
If a piece gets dusty, wipe it gently with a soft, dry cloth. Avoid wet cleaning; water can soften the gelatin. For stubborn spots, lightly brush with a dry, soft toothbrush.
Leftover gelatin solution does not store well, so make only what you plan to use in the session. Small batches keep waste low and cleanup simple. Any unused dry gelatin stays good in a sealed container in the pantry.
Reuse your tools. Warm, soapy water cleans dishes and stirring sticks quickly. Parchment can serve several times if it is not badly stained. For ideas about drying and preserving crafty pieces, our seashells drying guide has tips that translate well to suncatchers.
If a suncatcher softens after hanging in a humid room, move it to a drier space. These pieces do better in moderate indoor climates rather than very steamy bathrooms or humid basements.
FAQs About DIY Bioplastic Suncatchers
Will this make a big mess?
I worry about sticky counters and laundry. This is one of the low-mess crafts I reach for. The gelatin mix can drip, but it cleans with warm water. Use parchment and a small tray to contain spills. If clothes get a tiny smear, rinse quickly with warm water and soap; it usually comes out easily.
Is this safe for little kids to handle?
My three-year-old wants to help. With supervision, yes. Adults should handle the warming and pouring. Kids can add botanicals, press decorations, and help thread the twine. Keep hot items out of reach and teach safe handling while you work together.
Can I swap ingredients if I do not have glycerin or certain dyes?
Yes. Glycerin is optional. Without it, expect slightly firmer films that may be more brittle. Food coloring or a small dab of natural dye both work. If you use a new dye, test one small film first to see how the color dries.
What if my suncatchers do not look perfect or have tiny bubbles?
That is normal on early tries. Tiny bubbles, uneven edges, or slight cloudiness do not ruin the charm. Try gently tapping the dish before the mix sets to release a few bubbles. Thinner pours also reduce cloudiness and allow better light transmission.
How long will these pieces last once hung?
They will last a season or longer if kept out of damp conditions and direct heat. Expect some gradual change over time because the material is biodegradable. If a piece softens or gets cloudy, you can remove it and make a fresh one with the same materials.
A Final Helpful Note
Trust your rhythm and keep it simple. The first set may not be gallery perfect, and that is fine. Celebrate the colors, the little imperfections, and the time spent together. These suncatchers shine best when they represent a calm kitchen afternoon and hands working together.
Conclusion
If you want a different step-by-step viewpoint, this clear tutorial walks through the chemistry and methods well: How To Make A Bioplastic Suncatcher – Chemistry for Kids. For inspiration that focuses on botanical layouts and styling, this project post gives lovely examples: Botanical Bioplastic Sun Catchers – Wineberry Woods.
PrintDIY Bioplastic Suncatchers

A fun and easy project to make colorful suncatchers with kids using simple ingredients and minimal mess.
- Prep Time: 10 minutes
- Cook Time: 60 minutes
- Total Time: 70 minutes
- Yield: Multiple suncatchers
- Category: Craft
- Method: Crafting
- Cuisine: N/A
- Diet: N/A
Ingredients
- 1 tablespoon gelatin powder
- 3 tablespoons warm water
- 1 teaspoon glycerin (optional)
- Natural dyes or food coloring (optional)
- Small shallow glass or ceramic dishes
- Measuring spoons
- Wooden or silicone stirring stick
- Parchment paper or silicone mat
- Non-toxic oil for light greasing (optional)
- Scissors or small craft punches
- Thin twine or fishing line for hanging
- Pressed leaves, petals, dried herbs, or thin threads for decoration (optional)
Instructions
- Prepare your workspace and materials.
- Measure and mix ingredients.
- Warm the mixture slowly.
- Add color or scent if desired.
- Prepare your casting dish.
- Pour the warm gelatin blend into the dish.
- Arrange botanicals or threads atop the gelatin.
- Allow the film to cool and set for at least an hour.
- Lift and trim your suncatcher.
- Create a hanging point.
- Let it air dry for a day or two to firm up.
Notes
Use adult supervision when warming the gelatin, and ensure kids are safe while handling materials.
Nutrition
- Serving Size: 1 suncatcher
- Calories: N/A
- Sugar: N/A
- Sodium: N/A
- Fat: N/A
- Saturated Fat: N/A
- Unsaturated Fat: N/A
- Trans Fat: N/A
- Carbohydrates: N/A
- Fiber: N/A
- Protein: N/A
- Cholesterol: N/A