

The kitchen is often the heart of the home, a place where hands get busy, and creativity flows. Picture this: a bustling afternoon with kids eager to craft something special. They want to make something tangible and beautiful, maybe a little keepsake to brighten your day or to give as a gift. This is where the craft of creating Cornstarch Glass Floral Hearts and Flowers becomes a fantastic solution. With simple materials and quick steps, you can guide them through a fun and engaging project that results in lovely decorations. You may also find Diy Cornstarch Glass Floral Hearts Flowers useful.

Why You’ll Love Making Cornstarch Glass Floral Hearts and Flowers

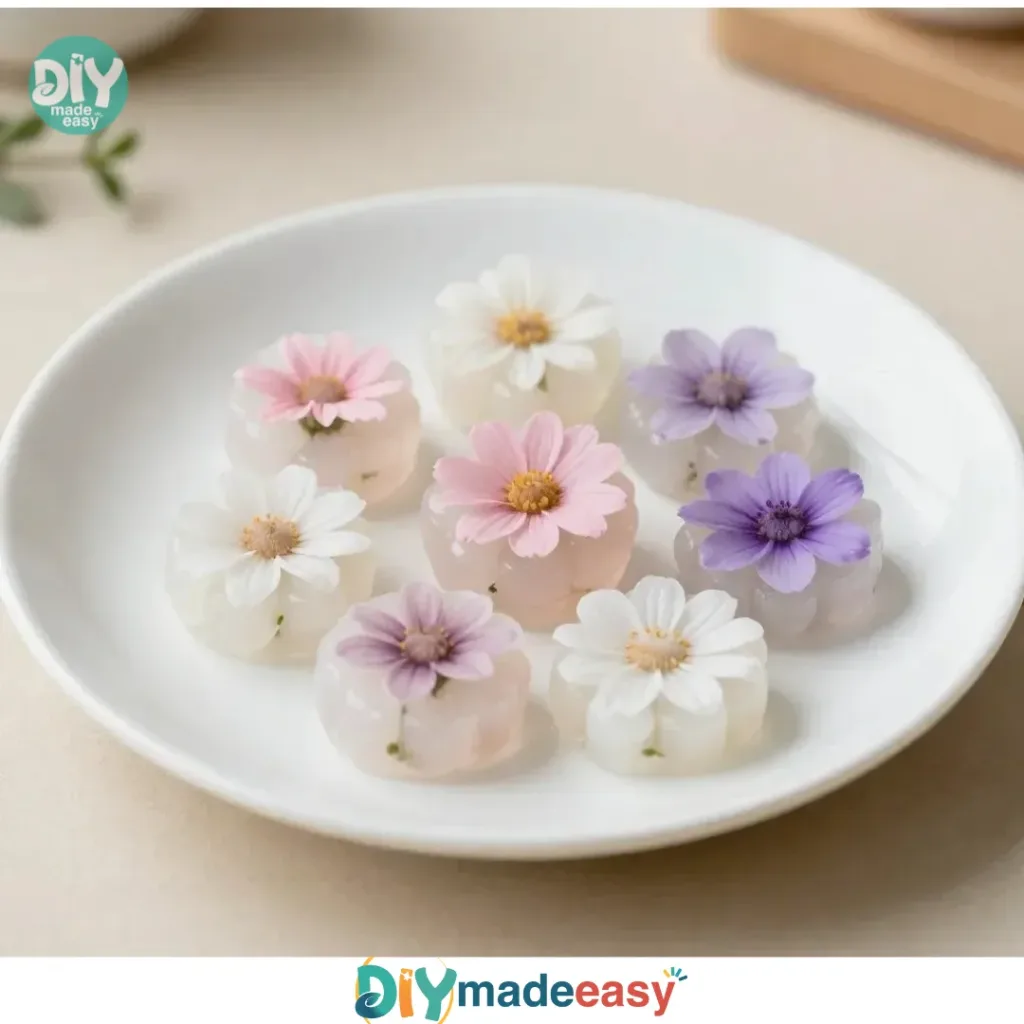
You may also find Cornstarch Bioplastic Pressed Flowers Recipe useful.
This project stands out for various reasons. First, it requires minimal preparation, making it perfect for spontaneous afternoons or days when time is tight. Just gather a few ingredients, and you’re ready to embark on a fun creative journey together. The approachability of the materials—cornstarch and water are easy to find—means you likely have everything you need right in your pantry. Additionally, the results are consistently charming, and the satisfaction from creating something that looks like glass adds an element of magic. For those who enjoy seeing the scientific principles in action, this project offers a delightful combination of art and science. You’ll witness firsthand how simple ingredients transform into beautiful, tangible art pieces. For more about the versatility of cornstarch in crafts, check out this bubble dough project which is equally engaging.
A Quick Look Before You Begin
In terms of timing, making the Cornstarch Glass Floral Hearts and Flowers is relatively straightforward. Allow about 2 to 3 hours for the shapes to dry in the oven, but the active preparation time is much shorter. It really boils down to mixing, shaping, and baking. The mess level is manageable, especially if you set up a designated workspace. You’ll only need bowls for mixing and a baking tray, making the clean-up afterward quite simple. Adult involvement may be needed during the cooking phase, especially to supervise the oven usage, but kids will enjoy the hands-on nature of the project, so they can take the lead on the otherwise straightforward steps.
Materials You’ll Need
- Cornstarch (easy to find)
- Water
- Non-stick cooking spray
- Food coloring (optional for customizing your creation)
- Optional decorative elements like glitter or dried flowers
Having these items ready will ensure a smooth process. Most of these materials are common household items, which means you can jump right into the fun without needing to run out for special supplies.
Step-by-Step Directions
-
Combine the cornstarch and water in a bowl until you achieve a smooth, malleable dough. The blend should feel soft and slightly cool to your touch, creating an inviting texture that’s perfect for shaping.
-
Lightly spray a baking sheet with non-stick cooking spray, ensuring your creations don’t stick when it’s time to remove them.
-
Use heart-shaped cookie cutters to press out shapes from the dough. Place them on the prepared baking sheet, ready for the next step.
-
If you want colored dough, mix a few drops of food coloring into it before rolling out the shapes. This is a wonderful opportunity for the kids to experiment with colors and combinations.
-
Preheat the oven to a low setting (around 175°F/80°C) and dry the shapes in the oven for 2 to 3 hours. Keep an eye on them; they should transform into pieces that resemble glass.
-
Gently remove the shapes from the baking sheet once dried; they should have a beautifully translucent appearance, capturing light in an enchanting way.
-
Optionally, apply glitter or dried flowers on top of the hearts for decoration. This adds a personal touch and makes each piece uniquely special.
-
Display your creations in a sunny window or gift them to loved ones. The joy of sharing these handcrafted beauties makes the process even more rewarding.
The Learning Behind This DIY

As you guide your kids through this crafty adventure, they will not only develop their creativity but also practice essential skills. This project enhances fine motor skills as they mix, roll, and cut the dough into shapes. It also invites them to explore scientific concepts like measuring, mixing, and the effects of heat, providing a fun way to learn through hands-on experience. As they watch the transformation from dough to glass-like creations, they gain a clearer understanding of cause and effect.
Troubleshooting Common Issues
If something doesn’t go as planned, don’t worry; adjustments can often turn a hiccup into a fun learning experience. For instance, if the dough feels too sticky, adding more cornstarch can help achieve the desired texture. If the shapes don’t dry properly, possibly due to higher humidity or oven fluctuations, try extending the baking time or changing the oven temperature slightly. Remember, ultimately, the process is about enjoying the creative flow rather than achieving perfection.
Easy Variations to Try
To keep things fresh and exciting, consider these simple modifications:
- Seasonal Themes: Incorporate seasonal elements like leaves for fall or flowers for spring, by using different shapes.
- Mix in scents: Add essential oils or spices to the dough for an aromatic twist.
- Use different molds: Instead of hearts, explore cookie cutters of varying shapes such as stars, flowers, or geometric shapes, paving the way for a themed collection.
- Collaborate on a larger project: Create a garland by stringing several hearts together, turning individual creations into a larger community art piece.
Storing or Reusing This Project
After this project, think about how to keep your creations for future enjoyment. If you plan to display them, a spot in a sunny window is perfect to showcase their glass-like qualities. However, if you want to reduce waste at the end of the project, consider storing the unused dough in an airtight container for later use. If you find that the hearts are no longer in demand, recycle them into the next round of crafting. This not only helps in cleanup but also reinforces good habits regarding reusing materials in future projects.
FAQs About Cornstarch Glass Floral Hearts and Flowers
What do I do if there’s a mess during the process?
It’s normal to have a bit of a mess when crafting, especially with kids involved. Simply lay down some newspaper or an old tablecloth for easy cleanup and keep wet wipes handy for quick clean-ups. The experience is all part of the fun.
Are the materials safe for kids?
Yes, cornstarch, water, and non-stick cooking spray are all safe for general use. However, it’s best to supervise children while using the oven; an adult should manage that part for safety.
What if I don’t have cornstarch?
If you’re out of cornstarch, you can experiment with other substitutes, like flour for a similar dough texture, although the final appearance may differ. For the next crafting session, be sure to check out this bioplastic project using cornstarch; it offers another engaging use of this versatile ingredient.
How should I store the dried hearts?
If properly dried and stored in a cool, dry place, these creations can last a long time. Consider placing them in a decorative box or on display to enjoy their beauty.
Can I reuse the dough later?
Yes! If you have leftover dough, store it in an airtight container in the fridge to keep it fresh for a few days. Just knead it again before using it.
Conclusion
Engaging in the Cornstarch Glass Floral Hearts and Flowers project is a wonderful way to nurture creativity and forge meaningful memories with your loved ones. These delightful creations can be enhanced with a touch of personal flair, transforming them into cherished gifts or decor. For those interested in similar artistic endeavors, explore the charming Heart Powder Box to find unique crafting supplies or delve into the exquisite painting options within the In the Garden Collection by Zuri Designs. Happy crafting!
PrintCornstarch Glass Floral Hearts and Flowers

A fun and engaging project to create beautiful cornstarch glass floral hearts and flowers with kids, combining art and science.
- Prep Time: 15 minutes
- Cook Time: 180 minutes
- Total Time: 195 minutes
- Yield: 8 creations
- Category: Craft
- Method: Baking
- Cuisine: N/A
- Diet: N/A
Ingredients
- Cornstarch
- Water
- Non-stick cooking spray
- Food coloring (optional)
- Optional decorative elements (glitter or dried flowers)
Instructions
- Combine the cornstarch and water in a bowl until you achieve a smooth, malleable dough.
- Lightly spray a baking sheet with non-stick cooking spray.
- Use heart-shaped cookie cutters to press out shapes from the dough and place them on the prepared baking sheet.
- If desired, mix in food coloring before rolling out shapes.
- Preheat the oven to 175°F (80°C) and dry the shapes for 2 to 3 hours.
- Gently remove the shapes once dried, ensuring they have a translucent appearance.
- Optionally, apply glitter or dried flowers for decoration.
- Display your creations in a sunny window or gift them to loved ones.
Notes
Adult supervision is recommended during the baking process. If the dough is sticky, add more cornstarch.
Nutrition
- Serving Size: 1 piece
- Calories: 50
- Sugar: 0g
- Sodium: 0mg
- Fat: 0g
- Saturated Fat: 0g
- Unsaturated Fat: 0g
- Trans Fat: 0g
- Carbohydrates: 12g
- Fiber: 0g
- Protein: 0g
- Cholesterol: 0mg