

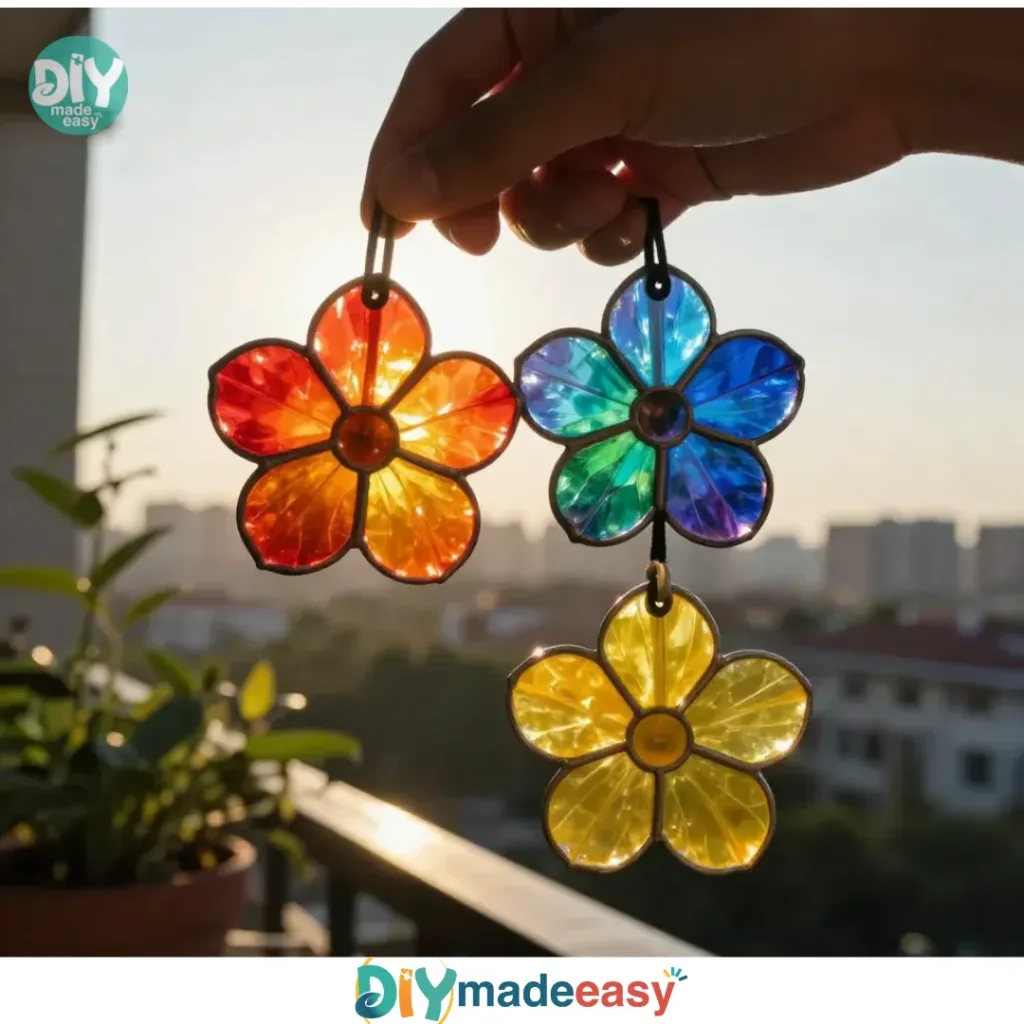
Broken crayons turned into glowing rainbow flowers. This is the prettiest way to recycle old art supplies. Imagine a busy afternoon when you hear the familiar sound of crayons clattering to the ground. Your kids are eager to create, but you notice that half of their art supplies have seen better days. Instead of tossing those broken crayons into the trash, how about transforming them into vibrant, glowing rainbow flowers? This simple project not only sparks creativity but also teaches the kids about recycling and the joy of making something new from what you already have. With just a few easy steps, you can turn their art mishaps into a beautiful centerpiece for your home.

Why This Broken crayons turned into glowing rainbow flowers Works So Well

This project is a great example of low-prep creativity. You don’t need fancy supplies or complicated steps to have fun. What makes this activity approachable is its simplicity. You can gather your materials in minutes and jump right into creating something lovely without a long setup time.
The glow from the crayons adds an element of excitement for kids. Who wouldn’t want to see their art project light up? Since you’re using broken crayons, it teaches kids about sustainability, making this not only a fun activity but also a meaningful one.
This project fits into real-life schedules, too. Whether you have a free afternoon or just an hour between activities, it’s manageable and satisfying. Plus, it’s a great way for kids to enjoy some screen-free time. When completed, the flowers can brighten up a room or make a thoughtful gift.
A Quick Look Before You Begin
Making glowing rainbow flowers from broken crayons is straightforward. You’ll need some time to gather your materials and let the crayons melt in the oven, but overall, it doesn’t take long. The cleanup is minimal, just some crayon remnants in the muffin tins and whatever surfaces you use.
You will need to supervise the melting process since it involves an oven, which means some adult involvement, especially when it comes to transferring hot items. The kids will love pouring the melted crayon into molds, but it’s nice to have you around for reassurance and safety.
Discover Easy Kids Activities
Looking for simple, fun ideas for kids? Explore our Low Prep Kids Activities and find quick projects that spark creativity without long prep time.
Materials You’ll Need
- Broken crayons (any colors will work)
- Silicone molds (flower-shaped preferred, but any shape works)
- Oven-safe muffin tin (if you don’t have silicone molds)
- Baking sheet (to catch any spills)
- Adult helper (for safety)
These materials are easy to find at home. Broken crayons are often overlooked, but they’re perfect for this project. Silicone molds are great because they allow for easy removal of the finished flowers. If you don’t have those, a muffin tin works just as well.
Step-by-Step Directions
- Gather Your Broken Crayons
Collect all your broken crayons. You can sort them by color if you want to create specific flower hues or blend them for a rainbow effect. - Prepare Your Molds
Place your silicone molds on a baking sheet for stability. This helps prevent spills. If you’re using a muffin tin, make sure it’s clean. - Preheat the Oven
Turn your oven to 200 degrees Fahrenheit. This low temperature will melt the crayons without burning them. - Peel and Chop Crayons
Remove the paper from each crayon. This can be a fun task for kids. Then, break the crayons into small pieces, about one inch or smaller. - Fill the Molds
Fill the molds with crayon pieces. Fill them about halfway to allow room for melting and expansion. It’s okay to mix colors for a fun surprise! - Melt the Crayons
Carefully put the baking sheet into the preheated oven. Set a timer for about 10-15 minutes. Watch closely until the crayons are fully melted. - Cool and Remove
Once melted, take the baking sheet out of the oven (this is where adult supervision is key). Allow the melted crayons to cool completely, which may take about 10-15 minutes. - Pop Out the Flowers
Once cool, gently pop the crayons out of the molds. If they stick, you may need to freeze them for a couple of minutes before removing. - Admire Your Creations
Enjoy the glowing rainbow flowers! You can place them in a sunny spot to see how they glow.
The Learning Behind This DIY

This craft not only focuses on creativity but also taps into some interesting science concepts. Kids witness a physical change as solid crayon turns into a liquid and then back into a solid. They’ll see firsthand how heat changes the state of materials, and it’s captivating to watch.
The project also engages fine motor skills. From peeling the crayons to pouring melted wax into molds, children practice coordination. They learn to handle materials carefully, promoting their dexterity.
Moreover, this activity strengthens cause-and-effect understanding. If crayons overheat, they can burn; if you pour too much, the flowers won’t hold their shape. This trial-and-error approach encourages critical thinking and problem-solving.
Troubleshooting Common Issues
If something doesn’t go as planned, don’t worry. Common problems could include crayons not melting fully. This can happen if the oven temperature is too low or if the crayon pieces are too large. If that happens, just pop them back in for a few more minutes.
Another issue could be sticking while removing the crayons from molds. If this occurs, try chilling the mold in the freezer for a few minutes. This will loosen the crayons, making it easier to get them out without breaking.
If the colors appear dull, it might be due to using too many dark colors. Mixing bright colors can help ensure your flowers have a vibrant glow.
Easy Variations to Try
Here are some simple ways to change it up:
- Use Cookie Cutters: Instead of molds, fill cookie cutters on a baking sheet for unique shapes.
- Add Glitter: Before pouring in the crayon, sprinkle some glitter into the molds for extra sparkle.
- Seasonal Themes: Create flowers in spring colors or festive shapes for holidays.
- Bigger Designs: Combine molds to make larger flowers or shapes.
- Use Different Materials: Try other crayons or colored pencils for varied effects.
These ideas allow you to personalize the project, making it suitable for different ages or occasions.
Storing or Reusing This Project
After your flowers are complete, storing them is crucial. Place them in a cool, dry place to prevent melting. If you want to reuse the materials, these crayons can easily be melted down again and reshaped.
Cleaning up is simple. The crayon residue can easily be wiped out of silicone molds. If there are leftover bits, a soft cloth or paper towel should suffice. For muffin tins, warm soapy water will help remove any stickiness.
By doing this project, you reduce waste and discover new ways to enjoy old supplies.
FAQs About Broken crayons turned into glowing rainbow flowers
What if my kids are messy during this project?
Mess is part of the fun! Prepare your workspace. Lay down old newspapers or an easy-to-clean tablecloth. This way, you keep spills manageable.
Are melted crayons safe for kids?
Yes! Crayons are made from non-toxic materials. However, adult supervision is important when using the oven and handling melted wax.
Can we use other kinds of crayons?
Absolutely! Any wax-based crayon will work. Just avoid specialty crayons that don’t melt well.
Will my flowers glow in the dark?
The glow appears when placed in bright light but won’t shine independently in the dark. They’re still bright and fun, especially in sunny settings.
How do I store these flowers once made?
Keep them in a cool, dry place. You could even give them as gifts in small bags, wrapping them beautifully for loved ones.
A Final Helpful Note
Feeling inspired yet? Remember, this project is about enjoying the moment and creating something beautiful, not about perfection. Keep it light and fun, and don’t stress over tiny details. The process is as valuable as the result. So grab those broken crayons and start crafting those glowing rainbow flowers. You’ll feel proud of what you create together, and in no time, you’ll have a colorful display that brightens your home.
PrintBroken Crayons Turned into Glowing Rainbow Flowers

Transform broken crayons into vibrant, glowing rainbow flowers with this fun and simple DIY project that engages creativity and sustainability.
- Prep Time: 15 minutes
- Cook Time: 15 minutes
- Total Time: 30 minutes
- Yield: Varies depending on mold size
- Category: Craft
- Method: Baking
- Cuisine: N/A
- Diet: N/A
Ingredients
- Broken crayons (any colors)
- Silicone molds (flower-shaped preferred)
- Oven-safe muffin tin (if silicone molds are not available)
- Baking sheet
- Adult helper (for safety)
Instructions
- Gather your broken crayons and sort by color if desired.
- Prepare your molds by placing them on a baking sheet for stability.
- Preheat the oven to 200 degrees Fahrenheit.
- Peel the paper from each crayon and break them into small pieces.
- Fill the molds with crayon pieces, about halfway full.
- Melt the crayons in the oven for 10-15 minutes, watching closely.
- Cool the melted crayons until they are completely set.
- Pop out the flowers from the molds and enjoy!
- Admire your creations in a sunny spot to see their glow.
Notes
Supervise the melting process for safety, especially when using the oven.
Nutrition
- Serving Size: Each flower is considered one serving
- Calories: N/A
- Sugar: N/A
- Sodium: N/A
- Fat: N/A
- Saturated Fat: N/A
- Unsaturated Fat: N/A
- Trans Fat: N/A
- Carbohydrates: N/A
- Fiber: N/A
- Protein: N/A
- Cholesterol: N/A