

A busy afternoon made suddenly louder by a chorus of “Can we make something now?” is the kind of moment this project was made for. You clear a corner of the kitchen table, grab a few recycled bottles from the recycling bin, and hand over a small pair of scissors to a curious kid. In about the time it takes to steam up the kettle, you can turn that spare bottle into a neat little self watering planter that feels like a small victory for both the planet and your schedule.
DIY Self Watering Planters Made from Recycled Bottles bring quick satisfaction, teach a little hands-on science, and leave you with a useful bit of green on the windowsill. If you love quick, low-mess projects, this one fits right into a grab-and-go afternoon of making. For another simple craft to try on a different day, you might like our colorful suncatchers project here: colorful DIY bioplastic suncatchers.
Why This DIY Self Watering Planters Made from Recycled Bottles Works So Well

This project wins because it uses what you already have. A clean plastic bottle and a homemade wick combine to make a tiny ecosystem that waters itself on a gentle schedule. That simplicity makes it low-prep. You do not need special tools or long shopping lists. You probably complete setup in about 15 to 30 minutes, and then check in only occasionally.
It feels approachable because the steps match real-life attention spans. Kids can help measure soil and thread the wick. Adults can handle the sharp bits and show how the water moves from the reservoir up into the soil. The setup is reliable for small plants like herbs or succulents. It does not replace regular plant care, but it reduces the number of times you need to water, which helps busy households.
This method suits a real-life schedule. If you work long hours or travel for a weekend, these planters hold extra water so the plant does not dry out quickly. They also live comfortably on a sunny kitchen sill, a small balcony, or a school classroom table. The design keeps mess minimal because the water stays in the bottom half of the bottle instead of spreading onto your furniture.
A Quick Look Before You Begin
This activity takes about 20 minutes to set up and then a little patience while the soil settles. Expect a small bit of cleanup: soil on the table and a damp bottle now and then. Lay down a towel or a newspaper to catch spills and you will be done in two minutes.
You will want a calm adult nearby for cutting the bottle. Once the bottle is split, kids can safely do most of the rest. The mess level is low to medium depending on how many little hands join in. If you want near-zero cleanup, assemble the planting over a bin or outside on a porch.
Timing is flexible. If you have only 10 minutes, you can slice the bottle and pre-fill the reservoir. If you want an afternoon activity, add decorating time and let kids plant seeds. Either way, the project feels satisfying quickly.
Materials You’ll Need
Clean plastic bottle
common household item; clear or any size that suits your plant
Wick
this can be cotton string or a strip of old cotton cloth; prepare it as the project instruction says
Potting soil
common household item; good for herbs or small houseplants
Plant or seedling
easy substitute: herb cutting or small succulent
Water
budget-friendly; plain tap water works fine
Scissors or utility knife (optional; use adult help)
only add if an adult will cut the bottle; labeled optional for safety
Step-by-Step Directions

- Take a clean plastic bottle and slice it into two parts. The top will hold the soil and plant, while the bottom will serve as the water reservoir.
Work on a towel or newspaper to catch spills. Make the cut neatly and evenly so the top part sits stably in the bottom. You should see a clear line where the top and bottom meet. - Prepare the Wick.
Cut a length of cotton string or a strip of cloth and thread it through the neck of the top half so one end reaches the soil and the other hangs into the bottom reservoir. Make sure the wick feels damp and moves water when you pull lightly.
The Learning Behind This DIY
This project teaches a few simple science ideas in a hands-on way. The wick moves water from the reservoir up into the soil through capillary action. That is the same movement that helps plants pull water from the ground. Kids see water travel and learn cause and effect by watching the soil go from dry to damp.
Fine motor skills get a gentle workout. Cutting the bottle, filling soil, and threading the wick all encourage steady hands and careful movement. Kids learn about timing, too. They see that a few minutes of work leads to longer periods of growth and care.
You can build small lessons around the planter. Ask how high the water level can be and still feed the plant. Check moisture by touch and show how different soils hold water differently. These small experiments help kids notice patterns without pressure.

Troubleshooting Common Issues
If the wick seems dry and the soil stays dry, check that the wick reaches both the soil and the water. Sometimes the wick sits too high in the reservoir. Pull it down gently and make sure it feels wet when you dip it.
If the bottle wobbles, cut a small notch in the top half rim so it locks into the bottom better. You can also trim the top edge so the planter sits level. A stable planter reduces spills and keeps the soil from slumping.
If water moves too fast and the soil stays waterlogged, the wick may be too wide or you may have overfilled the reservoir. Replace the wick with a thinner string or raise the soil level so it contacts the wick less directly. The goal is slow steady moisture, not soaking.
If mold or a bad smell develops, you probably left the soil too wet for too long. Remove any very soggy soil, replace with fresh potting mix, and rinse the bottle. Let the soil dry a bit between refills. Good ventilation and a bit less water usually fixes the issue.
Easy Variations to Try
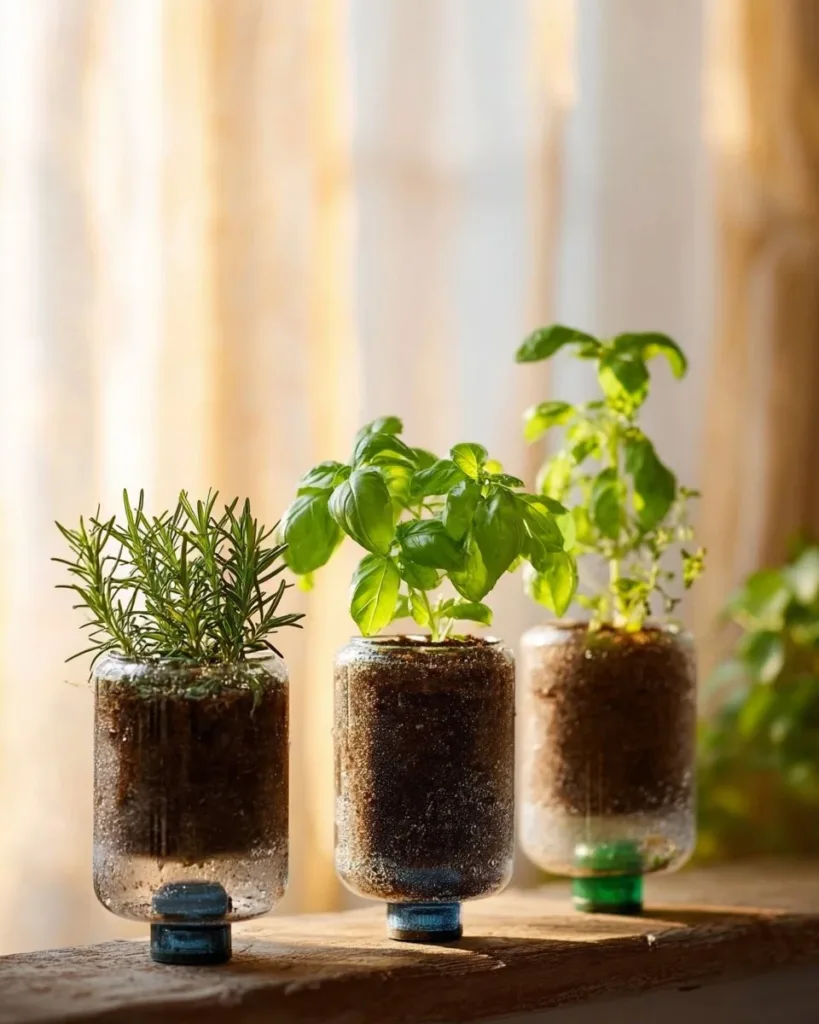
Try a herb strip for the kitchen. Use several small bottles lined up and plant different herbs in each one. That way you get a mini herb garden on the sill that waters itself for a few days. This idea works well if you like cooking with fresh leaves.
Make a little hanging planter. Use a wider bottle and attach string to the top half rim (secure with tape or tie around the neck). Hang it in a sunny kitchen corner or a sheltered porch. Keep it low enough to water from above when needed.
Use seeds instead of seedlings for a longer family project. Plant fast-germinating seeds like basil or radish and watch the daily changes. This version teaches patience and routine as kids check for sprout progress.
Decorate the outside with permanent markers or paint pens. Let each family member add a personal touch before planting. The decoration does not affect the function but makes the planters feel special and personal.
If you want more craft ideas that pair well with this project, try our colorful swirls tutorial or the crayon method for suncatchers for extra window décor. They make bright companions for your planters: colorful swirls suncatchers and crayon method suncatchers.
Storing or Reusing This Project
When a plant outgrows a bottle, reuse the bottle setup for cuttings or start new seedlings. The plastic holds up well for several cycles if you rinse it between uses. Scrub gently with warm soapy water, rinse thoroughly, and let it dry before starting again.
If you peel off decorations, wash the bottle carefully to avoid scratching paint into soil. Use a soft sponge and mild soap. Avoid bleach for painted surfaces because it can remove color and weaken plastic over time.
For storage, keep the empty bottles in a dry place out of sunlight to prevent warping. If you plan to keep your wick for reuse, launder it in hot water and let it air dry. Cotton wicks will soften over time but still work well for several uses.
FAQs About DIY Self Watering Planters Made from Recycled Bottles
Will this be too messy for young kids to help with?
I have done this with kids as young as four with supervision. Soil crumbs will happen. Lay down a towel and use a small scoop for soil to keep cleanup quick. Young children can add soil and press seeds while an adult handles cutting. If your child is especially fidgety, do the cutting and wick threading first and let them do the fun parts.
Is this safe for classroom use?
Yes, with a few rules. Have one adult make the cuts and keep scissors in a supervised area. Use washable markers for decorating and limit the amount of loose soil on desks. These planters work well for a small classroom station where children check moisture and record growth.
Can I use any bottle size?
You can, but size matters for stability and plant choice. Smaller bottles suit succulents or an herb cutting. Larger bottles hold more water and will keep plants hydrated longer. Be realistic: very tall thin bottles can tip easily. Choose a bottle that sits steady on a flat surface.
What if I want to use seeds instead of seedlings?
Seeds work fine but expect slower visible change. Keep the soil lightly moist and be patient. Seeds need gentler watering while they germinate, so watch that the wick does not keep the soil too wet. If sprouts seem drowned, remove some water and let the soil dry a little between refreshes.
How long will a wick last and can I reuse it?
A cotton wick can last several plant cycles if you wash and dry it between uses. Over time the fibers may thin, making it less effective. Replace it if it no longer moves water when you test it by dipping.
A Final Helpful Note
Remember that small projects like this are about learning and having fun, not perfection. If the first bottle wobbles or the wick needs an extra adjustment, that is part of the process. Take a deep breath and try a small tweak. Most fixes are quick and low-stress.
Give yourself permission to experiment. Plants teach patience and curiosity. Let kids make small observations, note what changed, and celebrate the little wins. You end up with a useful planter and a calm, hands-on moment that fits into a busy day.
Conclusion
If you want a detailed walk-through with extra photos, this guide offers a clear how-to: How to Build a Self-Watering Planter with a Recycled Bottle. For another friendly take with project photos and kid-tested tips, see this write-up: DIYes! Self Watering Plastic Bottle Planters.
PrintDIY Self Watering Planters Made from Recycled Bottles

Create self-watering planters from recycled plastic bottles, perfect for herbs or small plants while teaching hands-on science.
- Prep Time: 10 minutes
- Cook Time: 10 minutes
- Total Time: 20 minutes
- Yield: 1 planter
- Category: Craft
- Method: DIY
- Cuisine: N/A
- Diet: N/A
Ingredients
- Clean plastic bottle
- Cotton string or strip of old cotton cloth (Wick)
- Potting soil
- Plant or seedling
- Water
- Scissors or utility knife (optional)
Instructions
- Take a clean plastic bottle and slice it into two parts. The top will hold the soil and plant, while the bottom will serve as the water reservoir.
- Prepare the Wick by cutting a length of cotton string or cloth and threading it through the neck of the top half so one end reaches the soil and the other hangs into the bottom reservoir.
Notes
Use a towel or newspaper to catch spills. Supervise cutting with scissors.
Nutrition
- Serving Size: 1 planter
- Calories: 0
- Sugar: 0g
- Sodium: 0mg
- Fat: 0g
- Saturated Fat: 0g
- Unsaturated Fat: 0g
- Trans Fat: 0g
- Carbohydrates: 0g
- Fiber: 0g
- Protein: 0g
- Cholesterol: 0mg