

A busy afternoon, a sudden request from curious kids, and only a short stretch of time before dinner. I have sat at that spot more times than I can count and reached for a simple, satisfying project that keeps hands busy and faces excited. That is exactly when DIY CRYSTAL GARDEN: WATCH SCIENCE BLOOM! becomes a lifesaver. It sets up quickly on a kitchen towel, uses familiar kit pieces, and gives visible, slow-motion results that feel almost magical. If you want a low-prep activity that blends art and science, and that children can check on between homework and snack time, this project fits the bill and pairs nicely with other easy projects like the DIY crystal seashells recipe.
Why This DIY CRYSTAL GARDEN: WATCH SCIENCE BLOOM! Works So Well

This project keeps prep light. The kit usually comes with measured packets and a small plastic tray, so you do not need to hunt for special tools. That makes it simple to start on a weekday afternoon or during a weekend stretch when you want something that still feels special.
It stays approachable. Kids see the ingredients transform right in front of them. They mix, pour, and watch. The steps do not require advanced skills, yet the results look impressive. That balance between ease and reward helps maintain attention without pressure.
It proves reliable. With warm water and a few patient hours, the crystals form consistently. You get obvious results even if you skip a perfect measuring spoon or stir a little more vigorously than usual. The project tolerates small mistakes.
It fits real-life schedules. The active work takes only a few minutes. Then you leave the tray and check it over a day or two. That pause window works well around naps, homework, or dinner. You do not need to hover the whole time to get beautiful growth.
A Quick Look Before You Begin
This activity usually takes 15 to 30 minutes of hands-on time and then 24 to 48 hours of waiting while crystals grow. Plan to do the mixing on a protected surface and give the tray a quiet spot where pets or little siblings will not bump it.
Setup is minimal. Lay down a towel, set the tray, warm the water, and open the packets. You will want an adult present for the hot water step. The mixing itself is simple and forgiving.
Expect a medium mess level. You can avoid sticky counters by working over a towel. Spills happen when kids get enthusiastic. Wiping up warm water and powder is straightforward, but powdered mix can dust a bit, so keep the sleeve down on the packets until you are ready to pour.
Adult involvement depends on age. Young children need help with boiling or very hot water and with precise pouring. Older kids can handle most steps under light supervision and can practice measuring and timing. If you want something even more playful, try pairing this with a quick chemistry read or the hands-on salt volcano experiment to compare reactions.
Materials You’ll Need
Contents in the DIY CRYSTAL GARDEN: WATCH SCIENCE BLOOM! kit and a few common household items
Crystal growing mix packet (included in kit)
Plastic growing tray or dish (included in kit)
Measuring spoon or scoop (included in kit)
Mixing cup or beaker (included in kit)
Stirrer or wooden stick (included in kit)
Decorative base pieces such as small shapes or mock plants (included in kit)
Warm water (household)
Paper towel or tray liner (common household item)
Plastic gloves (optional, for hands-on mixing)
If your kit lists the pieces slightly differently, follow the labeling from the box. The kit usually provides the exact amounts you need so you do not have to measure by weight.
STEP-BY-STEP DIRECTIONS

- Lay out a towel on the table and place the plastic growing tray on top so spills stay contained.
- Open one packet of the crystal mix and pour it into the measuring cup that came with the kit.
- Carefully add the warm water specified by the kit to the crystal mix, then stir until the powder mostly dissolves.
- Arrange the small decorative base pieces in the tray where you want crystals to form.
- Pour the mixed solution slowly into the tray so it covers the bases and fills the shallow wells.
- Move the tray to a quiet, undisturbed spot indoors where it can sit level for the next 24 to 48 hours.
- Check after several hours; you will often see tiny seeds or fuzz forming, then larger crystals by the next day.
- When growth looks complete, gently lift out any pieces you want to save and let them dry on a paper towel.
- Dispose of leftover solution as your kit suggests, rinse the tray, and wipe the area with a damp cloth.
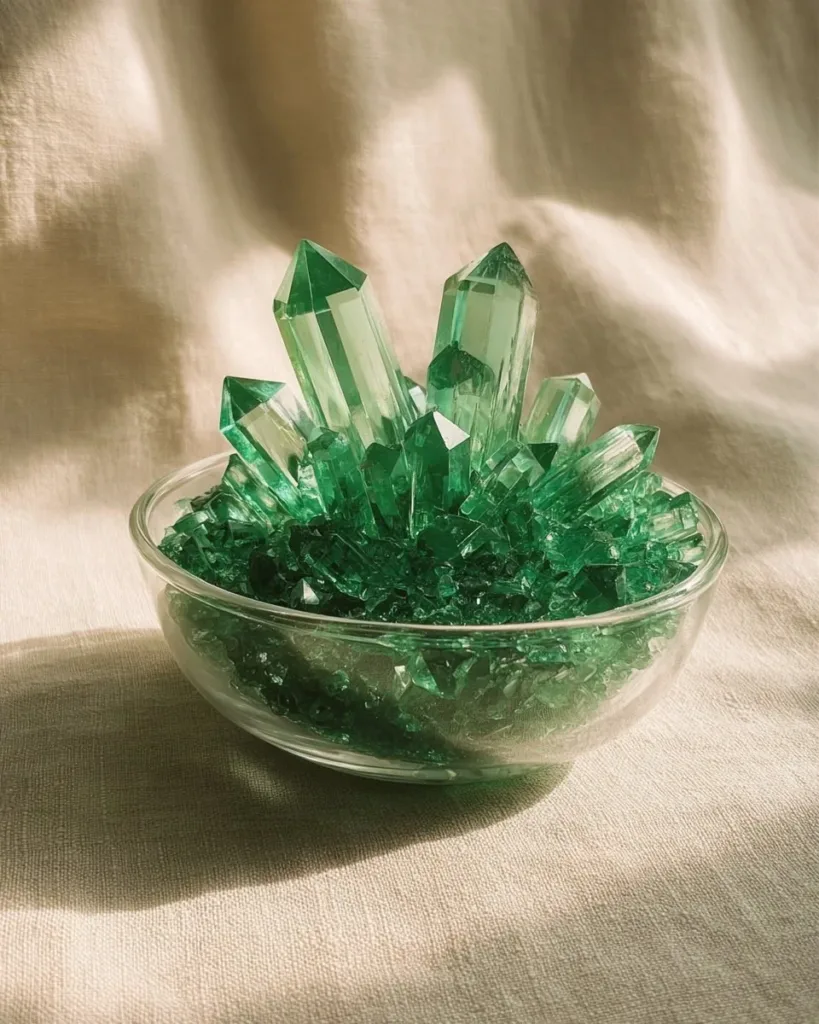
These steps follow the sequence the kit provides. You will notice a grainy texture while stirring and glassy, sparkly crystals as they grow. If you see a few bubbles after pouring, that is normal. They usually settle.
The Learning Behind This DIY

This activity teaches simple science ideas that kids grasp at once. When you mix the crystal powder with hot water, you create a solution that holds more dissolved particles than it would at cooler temperatures. As the water cools and slowly evaporates, those particles come together around tiny points to form crystals. That process is called nucleation and it leads to the sparkly shapes you watch form.
Children practice basic measurement and motor skills while scooping, pouring, and stirring. They notice cause and effect when moving the tray changes growth patterns or when adding different shapes affects where crystals form. The waiting part builds patience and gives a chance to observe slow change over time.
This exercise also supports observation skills. Kids learn to look for small cues like tiny fuzz, shinier patches, or a change in texture. Those are real scientific observations they can record or photograph each day.
Troubleshooting Common Issues
If Something Doesn’t Go as Planned
If the mix does not dissolve well, you likely used water that was not warm enough. Warm the water slightly more and stir longer. You should see the powder mostly dissolve into a clear or slightly cloudy liquid.
If crystals look fuzzy and not sparkly, the air in the room may be too humid. Move the tray to a drier place and give it more time. Fuzzy growth is still growth and often sharpens into clearer crystals with a bit more drying time.
If nothing grows after two days, check whether the tray stayed level and undisturbed. Movement can prevent proper crystal formation. Also double check you used the full amount of mix and the right amount of warm water. Small measurement errors can slow growth.
If the solution spills or splashes on hands, rinse with water. If you used gloves, remove and rinse gloves as needed. For sticky residue on the table, a damp cloth and a little soap usually cleans up the powder and water easily.
If colors look pale, you may not have stirred enough or may have used water that was too hot and caused the dye to separate. Stir gently and monitor next time with slightly less heat. Remember that results vary and even pale crystals still show the process clearly.
Easy Variations to Try
Seasonal or Creative Twists
Try color layering. Pour one colored solution and let it sit until a thin crust forms. Then pour a second color on top to create bands of color. The layers can create interesting patterns as crystals grow.
Use different decorative bases. Swap in small shells, bottle caps, or cardboard shapes to change how crystals attach and look. Some textures encourage more crystal attachment than smooth surfaces.
Make a mini terrarium display. Once crystals dry fully, arrange them in a small glass jar for a short-term display. Keep the jar open so any remaining dampness can evaporate and avoid sealing it shut.
Try smaller, faster versions for younger kids. Use a small amount of mix and water in tiny egg carton cups. They grow quicker and are easier for small hands to handle.
Combine with a seashore theme. If you enjoyed other projects, try adding a few sparkly crystal seashells alongside your garden for a combined display. See inspiration at this related project on how to use crystal molds and charms: DIY crystal seashells.
These are suggestions, not rules. Small changes teach new things and keep the process fresh.
Storing or Reusing This Project
What to Do With It After
Many crystals are fragile and do not hold up to rough handling. If you want to save pieces, let them dry completely and handle gently. Place saved pieces on a shelf away from direct sunlight and humidity.
You can reuse the plastic tray. Rinse it with warm water and mild soap, then let it dry fully before storing. Do not pour the leftover solution down a sink if your kit warns otherwise; follow the kit cleanup instructions. Usually the leftover liquid is safe to wash away with plenty of water.
If you plan to repeat the activity, label any leftover unopened packets and keep them in a cool, dry place. A zipper bag works well. Dispose of any used powdered mix that has contacted moisture.
To reduce waste, reuse decorative bases like plastic shapes and rinsable trays again and again. Use minimal single-use items during setup. Paper towels help with cleanup but try to limit them when possible.
FAQs About DIY CRYSTAL GARDEN: WATCH SCIENCE BLOOM!
Will this project make a huge mess?
You can control the mess with a simple setup. Work over a towel and keep the mix packets closed until needed. Most spills wipe away with a damp cloth. Powder can float a little while you pour, so a sleeve and a tidy surface help. I have had sprinkle moments that wiped up quickly and did not ruin the project.
Is this safe for young children?
The activity is safe with an adult nearby. The hot water step needs adult handling. The rest is fine for supervised kids. If you have very young children who might taste or touch everything, consider gloves and keep small pieces out of reach. I always make sure kids know not to eat any of the kit materials.
Can I substitute other powders or household salts?
The kit uses a specially balanced crystal mix designed for predictable growth. Ordinary table salt or baking soda can form crystals but behave differently and give mixed results. If you try substitutes, set expectations: results might be slower or less consistent. The kit aims for reliable growth on the first try.
How long do the crystals last?
Crystals can last months on display if you keep them dry and out of direct humidity. They will degrade if you leave them in a damp bathroom or a sunny windowsill. I have kept small crystal displays for months when stored gently.
What if I want faster or bigger crystals?
Big growth usually takes more solution and more time. You can experiment with slightly warmer water or a more concentrated solution following kit guidance, but do not rush the drying process. Patience gives the best shapes. If you try to speed up by drying with heat, crystals can become brittle or deformed.
A Final Helpful Note
One Last Tip Before You Go
Be flexible and kind to yourself and the kids. This project does not require perfection to feel like a success. Expect spills, excited stirring, and different-looking results each time. Those differences are exactly what makes it a real experiment and a small celebration when a shiny cluster appears.
If things go sideways, treat it as part of the process. You learn what works by trying, noticing, and adjusting. Keep cleanup simple and reuse as much as you can. Most importantly, enjoy the small moments when a child points and says, I made that.
Conclusion
If you want a how-to reference that lays out a clear, parent-friendly method for building a crystal garden at home, the guide at How to Make a Crystal Garden for a Science Project – WeHaveKids gives a helpful perspective on variations and display ideas.
If you prefer an all-in-one kit to make setup even easier, consider a trusted kit like the 4M Toysmith Crystal Garden kit on Amazon, which supplies measured materials and a tray so you can jump right in.
PrintDIY Crystal Garden: Watch Science Bloom!

A fun and educational project for kids to grow crystal gardens using a DIY kit, combining art and science.
- Prep Time: 15 minutes
- Cook Time: 0 minutes
- Total Time: 1440 minutes
- Yield: Varies (depends on size and number of crystals grown)
- Category: Craft
- Method: DIY Project
- Cuisine: N/A
- Diet: N/A
Ingredients
- Crystal growing mix packet (included in kit)
- Plastic growing tray or dish (included in kit)
- Measuring spoon or scoop (included in kit)
- Mixing cup or beaker (included in kit)
- Stirrer or wooden stick (included in kit)
- Decorative base pieces (included in kit)
- Warm water (household)
- Paper towel or tray liner
- Plastic gloves (optional)
Instructions
- Lay out a towel on the table and place the plastic growing tray on top.
- Open one packet of the crystal mix and pour it into the measuring cup.
- Carefully add the warm water specified by the kit to the crystal mix, then stir until mostly dissolved.
- Arrange the decorative base pieces in the tray where you want crystals to form.
- Pour the mixed solution slowly into the tray to cover the bases.
- Move the tray to a quiet spot indoors to sit level for 24 to 48 hours.
- Check after several hours for tiny seeds forming, then larger crystals by the next day.
- When growth looks complete, gently lift out saved pieces to dry.
- Dispose of leftover solution as your kit suggests and clean the tray.
Notes
Ideal for kids with adult supervision for the hot water step. Keep the area tidy to manage messiness during the activity.
Nutrition
- Serving Size: N/A
- Calories: 0
- Sugar: 0g
- Sodium: 0mg
- Fat: 0g
- Saturated Fat: 0g
- Unsaturated Fat: 0g
- Trans Fat: 0g
- Carbohydrates: 0g
- Fiber: 0g
- Protein: 0g
- Cholesterol: 0mg