

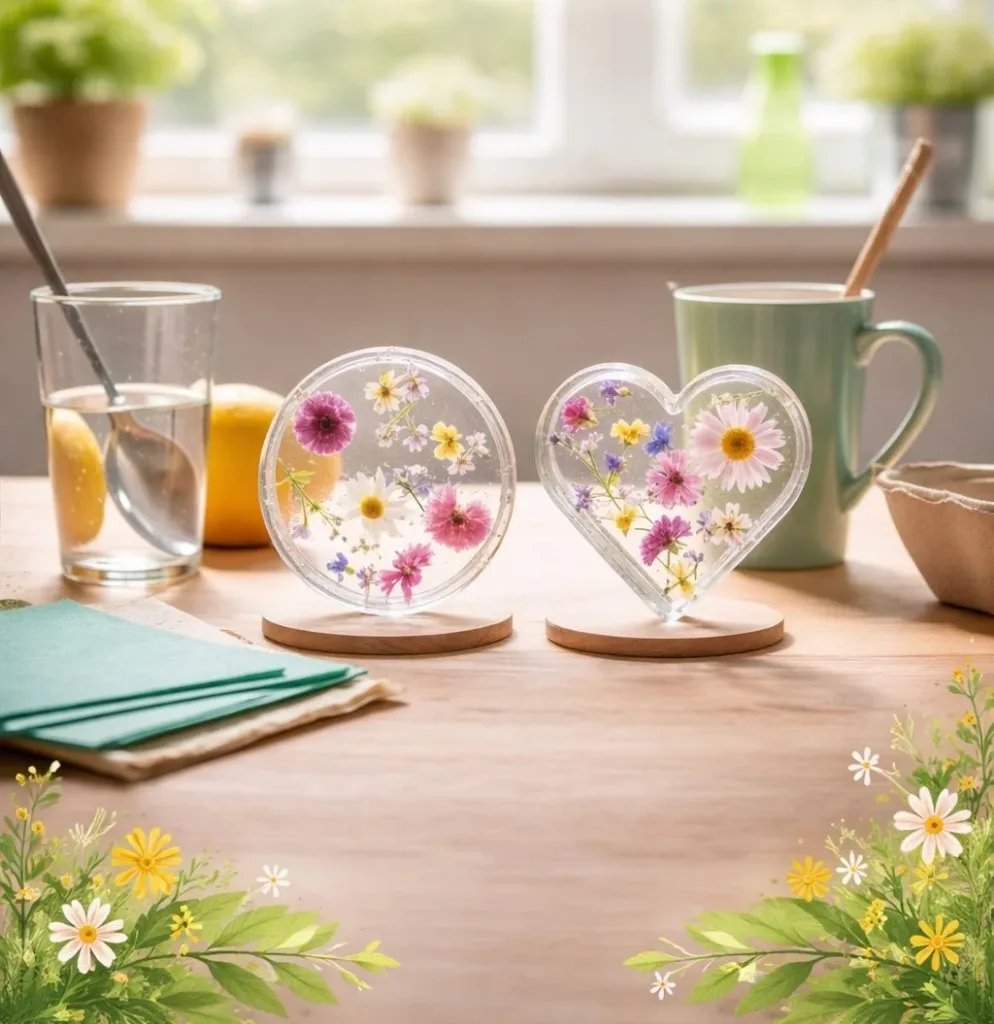
A busy afternoon, a small pile of freshly picked daisies, and kids asking to make something beautiful right now. That is how I first tried Beautiful Bioplastic Suncatchers with Natural Flowers: a quick kitchen setup, a bit of warm bioplastic, and the satisfying quiet that follows when everyone concentrates on tiny blooms. This project fits those grab-and-go moments because it uses things you already have or can make in minutes, and it gives real results without a long list of tools. If you want the exact recipe I use when I make larger sheets of bioplastic at home, see this helpful step-by-step guide for the bioplastic mixture DIY bioplastic suncatchers recipe so you feel ready before you begin.
Why You’ll Love Making Beautiful Bioplastic Suncatchers with Natural Flowers

This craft wins because it is low-prep and kind to busy schedules. You do not need fancy tools. The materials are simple and forgiving. A sheet of bioplastic softens quickly and holds tiny flowers in place, so children can see instant progress. The setup stays tidy if you lay down parchment paper and keep towels handy.
It also fits short time blocks. You can flatten flowers in a few minutes, warm the sheet while kids snack, and be pressing blooms into the bioplastic before dinner. Cleanup is quick since most mess stays on the parchment. In short, this activity respects real life: short on time, big on calm satisfaction.
A Quick Look Before You Begin
This project usually takes 30 to 60 minutes from start to finish, depending on drying and cooling time. Set aside a flat surface for cooling that will not be bumped. Expect a low to moderate mess level: small bits of petals, a warm sheet of bioplastic, and a few damp towels. Adults will want to handle the warming step and any trimming with sharp scissors.
Most of the work is hands-on and quiet. Kids can sort flowers, arrange designs, and help thread twine. Plan for a little adult supervision during heating and hole punching. If you have a short window, pick smaller suncatchers; they cool faster and feel more manageable.
Materials You’ll Need
Bioplastic sheets or homemade bioplastic mixture
Fresh or dried small flowers and leaves
Parchment paper or silicone baking mat
A smooth roller or a flat wooden spoon (optional)
Sharp scissors
A heat source (low-temp oven, dehydrator, or double boiler)
A flat, heatproof tray for cooling
Fine needle or awl for hanging hole
Cotton twine or thin ribbon (optional)
Clear craft sealant or gentle varnish (optional)
Towels and absorbent cloth
Timer and thermometer (optional)
Notes: The bioplastic sheet is the main ingredient. Fresh flowers press quickly, but dried ones work well and reduce moisture. Parchment paper keeps cleanup easy. The roller helps flatten gently but is not required. Use a low-temp oven or dehydrator for the most consistent warming. If you want a variation with colored wax effects, look at a different suncatcher method for inspiration like our blue crayon suncatchers DIY blue crayon suncatchers.
Step-by-Step Directions

- Prepare your workspace and gather materials.
Lay down parchment paper, have towels ready, and keep flowers in a shallow bowl.
Set your heat source to low and place the heatproof tray nearby. - Flatten flowers if fresh.
Press fresh blooms gently between paper towels or in a heavy book for 10 to 20 minutes.
You want them thinner and drier so they lay flat inside the bioplastic. - Gently warm the bioplastic until pliable.
Warm a small sheet slowly in a low-temp oven or dehydrator, watching for softening.
It should feel bendable, not runny; use a thermometer only if you want exact temps. - Place the softened bioplastic on parchment paper.
Move the warm sheet onto the paper on your work surface using towels if it is hot.
Smooth it lightly so it sits flat and ready for arranging. - Arrange flowers on the warm bioplastic sheet.
Place flowers and leaves face up where you want them to show.
Work quickly while the sheet still feels pliable but not steaming. - Gently press the flowers into the bioplastic.
Use a smooth roller or the back of a spoon to press petals in, avoiding air pockets.
You should see the petals sink slightly and the surface become evenly smooth. - Smooth edges and trim if needed.
Trim any rough edges with sharp scissors while the sheet stays slightly warm for cleaner cuts.
Round shapes feel friendlier and avoid sharp corners that can tear. - Allow to cool completely on a flat surface.
Move the suncatcher to a flat, heatproof tray to cool without bending.
Cooling makes the bioplastic harden clear, which can take 10 to 30 minutes. - Make a small hanging hole with a fine needle.
Once cool, push a fine needle through a corner for hanging; wiggle gently if the hole resists.
If the hole tears, trim the edge and try again slightly farther in. - Thread twine and hang your suncatcher.
Use cotton twine or thin ribbon to make a loop and hang in a sunny window.
Stand back and enjoy the light shifting through real blooms.
The Simple Science or Skills at Work

This activity blends simple chemistry and hands-on skills. Bioplastic softens when heated because its ingredients loosen and become flexible; as it cools, the molecules set and form a clear sheet that traps the flowers. You do not need to understand the chemistry to make it, but knowing that heat makes it pliable helps you time the pressing step.
Kids practice fine motor skills when they pick and place tiny petals and when they thread twine. They learn cause and effect by seeing how warming changes the sheet and how pressure flattens a petal. The slow wait while the suncatcher cools teaches patience in a gentle, visible way.
Troubleshooting Common Issues
If Something Doesn’t Go as Planned
If the bioplastic feels too stiff and cracks when you try to press flowers, it probably did not warm enough.
Return it to low heat for a short time and try again, watching closely so it does not overheat.
If flowers look cloudy or trapped air shows under petals, you may have pressed too quickly.
Lift carefully, smooth the spot with a roller, and press again gently. Small bubbles usually settle as the piece cools.
If the edge tears when you punch a hanging hole, the hole was too close to the corner.
Trim the edge slightly and make the hole a little farther in. For extra strength, tie the twine through a small loop of ribbon and glue it on top.
If colors fade or brown, fresh petals had too much moisture or the bioplastic got too hot.
Only use lightly flattened, mostly dry flowers and keep the temperature low and steady. Dried petals often hold color better.
Easy Variations to Try
Simple Ways to Change It Up
Add a tiny collage of small leaves and grasses for a nature-strip suncatcher that looks good in groups.
You can layer petals for a stained-glass look; place a thin petal on top of another small petal and press gently between layers.
Make mini suncatchers for a mobile. Use smaller shapes and string several together at varied lengths for a delicate display.
Try a memory set. Press small, meaningful items like a bit of ribbon or a tiny cut flower from a special bouquet alongside petals for keepsakes.
Seasonal change: use bright spring blooms, summer herbs, autumn leaves, or frosty-looking dried sprays in winter.
Adaptations like these keep the activity fresh and let different ages take part. Younger kids can pick and arrange; older kids can handle warming and trimming.
Storing or Reusing This Project
What to Do With It After
Store finished suncatchers flat if you keep extras. A shallow box lined with parchment paper will protect them.
If you want to reuse materials, gently remove loose petals before discarding or composting; bioplastic scraps can sometimes be warmed and flattened into a small patch, but expect visual differences.
Clean up by folding the parchment with leftover bits and tossing them, then wipe down your work area with a damp cloth.
Keep leftover, unused sheets of bioplastic flat and covered so they do not collect dust. Towels and absorbent cloth help catch spills and make the cleanup quick.
FAQs About Beautiful Bioplastic Suncatchers with Natural Flowers
Will this get very messy?
I have little kids and not much time. It stays fairly tidy if you use parchment and keep a towel under your work area. The main mess is small petals and a bit of warm bioplastic. Children can do the arranging part while an adult handles the warming and hole punching. Quick, calm cleanup with a damp cloth usually takes just a few minutes.
Is this safe for my child to do?
Yes, with supervision. The only step that needs adult hands is the warming. Keep kids away from the heat source and handle the softened sheet with towels if it is still warm. Using low temperatures reduces the risk. For hole punching, an adult should use the needle or awl.
What if I do not have ready-made bioplastic sheets?
You can make a small batch using a simple recipe, and I explain that process in more detail elsewhere if you want step-by-step guidance. For a quick start, pre-made sheets save time and are easier for little hands.
Will the flowers keep their color?
Fresh colors often soften a bit once sealed in bioplastic. Dried flowers usually keep tone better. If a petal browns, it often means it had too much moisture or the bioplastic got a little too warm. Choosing smaller, dry bits helps preserve brighter color.
A Final Helpful Note
Ending This Project on a Good Note
If you feel unsure, start small. Make one or two tiny suncatchers first so you learn the feel of the warmed sheet and the right amount of pressure. Celebrate simple success rather than perfection. The slight imperfections are part of the charm and often look best when the light catches them. Trust the process and enjoy the calm rhythm of arranging tiny natural pieces.
Conclusion
If you want another real-world example and extra tips for botanical layouts, this blog post offers a clear, walk-through look at botanical bioplastic sun catchers that pairs well with what you learned here Botanical Bioplastic Sun Catchers – Wineberry Woods. For event or group ideas, this workshop page shows how organizers use similar techniques for spring projects and community classes Petals + Plastic Art, Spring Break Workshop.
Internal resources mentioned in the article:
I included a link to the recipe for homemade sheets in the introduction to help you get started DIY bioplastic suncatchers recipe.
For shape and color ideas, see our crayon suncatcher project referenced in the materials section DIY blue crayon suncatchers.
If you want a step-by-step method using pre-made sheets and tips for bigger pieces, this guide is helpful DIY bioplastic suncatchers.
For inspiration on arranging tiny botanical clusters and crystal-like details, check our floral collage piece crystal flowers.
You are ready. Gather a few blooms, warm a sheet, and enjoy a quiet, hands-on project that fits into a busy day. Clear steps, simple materials, real results. Made easy.
PrintBeautiful Bioplastic Suncatchers with Natural Flowers

Create beautiful bioplastic suncatchers using natural flowers in a simple, hands-on project perfect for kids and busy afternoons.
- Prep Time: 15 minutes
- Cook Time: 15 minutes
- Total Time: 30 minutes
- Yield: 2 suncatchers
- Category: Craft
- Method: Crafting
- Cuisine: N/A
- Diet: N/A
Ingredients
- Bioplastic sheets or homemade bioplastic mixture
- Fresh or dried small flowers and leaves
- Parchment paper or silicone baking mat
- A smooth roller or a flat wooden spoon (optional)
- Sharp scissors
- A heat source (low-temp oven, dehydrator, or double boiler)
- A flat, heatproof tray for cooling
- Fine needle or awl for hanging hole
- Cotton twine or thin ribbon (optional)
- Clear craft sealant or gentle varnish (optional)
- Towels and absorbent cloth
- Timer and thermometer (optional)
Instructions
- Prepare your workspace and gather materials.
- Flatten flowers if fresh.
- Gently warm the bioplastic until pliable.
- Place the softened bioplastic on parchment paper.
- Arrange flowers on the warm bioplastic sheet.
- Gently press the flowers into the bioplastic.
- Smooth edges and trim if needed.
- Allow to cool completely on a flat surface.
- Make a small hanging hole with a fine needle.
- Thread twine and hang your suncatcher.
Notes
This project is low-prep and perfect for busy schedules, utilizing materials you already have. Cleanup is quick with parchment paper.
Nutrition
- Serving Size: 1 suncatcher
- Calories: 50
- Sugar: 0g
- Sodium: 0mg
- Fat: 0g
- Saturated Fat: 0g
- Unsaturated Fat: 0g
- Trans Fat: 0g
- Carbohydrates: 10g
- Fiber: 0g
- Protein: 1g
- Cholesterol: 0mg