

A busy afternoon. Snacks are out. Hands want something to do now. The Walking Water Experiment fits right into that small window of time when kids need an activity and you want something simple but satisfying. With six clear cups, a few paper towels, water, and three colors of food coloring you can set this up on the kitchen table and watch the colors travel, mix, and surprise everyone. If your kids liked other easy kitchen experiments, this one keeps the same hands-on fun with even less prep than a messy volcano, and it pairs well after something like the balloon baking soda experiment as a calm, colorful follow up.
Why This Walking Water Experiment Works So Well

This activity feels low-prep because you only need everyday items and a clear workspace. It takes minutes to set up and then mostly runs itself. That makes it perfect for quick afternoons, short attention spans, or as a waiting game while dinner cooks.
It stays approachable because the steps are predictable and visual. Kids see water move, and that immediate feedback keeps them engaged. It also gives reliable results most of the time. Even if a paper towel takes longer to wick, the cups will eventually show color movement, so you rarely end up with nothing.
Finally, the experiment fits real-life schedules. Set it up in ten minutes, check it after 30 minutes, and come back to a colorful payoff. You can leave it longer for richer colors, or wrap it up early to keep cleanup minimal. It respects a busy household and still delivers a satisfying small win.
A Quick Look Before You Begin
This experiment flows in short stages and then becomes a look-and-wait activity. Expect about ten minutes of prep and at least 30 minutes of watching. You can leave the setup for an hour or two if you want stronger color mixing.
Setup takes place on a tray or towel to catch drips, and a child can do most of the work with gentle supervision. The mess level stays low if you use a shallow tray and keep paper towels folded neatly. Food coloring can stain, so a quick shirt change or an apron helps.
You, or an older child, should be nearby while the first few minutes settle to make sure the paper towels sit securely. After that, everyone can watch, discuss, or draw what they see. This makes the activity flexible around other tasks.
Materials You’ll Need
6 clear cups or jars
common household item that shows the colors well
3 to 6 sheets of paper towels
use thicker towels for faster wicking, thinner for a slower effect
Water
tap water works fine; a measuring cup or pitcher helps pour evenly
Liquid food coloring (red, yellow, blue)
liquid food colors mix easily and give bright results
Measuring cup or pitcher (optional)
helps fill cups without spills
Tray or towel (to catch drips)
protects your table and keeps cleanup simple
Step-by-Step Directions

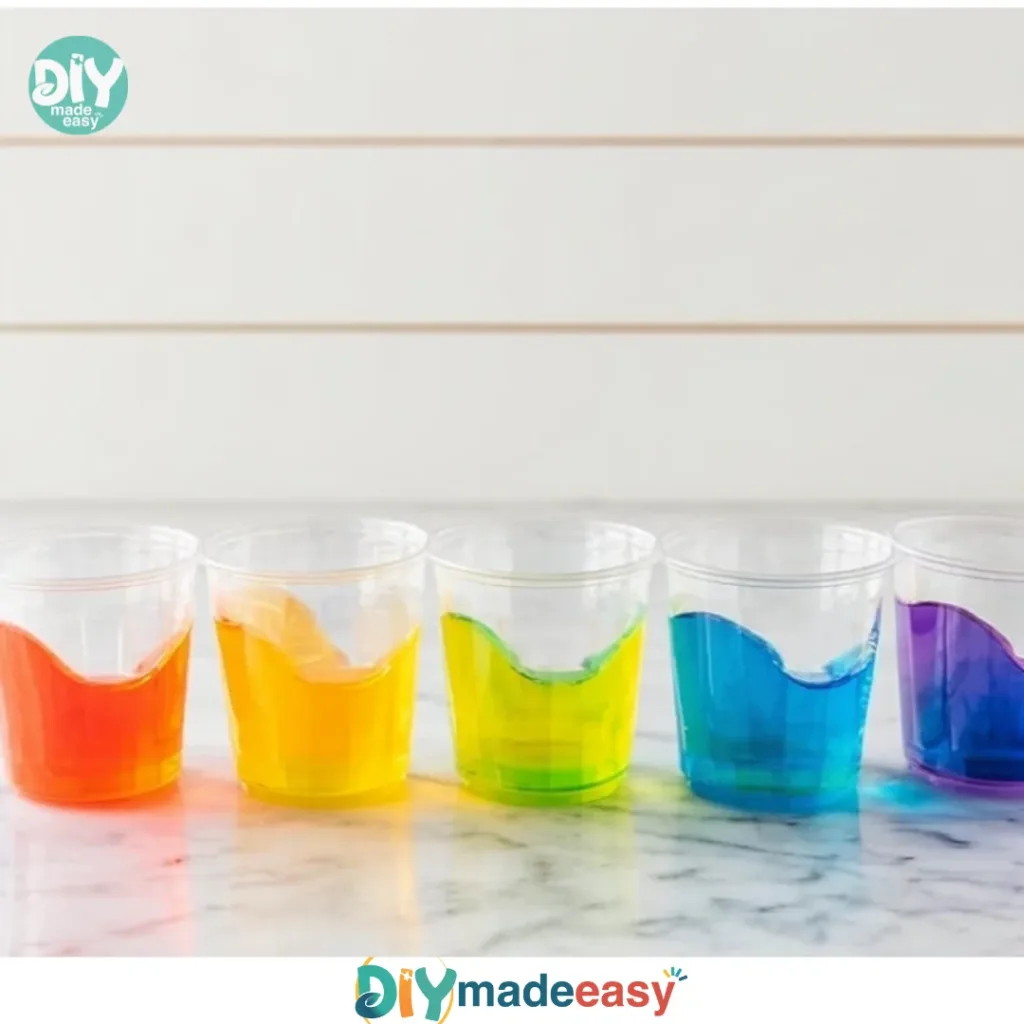
- Arrange six clear cups in a line with a small gap between each on a tray or towel.
Place them where you can watch easily. The small gap gives room for paper towel strips to hang. - Fill cups 1, 3, and 5 about two-thirds full with water, leaving cups 2, 4, and 6 empty.
Aim for a similar water level in each filled cup so the wicking happens evenly. - Add three drops of food coloring to the filled cups and stir gently.
Use red in the first cup, yellow in the third, and blue in the fifth for classic mixing. Stir just enough to distribute the color. - Fold the paper towels in half lengthwise and then in half again.
This creates narrow strips that fit neatly between the cups and wick more predictably. - Place one end of a paper towel strip into cup 1 and the other end into cup 2, repeating for the rest of the cups.
Make sure each strip touches the water and dips slightly into the empty cup so the color can transfer. - Watch the colored water move up the paper towels into the empty cups.
You will see color climb and then drip into the empty cups. Look for subtle changes at the paper towel edge and little beads of color forming. - Leave the setup for at least 30 minutes and observe color mixing.
Check every 15 minutes and take photos. After an hour, the middle cups will often show new mixed colors.
The Learning Behind This DIY

You are seeing capillary action at work. Paper towels have tiny fibers that pull water along like a string pulls beads. The water climbs against gravity because it sticks to the fibers and pulls more water along with it.
Kids practice cause and effect when they watch one cup change and understand it came from the next. They work on observation skills by noting color changes, timing, and how fast the water moves.
Fine motor skills come from folding the paper towels and placing them into the cups. That small motion builds control and attention. Letting kids stir the color and pour water also helps hand-eye coordination.
This activity also supports simple reasoning. When two colors meet in an empty cup and mix, children learn predictable color mixing and get a real-time demonstration of how red plus yellow makes orange, or blue plus yellow makes green.
Troubleshooting Common Issues
If the water does not move much, the strips might be too thick or not touching the water deeply enough. Unfold a corner and press the edge deeper into the cups.
If one paper towel moves faster than the others, check the water levels. Uneven water heights change how quickly the liquid transfers. Top up the lower filled cups a little to balance the flow.
If colors look faint, give it more time. Thicker paper towel or less color will slow the visual payoff. Add an extra drop of food coloring only if you want stronger hues, but do this before the strips soak up too much.
If food coloring dots the tray or table, blot immediately with a damp cloth. Rinse hands and use an old towel or apron next time. Remember that food coloring can stain clothes and light surfaces, so a small setup on a tray reduces worry.
If the strips sag or fall, they may be too long or the cups too far apart. Refold the towels shorter or move the cups in slightly. You want a gentle arch of the towel with both ends resting in the cups.
Easy Variations to Try
Try a shorter line of four cups with two colors to simplify setup for younger children. This short change reduces wait time and still shows the effect.
Use different color placements. Put blue and red in the outer cups and yellow in the middle to see different mixes and teach about primary and secondary colors.
Try using thicker vs thinner paper towels in the same line. Mark which strip is which and compare how fast the water travels. This small experiment shows how materials affect outcomes.
Turn it into a drawing prompt. Have kids sketch the cups at 0, 15, 30, and 60 minutes to track changes. This makes the activity last longer and builds observation skills.
For older kids, time each strip with a stopwatch and note the minutes it takes to reach the empty cup. They can compare results and make simple graphs.
If you want a related messy idea for another day, try the simple volcano experiment and then follow with this calm, colorful activity to wind down. The two make a nice pair for a science-themed afternoon and echo each other in cause-and-effect learning. See that volcano experiment here.
Storing or Reusing This Project
If you want to keep the cups for a short display, move the setup to a safe tray and set it out of direct sunlight to slow evaporation. Cover loosely with plastic wrap to prevent dust if you plan to return.
Paper towels soaked with food coloring go in the trash. Rinse cups immediately to avoid staining and make them ready for another run. A quick rinse usually removes most color; for stubborn stains, use warm soapy water.
You can reuse the cups many times but replace paper towels each run. If you like, let the kids experiment with different towel types and label which ones they used so you can reuse the clear jars as teaching tools.
For minimal waste, use washable containers and limit extra materials. Keep only what you need on the tray and tidy up before the next activity. That keeps this experiment fast and family-friendly.
FAQs About Walking Water Experiment
Will this make a big mess?
I worry about dyed water on the table.
It usually stays tidy if you use a tray or towel and fold the paper towels so they sit cleanly between cups. Small drips happen when the towels first soak. Blot spills right away with a damp cloth. If you expect fidgety kids, set the whole tray on a washable surface or outside.
How old should kids be to try this?
Young preschoolers enjoy watching the colors and helping with simple steps if you help fold the paper towels and pour the water. Around age four they can do parts of it with supervision. Older kids can manage the whole setup themselves and take measurements or drawings. Stay nearby the first few minutes so the strips sit properly.
Can I use powdered food coloring or paint?
Liquid food coloring works best because it dissolves instantly and travels easily. Powdered colors may not dissolve well and could clog the towel fibers. Paints could be thicker and will not wick like water. For safe, clear results, stick to liquid food coloring.
What if the colors don’t mix into pretty new colors?
Sometimes the colors blend slowly or look muddy if you use too much dye or shallow water. If the result looks off, refill and try with smaller amounts of food coloring. Expect variation and treat it as part of learning. Often a second run with adjusted amounts gives the bright, clean mixes you want.
How long can I leave it before cleaning up?
Thirty minutes gives a good result, but leaving it an hour or two deepens colors. Avoid leaving it overnight near pets or small children. Rinse cups soon after to prevent lingering stains and toss used towels.
A Final Helpful Note
This is one of those projects that rewards patience. The setup is short, and the payoff builds with time. If you want a quick result, check at 30 minutes. If you can wait, the colors grow stronger and the mixing looks even more like a rainbow. Stay flexible, keep the mood light, and celebrate what works. If one strip doesn’t behave, try again with a slightly different towel or water level. It all counts as learning and good table time.
Conclusion
I hope this makes your next busy afternoon easier and more colorful. For a gentle roundup of the same idea and more photos to inspire placement and color choices, see the Rainbow Walking Water Science Experiment for Kids. If you want a classroom-ready explanation and extra tips about the capillary action behind the scenes, check the Colorful Capillary Action “Walking Water” | STEM Activity.
PrintWalking Water Experiment

A fun and colorful science experiment for kids that demonstrates capillary action using simple household items.
- Prep Time: 10 minutes
- Cook Time: 30 minutes
- Total Time: 40 minutes
- Yield: 1 experiment 1x
- Category: Science Experiment
- Method: Demonstration
- Cuisine: N/A
- Diet: N/A
Ingredients
- 6 clear cups or jars
- Water (tap water works fine)
- Liquid food coloring (red, yellow, blue)
- 3 to 6 sheets of paper towels
- Tray or towel (to catch drips)
- Measuring cup or pitcher (optional)
Instructions
- Arrange six clear cups in a line with a small gap between each on a tray or towel.
- Fill cups 1, 3, and 5 about two-thirds full with water, leaving cups 2, 4, and 6 empty.
- Add three drops of food coloring to the filled cups and stir gently.
- Fold the paper towels in half lengthwise and then in half again.
- Place one end of a paper towel strip into cup 1 and the other end into cup 2, repeating for the rest of the cups.
- Watch the colored water move up the paper towels into the empty cups.
- Leave the setup for at least 30 minutes and observe color mixing.
Notes
Use thicker paper towels for faster wicking and thinner for a slower effect. Ensure a gentle arch of the towel with both ends resting in the cups.
Nutrition
- Serving Size: N/A
- Calories: 0
- Sugar: 0g
- Sodium: 0mg
- Fat: 0g
- Saturated Fat: 0g
- Unsaturated Fat: 0g
- Trans Fat: 0g
- Carbohydrates: 0g
- Fiber: 0g
- Protein: 0g
- Cholesterol: 0mg