

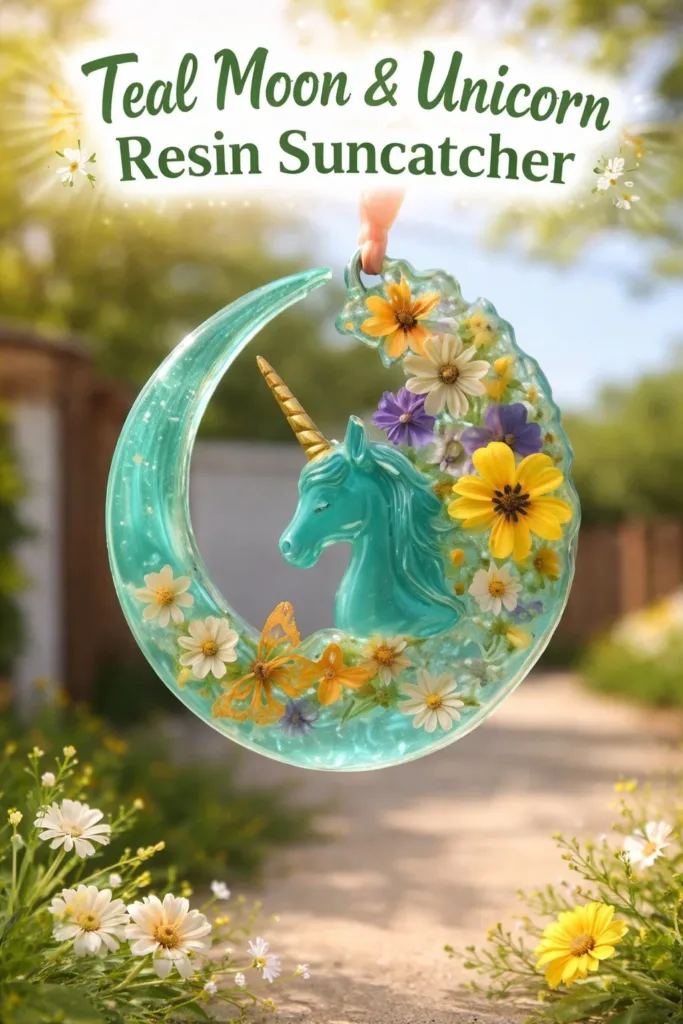
A busy afternoon and a sudden craft craving can feel like a small rescue mission. Maybe the kids just finished snack time and want something sparkly to make, or you need a calming, short project that still looks special. The Teal Moon & Unicorn Resin Suncatcher fits that moment perfectly.
It takes only a few household tools, a tiny charm, and a little focused time to make something that catches light and makes everyone smile. If you like the idea of simple, satisfying crafts that feel a bit magical, this one sits right between an easy kitchen recipe and a small science experiment. For another kid-friendly suncatcher idea that uses recycled crayons and similar calm steps, see this example of crayon suncatchers in blue hues to compare textures and simplicity.
Why You’ll Love Making Teal Moon & Unicorn Resin Suncatcher

This project works well because it keeps prep and mess low. You use a single silicone mold and one pourable material, so cleanup stays simple. You do not need elaborate tools or long lists of supplies. That makes it easy to start between errands, after school, or on a quiet afternoon.
It is approachable for adults who want to guide kids and for teens who want to try something more grown-up. The steps move at an even pace. You mix, tint, pour, and watch things set. That pace fits real life. You can pause between layers or return later while the resin cures.
It is reliable because epoxy resin behaves predictably when you follow basic rules. Measure carefully, stir long enough, and keep the piece dust-free while it cures. Those three rules usually give a clear, shiny finish. The result feels professional even when you keep it simple.
The suncatcher also rewards small choices. A tiny tilt of the charm, a pinch of mica, or a thin colored layer changes the final look. Those small creative decisions let you personalize without adding complexity.
A Quick Look Before You Begin
This activity takes a focused start and then patience. Expect about 10 to 20 minutes of active work and several hours to a full day of curing, depending on your resin. Plan for a calm surface to leave the piece flat and undisturbed while it sets.
Setup is straightforward. Lay wax paper, gather cups and stir sticks, and keep gloves and a respirator handy. You will stir resin slowly for a few minutes. That step needs attention more than speed.
Mess level stays low if you use a wax paper or silicone mat. Resin can drip, but it wipes up while wet. Have a little isopropyl alcohol or paper towels nearby. If you want a child-friendly alternative for the look without resin, try a no-heat craft like laminated stickers, but remember the shimmer and transparency come from resin.
Adult involvement matters for safety and for the mixing step. A calm adult can let a child place the charm or add mica. If a child will pour, supervise closely. For more ideas on simple, kid-friendly light crafts that build similar skills, check this no-curl swirled heart suncatchers article for low-prep variations and gentle guidance.
Materials You’ll Need
Clear epoxy resin and hardener (1:1 or per brand’s instructions)
Note: The main ingredient. Follow the brand ratio exactly.
Teal resin pigment or mica powder
Note: A tiny pinch goes a long way. Mica gives shimmer.
Silicone crescent moon mold
Note: Flexible and easy to release.
Tiny unicorn charm or small unicorn sticker sealed in clear tape (optional)
Note: Use a sealed sticker if you want flat embellishment.
Mixing cups
Note: Disposable cups make cleanup easy.
Stir sticks
Note: Use wooden or plastic sticks; one per mix.
Disposable gloves
Note: Nitrile works well and keeps hands clean.
Small kitchen torch or lighter
Note: Optional for popping bubbles. Use carefully.
Toothpicks or tweezers
Note: For small placement adjustments.
Fine sandpaper or sanding block
Note: For smoothing edges after curing.
Thin cord or jewelry chain and small jump ring
Note: For hanging the finished suncatcher.
Wax paper or silicone mat
Note: Protects your table and keeps things tidy.
Fan for air circulation (optional)
Note: Helps ventilate; never aim directly at curing resin.
Respirator rated for organic vapors (if in small space)
Note: Use when you cannot open windows or when you have sensitive lungs.
These items focus on what you need. They keep the project simple and budget-friendly. Many are common household pieces or easy to buy without specialty gear.
Step-by-Step Directions

- Prepare your workspace with wax paper and set all materials within reach.
Put on gloves and a respirator if necessary.
Open windows for ventilation and double-check everything before mixing. - Measure resin and hardener into a clear mixing cup.
Stir slowly for three minutes until clear and even.
Watch for streaks and scrape the sides and bottom as you mix. - Add a tiny pinch of teal pigment and stir until smooth.
Start with a little; you can always add more for a deeper color.
Aim for a soft, translucent teal rather than opaque. - Pour a thin base layer into the crescent mold.
Let sit to release bubbles for a few minutes.
This thin layer gives a stable base and helps anchor the charm. - Place the unicorn charm where desired in the resin.
Use toothpicks or tweezers to adjust position gently.
If using a sticker, seal it in clear tape first to keep it dry. - Pour a thicker layer to cover the charm, pouring slowly to reduce bubbles.
Pour from a low height and in one steady stream.
If bubbles appear, pass a light flame briefly or wait for them to pop. - Add layers of mica or flakes for depth if desired.
Drop tiny amounts in different spots, not all at once.
Layering creates shimmer as the sun hits different depths. - Let cure flat and undisturbed according to resin instructions.
Cover to keep dust away and avoid moving the mold.
Curing times vary; check the brand for full cure time. - Remove from the mold and sand edges if necessary.
Use fine sandpaper to smooth any rough bits gently.
Drill or compress a small hole and insert a jump ring if needed. - Hang/display in a well-lit area to enjoy the effects of light.
Use thin cord or a small chain and secure the jump ring.
Watch the teal glow and tiny unicorn catch the sun.
Skills This Activity Supports

This project teaches simple cause and effect. Children see that mixing thoroughly leads to a clear cure. They learn that stirring too fast makes bubbles and that letting layers sit helps them calm down.
Fine motor skills get practical practice. Picking up a tiny charm with tweezers and placing it precisely builds hand-eye coordination. Sanding edges later gives a chance to practice steady pressure.
Observation skills grow too. Kids watch how light passes through resin and how mica shifts tone. That observation builds a quiet curiosity about materials and light.
There is a bit of basic chemistry in plain terms. Resin hardens when mixed. It changes from pourable to solid based on the correct ratio and proper mixing. You do not need to explain details to younger children. Just say the resin needs time and a careful start.
Making the suncatcher also practices patience. The mixing and pouring are quick. The waiting time teaches that some good things take a bit of time to finish.
Troubleshooting Common Issues
If the resin looks foggy or tacky after the expected cure time, it likely did not get mixed thoroughly or the ratio was off.
Fix: Gently remelt the surface with a warm environment or follow the brand instructions for re-coating. If tacky persists, a thin top coat mixed correctly often completes the cure.
If bubbles keep rising after pouring, try these quick fixes.
Use a small torch or lighter briefly across the surface, moving in a steady sweep.
You can also blow gently with a fan from a distance or wait for small bubbles to break on their own.
If the charm floats or sinks unexpectedly, adjust your technique next time.
Place the charm on a thin base layer and let that layer tack up a bit before moving the charm.
If it shifts while wet, remove it with tweezers and reposition, or add a small drop of resin under it to anchor.
If dust lands on the curing piece, cover it with a lightweight box or a large container.
Work in a clean area, and check the cover does not touch the surface.
Light dust can sometimes be sanded away after cure.
If edges feel sharp after demolding, sand them gently with fine sandpaper.
Move in small circles and test frequently.
Finish with a light polish with a soft cloth if you want extra shine.
Easy Variations to Try
Try a pale ombre teal by mixing slightly different strengths of pigment in two cups.
Pour the paler mix first, then slowly add the darker mix for a soft gradient.
This change adds depth without extra tools.
Swap the unicorn charm for a flat sealed sticker or a pressed flower.
Seal stickers in clear tape to protect them from resin.
Pressed flowers need a light precoat to prevent bleeding color.
Add tiny iridescent flakes or star-shaped glitter in separate spots.
Drop them in with tweezers to control placement.
Keep glitter sparse for a delicate, not overpowering, shimmer.
Make a set instead of one piece by pouring two smaller crescents.
Vary the mica placement so each suncatcher is similar but unique.
These make charming gifts or matched decor.
Try a hanging mobile by attaching three crescent suncatchers to one chain.
Vary their heights for a playful movement when hung.
This idea works well for older kids with adult help.
For another creative take that uses light and simple steps for a different material, see our glow-in-the-dark rock recipe here: glow-in-the-dark moon rocks.
Storing or Reusing This Project
Store leftover resin in a cool, dry place and use it soon.
Unopened resin has a long shelf life, but mixed resin cures and then becomes unusable.
Label any leftover resin with the date and do not pour cured chunks back into new mixes.
Clean tools while the resin is wet.
Use paper towels and isopropyl alcohol to wipe cups and sticks.
For hardened bits, you often need to cut them away or let them cure and then sand.
Keep molds on a flat shelf when not in use.
Silicone molds can gather dust; store them in a sealed box or a resealable bag.
Clean with warm soapy water and dry fully before the next use.
If you want to reuse charms, remove them carefully with pliers after curing.
Tiny metal charms can often be reused.
Stickers and tape usually do not survive the demolding.
Label the finished suncatcher if you gift it.
Write the maker and date on a small tag.
That makes a lovely keepsake and helps track when it was made.
FAQs About Teal Moon & Unicorn Resin Suncatcher
Will this project make a big mess at home?
It can stay neat when you prepare well. Lay wax paper or a silicone mat under your work and use disposable cups. Wipe spills immediately with alcohol while wet. Expect a little cleanup, but nothing that needs special tools.
Is this safe for kids?
What age is best? Resin needs adult handling for mixing and pouring. Children can safely help with placing charms, adding mica, and sanding after the piece cures. I find that ages 8 and up work well with close supervision. Use a respirator or work outdoors if you have little ones around.
What if I do not have a real unicorn charm?
A small sticker sealed in clear tape works fine for a flat look. You can also use any small charm you already have. I have used tiny beads and sequins for a similar effect. Be honest about texture: 3D charms will cast small shadows; flat stickers sit smooth.
How long before I can hang it?
You can usually handle the piece for hanging after the resin reaches a firm cure, often 24 to 48 hours depending on the product. For full hardness, follow the resin brand instructions. If you hang it too soon, the charm can shift or the surface can dent.
What if my finished piece has a cloudy layer or dust?
A thin cloudy band often comes from not mixing long enough or from pouring in cooler air. For dust, sand lightly and add a thin clear top coat to re-seal. These are normal steps. I have fixed cloudy tops with a light recoat many times with good results.
A Final Helpful Note
Trust that small, careful steps get the best results. You do not need perfect tools. A simple kitchen torch, a pair of tweezers, and a small charm make a lovely suncatcher. If something moves or a bubble appears, it rarely ruins the piece. You can correct little things and still end up with a joyful, display-ready crescent.
Give yourself time to enjoy the process. Mixing slowly, tucking the charm in place, and watching the teal settle teaches a quiet kind of patience. That calm focus is part of why this project works so well for busy afternoons or a rainy day. Make one, then try a second with a tiny twist. You will learn something with each piece and keep the mess small.
Conclusion
If you like handmade inspiration or want to compare how different artists style a crescent moon charm, you might enjoy a professionally made example like this Handmade Resin Crescent Moon & Unicorn Sun Catcher to see one possible finish and presentation.
If you need more mold options or want a different silicone shape, this crescent moon silicone mold selection offers a few sizes and depths that work well for similar suncatcher projects.
Happy crafting. Keep it simple, keep it safe, and enjoy watching your teal moon sparkle in the light.
PrintTeal Moon & Unicorn Resin Suncatcher

Create a magical teal moon and unicorn resin suncatcher that’s perfect for a fun craft project with kids or a calming afternoon activity.
- Prep Time: 20 minutes
- Cook Time: 0 minutes
- Total Time: 720 minutes
- Yield: 1 suncatcher
- Category: Crafts
- Method: Crafting
- Cuisine: N/A
- Diet: N/A
Ingredients
- Clear epoxy resin and hardener (1:1 ratio or per brand’s instructions)
- Teal resin pigment or mica powder
- Silicone crescent moon mold
- Tiny unicorn charm or small unicorn sticker sealed in clear tape (optional)
- Mixing cups
- Stir sticks
- Disposable gloves
- Small kitchen torch or lighter (optional)
- Toothpicks or tweezers
- Fine sandpaper or sanding block
- Thin cord or jewelry chain and small jump ring
- Wax paper or silicone mat
- Fan for air circulation (optional)
- Respirator rated for organic vapors (if in small space)
Instructions
- Prepare your workspace with wax paper and set all materials within reach.
- Put on gloves and a respirator if necessary.
- Measure resin and hardener into a clear mixing cup and stir for three minutes until clear.
- Add a tiny pinch of teal pigment and stir until smooth.
- Pour a thin base layer into the crescent mold and let sit to release bubbles.
- Place the unicorn charm where desired in the resin.
- Pour a thicker layer to cover the charm slowly to reduce bubbles.
- Add layers of mica or flakes for depth if desired.
- Let cure flat and undisturbed according to resin instructions.
- Remove from the mold, sand edges if needed, and attach a jump ring if required.
- Hang/display in a well-lit area to enjoy the sun’s effects.
Notes
Cleanup is simple with disposable materials; keep a clean workspace using wax paper or a silicone mat.
Nutrition
- Serving Size: 1 suncatcher
- Calories: 0
- Sugar: 0g
- Sodium: 0mg
- Fat: 0g
- Saturated Fat: 0g
- Unsaturated Fat: 0g
- Trans Fat: 0g
- Carbohydrates: 0g
- Fiber: 0g
- Protein: 0g
- Cholesterol: 0mg