

A busy afternoon, the oven cooling down, and two kids asking for something to do right now. That small moment makes this Sugar Crystal Experiment perfect. It only needs a few common kitchen items, a short time at the stove, and a patient place to leave a jar alone.
I remember a Tuesday when I mixed hot water and sugar with my seven year old, watched the steam curl up, and then walked away to make snacks while tiny crystals quietly began to form overnight. If you want an easy, hands-on activity that feels like real magic without a lot of prep, this experiment fits the bill. For another quick kitchen science you can set up in minutes, check out this simple balloon baking soda experiment for a different kind of fizz and fun: balloon baking soda experiment.
Why This Sugar Crystal Experiment Works So Well

This project works because it uses things you already have and follows a gentle, repeatable process. Heating water and dissolving sugar gives you a clear solution that wants to become solid again. When the solution cools slowly, sugar molecules find each other and lock into place on the string. That slow change is what makes neat crystals form.
It feels low-prep because you only need sugar and water plus a jar and a stick. You do a little stirring and then you wait. The steps take only a few focused minutes up front and then a calm period of checking in for a few days. That makes it great for busy family schedules.
It stays approachable because you can scale jars up or down. Use one jar for a simple afternoon experiment or several jars to test colors and flavors. Most families get clear results on the first try if they follow the basics and avoid rushing the cooling. The method is reliable enough to be a go-to short activity, and it gives satisfying, visible results that feel like real science.
A Quick Look Before You Begin
This project takes two parts: a short hands-on setup and several days of patient waiting. The cooking part lasts 10 to 20 minutes depending on how much sugar you add. Then plan for three days to a week of checking without touching the jar.
Setup stays tidy if you measure into a single pot and pour into clean jars. Expect a little sticky work around the pot and a few granules on the counter. I keep a damp cloth nearby to wipe spills right away. Cleanup is mostly rinsing a pot and wiping the work surface.
Adult help matters when heating the water. Let the adult handle the stove and pouring hot liquid. Older kids can do the string work and help with stirring once the water is off the heat. For younger children, assign the watching and drawing parts so they feel involved while staying safe.
For a quick alternative that also sparks curiosity, you can pair this with a small eruption demo like the salt volcano science experiment to keep kids engaged while crystals grow: salt volcano science experiment.
Materials You’ll Need
Granulated white sugar
common household pantry staple
Clean glass jars or heatproof glasses
reuse jam jars or glasses you already have
Wooden craft sticks or a clean pencil
pencil works well for suspending the string
Cotton string or fishing line
cotton helps crystals grip, fishing line gives a clear look
Small clothespin or tape
keeps the pencil steady across the jar top
Medium-sized pot for heating water
use one you do not mind having sugar residue in
Measuring cup and spoon
for consistent results
Food coloring (optional)
adds color when placed in the cooled solution
Flavor extracts like vanilla or lemon (optional)
optional for scent and slight color change
Step-by-Step Directions

- Warm the water slowly until it feels comfortably hot.
Keep the heat low and steady and avoid boiling.
You should see gentle steam and feel warmth. - Stir in sugar a little at a time until no more dissolves and the liquid looks syrupy.
Add a spoonful, stir, and watch crystals dissolve.
When spoonfuls stop disappearing, you have a saturated syrup. - Let the mixture cool slightly, then pour it into a clean glass jar.
Cool until it is warm but not steaming so the jar does not crack.
Pour slowly to avoid spills and leave a little headroom. - Tie a short length of string to a pencil or stick and dip the string in the solution.
Leave a small loop of string hanging to catch crystals.
If you want bigger crystals, use cotton string for better grip. - Suspend the string in the middle of the jar without touching the sides.
Rest the pencil across the jar rim and balance the string.
Make sure it hangs freely so crystals form evenly. - Place the jar somewhere undisturbed at room temperature.
Choose a spot away from fans, vents, and direct sunlight.
A pantry shelf or a quiet corner of the counter works well. - Observe tiny crystal points forming each day.
Check gently without moving the jar too much.
You will see small sparkles grow into visible crystals over days. - Add a drop of food coloring once the solution cools, if desired.
Stir a single drop in the warm but cooled solution.
Color stays subtle; avoid adding it while the solution is very hot. - After several days to a week, lift the string to admire your crystals.
Lift slowly and look at both sides of the crystal growth.
If crystals stick to the jar, run the jar under warm water to loosen. - Store finished crystals in a dry place.
Let them dry on a paper towel for a day before storing.
Keep them in a small box or jar away from humidity.
The Simple Science or Skills at Work

This activity shows a real chemical pattern in a simple way. Warm water lets more sugar dissolve than cold water. As the solution cools, it carries more sugar than it can hold, so sugar comes back out of the solution. Those sugar molecules line up in an orderly pattern and form crystals on the string. The string gives them a place to start.
Kids practice fine motor skills as they tie the string and balance the pencil. They learn patience while watching slow change and gain an early sense of cause and effect: add heat, dissolve sugar, cool, and crystals appear. They also learn to make careful observations, like noting small sparkles the first day and larger crystal clusters later.
This experiment also teaches simple measuring and following a process. Stirring until the sugar stops dissolving reinforces listening to touch and sight cues. The project gives a gentle science lesson without heavy words, so kids connect results to steps they did themselves.
Troubleshooting Common Issues
If nothing happens, it usually comes down to one of a few things. The solution may not have been saturated enough. That means you need to add more sugar while the water is still warm so the mixture looks thick and syrupy. Another issue is moving the jar too often. Crystals like still air and steady temperatures.
If crystals form on the jar sides instead of the string, your string likely touched the glass. Reset with a new string and make sure it hangs in the center. If the crystals stay tiny, try a new batch with a bit more sugar dissolved; a more concentrated solution often gives faster growth.
If the solution turns cloudy or shows strange flakes, that cloudiness can come from impurities on the jar or string. Clean your jar well and use plain cotton string or fresh fishing line. If you used an extract like vanilla, use only a tiny amount; too much can introduce oils that prevent neat crystals.
If the string breaks or slips, secure it with a clothespin or tape and check balance before you walk away. If a spill happens, wipe immediately with warm water. Sugar can stick to surfaces, but it cleans easily when you rinse while it is still wet.
Easy Variations to Try
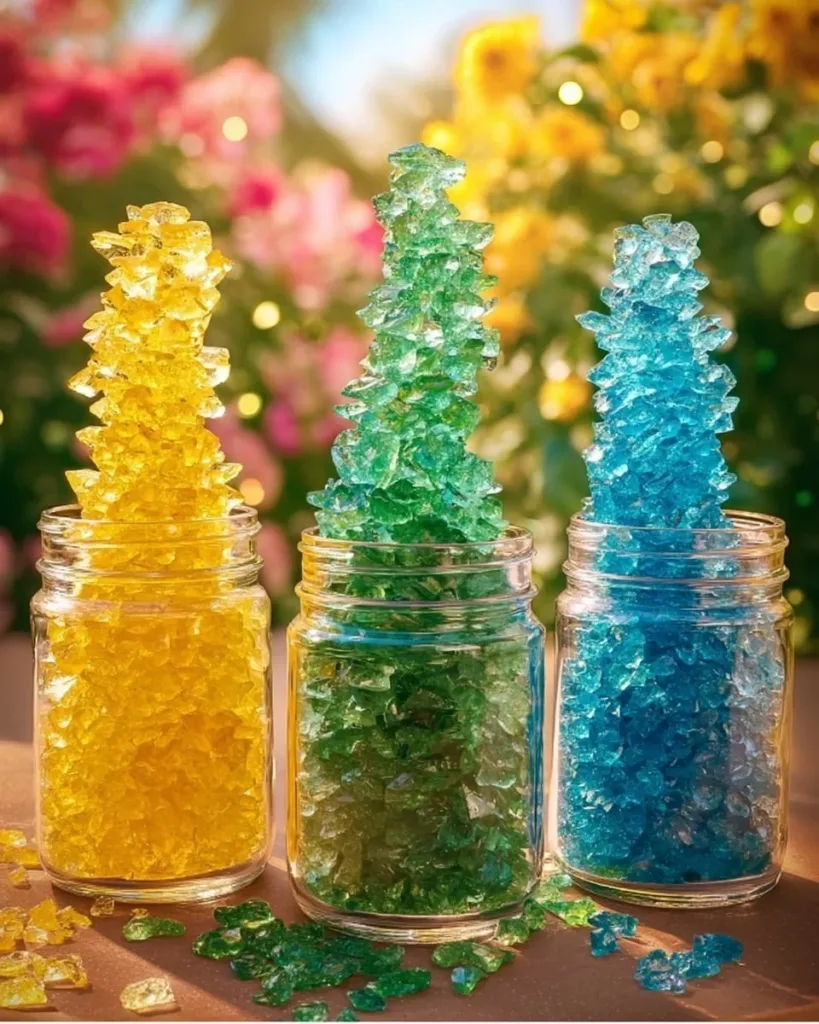
Try different colors by adding a single drop of food coloring to the cooled solution.
Use separate jars for different shades and watch how color changes the crystal look.
This stays optional and uses items already on the materials list.
Tie many short strings to the pencil to grow several crystal sticks at once.
Each string may grow slightly different crystals depending on its texture.
This is a fun way for siblings to each have their own crystal.
Add a tiny drop of flavor extract after the solution cools for a gentle scent.
Vanilla or lemon gives a faint aroma to the finished crystal.
Remember, use just a drop so the solution stays clear.
Grow crystals on cotton string for a sugary, rough crystal surface.
Or use fishing line for almost invisible support that makes crystals look like they float.
Both options require no extra tools and give different visual results.
Seasonal twist: tie small paper shapes to the string just above the crystals.
Paper does not grow crystals but makes a decorative top for the finished stick.
Keep the paper small and out of the solution to avoid soggy decoration.
For a fun comparison, try one jar with a rapid cool (put in a cooler spot) and one jar left to cool slowly.
You will likely see that slow cooling gives bigger, clearer crystals.
This helps kids see how pace affects results.
For another colorful kitchen science project that shows a different kind of spark, you can pair this with the fireworks rainbow sugar explosion activity for bright, quick results: fireworks rainbow sugar explosion.
Storing or Reusing This Project
Finished sugar crystals can sit on a paper towel in a dry place for a day to firm up.
Store them in a small airtight container if you want to keep them for a while.
Humidity will soften and dissolve the crystals over time, so avoid bathrooms or damp basements.
If you plan to reuse jars, soak them in warm water to dissolve leftover sugar.
A quick wash with dish soap and hot water removes sticky residue easily.
You can reuse the pot and spoon after a simple rinse and wash.
If you want to preserve crystals for display, avoid touching them with damp hands.
Handle by the top edge or leave them on a stick inside a small clear box.
If you intend to taste or sample them, be honest about cleanliness and whether you used only food-safe materials. The flavor extracts are optional and may change how appealing the crystals taste.
Leftover sugar water can go down the drain with plenty of hot water to cut stickiness.
Try to reuse utensils in the kitchen rather than letting sugar stick around to waste.
This project makes little waste if you wipe and wash right away.
FAQs About Sugar Crystal Experiment
My child will be messy. How much cleanup should I expect and can we keep it low?
You will see some sugar on the counter and a pot to wash, but cleanup is quick. Wipe spills with a damp cloth right after you pour and rinse the pot while the syrup is still wet. If the syrup dries, it sticks more, so early cleanup saves time. Use a tray under the jar during the setup to catch drips if that helps.
Is this safe for toddlers and what age needs adult help?
This project suits kids roughly five and up for observation and stirring with supervision. Heat on the stove means an adult handles boiling or very hot water. Toddlers can help tie strings, watch the crystals grow, and draw the process. Always manage the hot parts and pouring.
Can I use other types of sugar or substitutes if I do not have white granulated sugar?
White granulated sugar works best for clear crystals. Brown sugar or other sweeteners change the color and the way crystals form because of added molasses or different molecules. You can try other sugars, but results will vary. Be honest with kids that using substitutes may not give the classic clear crystals.
What if I follow the steps and the crystals stay small or never grow?
Small crystals often mean the solution was not concentrated enough or the jar moved too much. Make sure the water warmed slowly and you added sugar until the liquid looked syrupy. Let the jar sit in a quiet spot and avoid opening or moving it while crystals form. If the string touched the glass, try again with the string centered.
How long can I keep the crystals and can I reuse the string and jar for another batch?
Crystals keep for a while if you store them dry. They soften in humid places. To reuse, soak the jar and string in warm water to dissolve sugars. It usually works best to use a new string each time since cotton can trap bits of old crystals. The jar reuses fine after a good wash.
A Final Helpful Note
This is a project where patience brings the best reward. The first day shows hesitating sparkles and the fifth day shows chunks you can hold. If you miss a check-in day, do not worry. Crystals do not vanish with one extra day of waiting. Treat this like a slow art project: a small active setup, then quiet watching with occasional notes. Celebrate the wins, and remember spills and imperfect crystals still mean science happened. This activity fits easily into a busy afternoon and leaves room for kids to be curious and proud.
Conclusion
If you want a trusted step-by-step reference to the science and troubleshooting behind growing sugar crystals, Growing Rock Candy Crystals | Science Project gives a helpful, science-backed look at variables and classroom tips. For a visual guide with larger crystal techniques and photo examples, try this detailed walkthrough on how people grow big, transparent sugar crystals at home: How to Make Giant Transparent Sugar Crystals at Home – Crystalverse.
PrintSugar Crystal Experiment

An engaging kitchen science experiment for kids to grow sugar crystals using simple ingredients and patience.
- Prep Time: 10 minutes
- Cook Time: 20 minutes
- Total Time: 4320 minutes
- Yield: Varies (dependent on amount of sugar and water used)
- Category: Science Experiment
- Method: Stirring and Waiting
- Cuisine: N/A
- Diet: N/A
Ingredients
- Granulated white sugar
- Clean glass jars or heatproof glasses
- Wooden craft sticks or a clean pencil
- Cotton string or fishing line
- Small clothespin or tape
- Medium-sized pot for heating water
- Measuring cup and spoon
- Food coloring (optional)
- Flavor extracts like vanilla or lemon (optional)
Instructions
- Warm the water slowly until it feels comfortably hot.
- Stir in sugar a little at a time until no more sugar dissolves and the liquid looks syrupy.
- Let the mixture cool slightly, then pour it into a clean glass jar.
- Tie a short length of string to a pencil or stick and dip the string in the solution.
- Suspend the string in the middle of the jar without touching the sides.
- Place the jar somewhere undisturbed at room temperature.
- Observe tiny crystal points forming each day.
- Add a drop of food coloring once the solution cools, if desired.
- After several days to a week, lift the string to admire your crystals.
- Store finished crystals in a dry place.
Notes
Be cautious with hot water; adult supervision is required when using the stove. If crystals stick to the jar, run the jar under warm water to loosen.
Nutrition
- Serving Size: 1 experiment
- Calories: 200 (approx. based on sugar used)
- Sugar: 50g (approx. based on sugar used)
- Sodium: 0mg
- Fat: 0g
- Saturated Fat: 0g
- Unsaturated Fat: 0g
- Trans Fat: 0g
- Carbohydrates: 50g (approx. based on sugar used)
- Fiber: 0g
- Protein: 0g
- Cholesterol: 0mg