

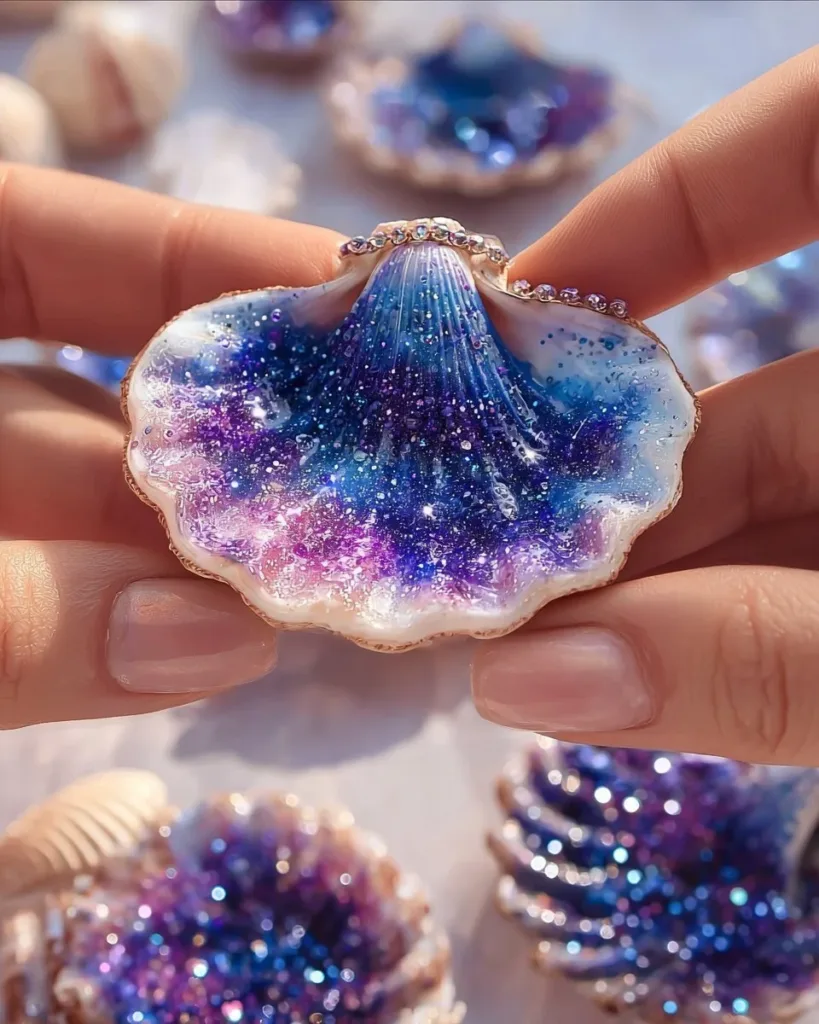
A busy afternoon, a sink full of dishes, and three kids at the table asking to make something right now sets the scene for The Quiet Joy of Making Galaxy Crystal Seashells. I set out a shallow tray, some cleaned shells, and a few jars of crystal chips, and we found a calm, small project that fit into the chaos. It took little prep, gave everyone a task they could handle, and left us with something shiny to admire. If you want a similar low-fuss idea that uses bits from around the house, you might enjoy the look and feel of our turquoise crystal seashells project, which follows the same easy, stepwise rhythm.
Why This The Quiet Joy of Making Galaxy Crystal Seashells Works So Well

This project works because it pairs tiny, satisfying tasks with quick payoff. You clean one shell, lay out crystals, and in a short stretch of time you see it transform into something jewel-like. It stays low-prep because the materials are simple and reusable, and you can stop after any step if someone needs a break.
It fits real life because you can do it at the kitchen table, on a porch, or at a kid’s craft corner. Because the pieces are small, adults can step in for delicate parts and kids can handle the filling-in. The method gives reliable visual cues: glue looks wet and shiny, crystals press in and hold, and mica dust adds a clear, immediate shimmer.
This is approachable for busy days. The glue needs time to set, but your active time stays short. That combination of short hands-on time and satisfying results makes it a go-to craft when time feels tight.
The Flow of Making The Quiet Joy of Making Galaxy Crystal Seashells
Before you start, think of this as a three-part rhythm: prepare, place, and protect. Prepare the shells and your workspace. Place the crystals in a pattern or scattering that pleases you. Protect the finished work with a clear sealer and give it time to rest.
Timing stays friendly. Set aside 30 to 60 minutes for layout and sticking, and then plan a few hours or overnight for curing. Mess stays low if you use a tray to catch stray crystals. Adult help matters most for cutting or gluing in tight spots, and for spray sealer use.
If you worry about whether it will look like the picture, relax. The result will feel handmade. Imperfections add character, and small gaps of exposed shell make the crystals pop more. The easy pace and clear cues keep things calm and satisfying.
Materials You’ll Need
Clean seashells, any shape you love.
Clear craft glue or jewelry adhesive.
Fine and coarse crystal chips or crushed glass.
Iridescent mica powder or fine glitter.
Small paintbrush, soft bristles.
Tweezers or toothpick.
Shallow tray or scrap paper.
Clear sealer spray or gloss varnish.
Cotton gloves or finger protectors (optional).
Notes: clean shells come from the beach or craft stores. Clear craft glue works fine for most shells; jewelry adhesive gives a firmer hold. Crystal chips range from tiny glass to decorative craft gems. Mica dust adds shimmer without bulk. A shallow tray keeps bits contained. Gloves help if you want to avoid glue on fingers.
If you like projects that mix small, careful steps with big visual wins, we have other short activities that use similar tidy setups; try the colorful chromatography coffee butterflies for a different kind of table-friendly experiment that kids love.
STEP-BY-STEP DIRECTIONS

- Clean and dry shells thoroughly.
Wipe away grit and let shells air dry or dry with a soft cloth.
Check hollow or rough spots and remove any loose debris. - Lay out crystals and tools for easy access.
Use a shallow tray or scrap paper so nothing rolls away.
Group crystals by size and color for quicker picking. - Arrange crystals on the shell without glue to test placement.
Play with patterns or random clusters until it feels right.
This keeps surprises low and saves time once glue goes on. - Apply a thin layer of adhesive to the shell using the brush.
Paint only where you plan to place crystals to avoid a glossy mess.
A thin film dries more predictably and prevents pooling. - Place larger crystals first, gently pressing them into the glue.
Set big pieces where they anchor the design.
Press just enough to seat them; you should feel slight stick but not slide. - Fill in smaller crystals around the larger ones.
Tuck tiny chips into gaps to create a dense, starry look.
Use tweezers or a toothpick for control and to avoid finger smudges. - Dust with mica powder for shimmer if desired.
Lightly tap mica onto the glue while it is still tacky for subtle glow.
Too much mica can blur crystal edges, so dust sparingly. - Allow to set undisturbed for several hours.
Move finished shells to a safe spot away from pets and kids.
Check after the first hour for any sliding pieces and lightly press if needed. - If needed, add a second layer of adhesive.
Spot-glue any loose chips by painting thinly on top and reseating.
Let each layer dry well to build a secure hold. - Seal the finished pieces with clear sealer.
Spray or brush on a light coat to lock in crystals and mica.
Work in a ventilated area and follow sealer directions for dry time. - Clean excess dust once dry.
Use a soft brush or cloth to remove residual mica and tiny chips.
Avoid scrubbing, which can loosen delicate pieces. - Reflect on and enjoy your finished shells.
Display in a dish, on a shelf, or give a few as small gifts.
Take a moment to notice how the light plays across the crystals.
The Simple Science or Skills at Work

Making these shells practices several small skills. Picking up chips with tweezers strengthens fine motor control. Painting a thin glue layer teaches patience and careful hand pressure. Arranging shapes and colors supports simple design sense.
You also see cause and effect in real time. Wet glue looks darker, crystals sink a touch, and mica dust reduces shine if layered too thick. Those are clear cues: darker glue is wet, crystals that slide need more support, and a second adhesive layer helps anchor tiny pieces.
For kids, these actions encourage focus and a gentle pace. They learn to wait while glue sets and how a light touch makes a bigger difference than rushing. The project also offers early chemistry lessons: adhesives work by forming bonds as they dry, and sprays add a protective film to hold everything together.
Troubleshooting Common Issues
If crystals do not stick, check that the shell surface is clean and dry. Oils from hands or leftover sand will prevent adhesion. Lightly wipe the area with rubbing alcohol and let it dry before reapplying glue.
If glue pools and creates domes, you used too much at once. Gently blot excess with scrap paper right away and let the thin layer dry before adding more. For future shells, brush thinner coats and use less glue on raised areas.
If tiny chips scatter while you work, work over a tray and press pieces into the glue as you go. If a child gets impatient, let them sort by color or size instead of placing every chip. Small helpers can still contribute without causing setbacks.
If the sparkle looks muddied after adding mica, you probably applied too much. Use a soft brush to sweep away excess once dry. Reapply a tiny dusting only where the glue remains tacky for a clearer shimmer.
If you need extra ideas for keeping small materials contained, look at projects that use shallow trays and simple sorting jobs, like our glow-in-the-dark moon rocks activity which shows practical ways to manage bits and keep cleanup calm.
Easy Variations to Try
Try a traced constellation pattern with larger chips as star points and fine chips as star fields. This creates a deliberate, celestial look without complex steps.
Make a gradient of colors across a shell, moving from coarse to fine crystals to suggest depth. It needs only sorting and a steady hand.
Use mixed media by combining a small dab of mica-heavy areas and leaving other parts plain. Let the contrast tell the story and avoid covering the entire shell.
For younger kids, let them create one or two focal spots while an adult finishes delicate edges. It keeps the charm of their contribution while securing fragile parts.
Seasonal twist: use cooler, blue-toned crystals for a wintery feel, or warm golds and bronzes for autumn display. These simple swaps change the mood without changing the method.
Storing or Reusing This Project
Store finished shells in a shallow box lined with soft tissue to prevent rubbing. Layer them with paper between pieces to keep crystals from scratching one another.
Keep leftover crystals and mica in small, sealed containers or zip bags. Sort by size and color so you can reuse them easily without hunting through mixed jars.
If a shell loses a chip later, keep a small repair kit of glue, a brush, and a few spare chips. Repairs usually need only a thin dab and a light press, then a recovery period under a cup to prevent dust.
Reduce waste by reusing scrap paper as a working surface until it fills up. Any crystals that fall unchanged can go back into their containers after a quick sweep.
If you have shells you do not want to keep, these make thoughtful little gifts. Wrap them in tissue and place in a small seed packet or paper envelope for a simple, personal touch.
FAQs About The Quiet Joy of Making Galaxy Crystal Seashells
Will this be too messy for my kitchen table?
It can be tidy if you set a shallow tray and work over scrap paper. You will get a few stray chips, but a quick sweep and tray lift usually contain the mess. If you worry about glue, place a washable mat or old placemat under your workspace for easy cleanup.
At what age can kids do this safely?
Children around five and older can participate in simple tasks like sorting crystals and dusting with mica under supervision. Younger children can join with strict adult help; the glue and small chips present choking and bonding hazards. Always supervise and assign age-appropriate jobs.
Can I substitute anything if I do not have mica powder?
Fine glitter works in a similar way, though shimmer will be a bit bolder and more reflective. If you use glitter, apply less and brush off excess after drying to keep the crystal detail clear. Be honest with kids about shimmer differences so expectations stay realistic.
What if I get glue on my fingers or clothes?
Craft glue often peels off skin after it dries; washing with warm soapy water helps remove fresh glue. For clothes, blot excess and follow the glue manufacturer’s stain advice; some glues may need pre-treatment. Wearing finger protectors or disposable gloves keeps hands cleaner during the stickiest parts.
How long will the shells last once done?
With a good seal and gentle handling, these shells can look great for months or years as display items. They are decorative, not for heavy handling or jewelry meant to wear, so treat them like delicate keepsakes. Small repairs are normal and quick if a chip comes loose.
A Final Helpful Note
Do not aim for perfection. The handmade look gives each shell personality and story. Small gaps, uneven clusters, or tiny stray dust specks become part of the charm once you step back and admire the piece.
Keep a relaxed pace. Work for short bursts and step away while glue sets. That breathing room helps you see what to fix and what to leave be.
Trust what you already know about glues and small crafts. Thin coats, tidy trays, and careful pressing will get you reliable results. If a child gets frustrated, hand them a new job like sorting or counting crystals so they stay involved without pressure.
Enjoy the quiet of the process. The soft clicking of chips, the careful press of a tweezer, and the warm light across a finished shell add up to a small, steady joy worth repeating.
Conclusion
If you enjoy turning simple materials into tiny treasures and want a printable source of classic poems to read while your glue dries, consider this collection of The Poems of William Wordsworth which makes a calm companion during slow-cure moments. For gentle creative prompts and seasonal reading to pair with table crafts, the Lockdown Poems collection from Ledbury Poetry Festival offers short, reflective pieces that match the low-key rhythm of this project.
PrintGalaxy Crystal Seashells

A relaxing, step-by-step craft project for kids to create beautiful, jewel-like crystal seashells using simple materials.
- Prep Time: 15 minutes
- Cook Time: 0 minutes
- Total Time: 60 minutes
- Yield: 4-6 shells
- Category: Craft
- Method: Crafting
- Cuisine: N/A
- Diet: N/A
Ingredients
- Clean seashells, any shape
- Clear craft glue or jewelry adhesive
- Fine and coarse crystal chips or crushed glass
- Iridescent mica powder or fine glitter
- Small paintbrush, soft bristles
- Tweezers or toothpick
- Shallow tray or scrap paper
- Clear sealer spray or gloss varnish
- Cotton gloves or finger protectors (optional)
Instructions
- Clean and dry shells thoroughly.
- Lay out crystals and tools for easy access.
- Arrange crystals on the shell without glue to test placement.
- Apply a thin layer of adhesive to the shell using the brush.
- Place larger crystals first, gently pressing them into the glue.
- Fill in smaller crystals around the larger ones.
- Dust with mica powder for shimmer if desired.
- Allow to set undisturbed for several hours.
- If needed, add a second layer of adhesive.
- Seal the finished pieces with clear sealer.
- Clean excess dust once dry.
- Reflect on and enjoy your finished shells.
Notes
Use a tray to keep the mess contained. Adult supervision is essential, especially for cutting or gluing in tight spots. Mix colors and shapes for a unique look.
Nutrition
- Serving Size: 1 shell
- Calories: 0
- Sugar: 0g
- Sodium: 0mg
- Fat: 0g
- Saturated Fat: 0g
- Unsaturated Fat: 0g
- Trans Fat: 0g
- Carbohydrates: 0g
- Fiber: 0g
- Protein: 0g
- Cholesterol: 0mg