

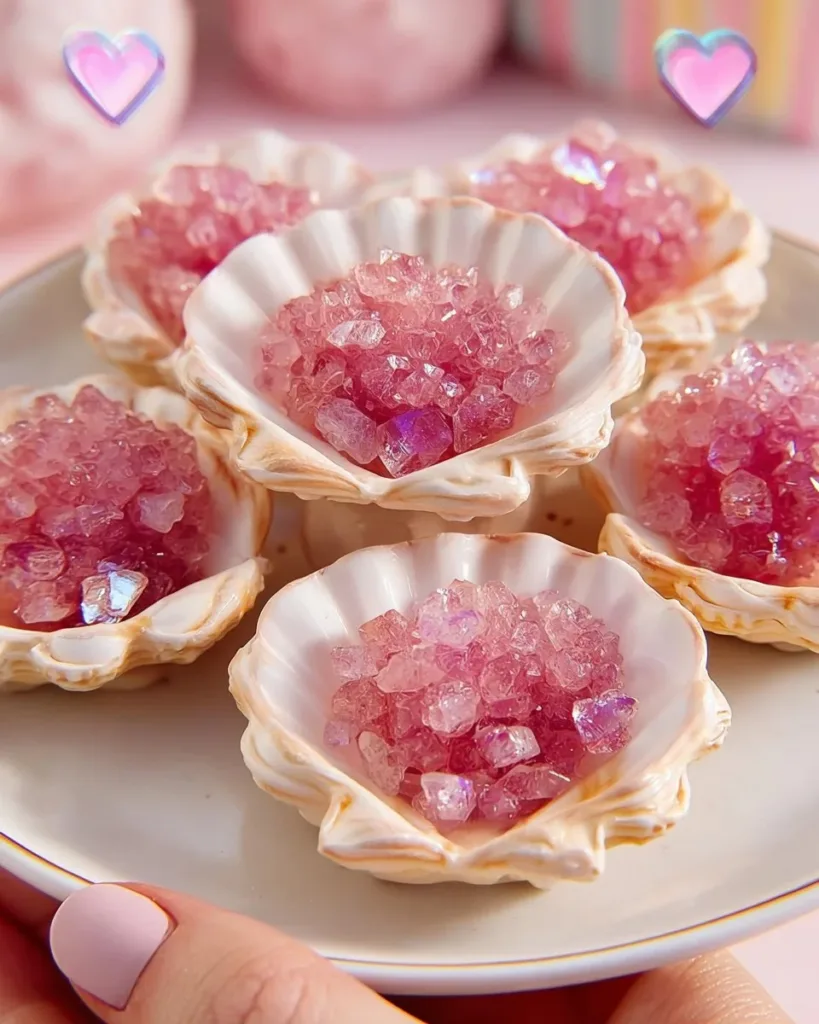
A busy afternoon, a sink full of dishes, and an urgent request from the kids: can we make something sparkly right now? Pink Seashell Crystals fit that exact moment. They need only a little prep, a clear space on the kitchen counter or a small card table, and a few familiar supplies. I often pull this project out when we want a calm, creative half hour that still feels special. The shells look delicate and almost store-bought when they cure, and they catch the light in a way that makes everyone pause and smile.
Why You’ll Love Making Pink Seashell Crystals

This project works because it keeps things simple from start to finish. You pick one color, one small mold, and a single clear medium. That trims decision fatigue and keeps set up quick. You can measure, mix, and pour in about 20 minutes, then leave the molds to cure while you move on with the day.
It stays approachable for busy households. Younger kids can watch and help with safe parts like stirring or choosing the mica color, while an adult handles measuring and any tools that give off fumes or heat. The steps are short and repeatable, so you get reliable results after one try.
It also fits real schedules. You can prepare the mix in the late afternoon, let it cure overnight, and have finished ornaments or drawer decorations the next morning. You do not need a special workshop. A small tray on a kitchen counter works just fine.
A Quick Look Before You Begin
This takes about 20 to 30 minutes of hands-on time and then a cure period set by the product you choose. If you use a low-heat melting crystal medium, cure is quick. If you use a clear casting resin, cure can take longer and needs ventilation.
The mess level stays low when you use a small tray and disposable cups. Still, sticky drops happen. I keep a soft cloth and mild soap nearby, and I wipe spills within minutes before they harden.
Adult involvement is required. Measure and mix carefully and use a mask if you are working with resin. Kids can help with gentle tasks. If you want the kids more involved, make one batch while another adult lets them decorate pre-made cured pieces.
Materials You’ll Need
Clear casting resin or low-heat melting crystal medium
Note: Use only one of these as your clear base. Resin may need ventilation. Crystal medium melts with low heat and cools quickly.
Pink mica powder or pastel pigment
Note: A little goes a long way. Start with a pinch for a soft color.
Small seashell-shaped silicone molds
Note: Flexible molds make unmolding easier and reduce nicks.
Mixing cups and wooden stir sticks
Note: Disposable cups and sticks keep cleanup simple.
Disposable gloves
Note: Protects skin from resin or melted medium. Change if sticky.
Fine-point syringe or small pouring spout
Note: Helps get into tiny mold crevices without spills.
Toothpick or pin for coaxing bubbles
Note: A quick tool for nudging trapped air to the edge.
Mask rated for organic vapors if using resin
Note: Essential with resin in a small room. Keep kids out of the immediate area while you mix.
Heat gun or small torch (optional)
Note: Briefly removes surface bubbles. Use carefully and keep distance.
Soft cloth and mild soap for cleaning
Note: Wipe up spills right away. Soap handles sticky residue before curing.
String, ribbon, or small eye pins for hanging (optional)
Note: Add after cure for ornaments or sun catchers.
Small tray or cardboard to protect work surface
Note: Prevents drips from reaching the counter or table.
STEP-BY-STEP DIRECTIONS

- Clear and calm your space. Gather all your supplies and put on gloves and your mask.
Lay a small tray or piece of cardboard on your work surface and set each supply in reach.
Open windows or run a fan for airflow if you use resin, and keep curious hands at a safe distance. - Measure the resin or crystal medium into a mixing cup as per product instructions and stir until glossy.
Follow the exact ratio on your product label for resin. For low-heat crystal medium, cut or measure the amount your mold needs.
Stir slowly and scrape the sides so the mixture becomes smooth and glossy with no streaks. - Add a pinch of pink mica powder and fold in slowly.
A tiny pinch yields a delicate pink. Add more a little at a time for deeper color.
Fold gently to avoid whipping air into the mix; stop when color looks even and translucent. - Let the mix rest, coaxing bubbles to the edges with a toothpick.
Set the cup down for a few minutes and watch bubbles rise to the surface.
Use a toothpick or pin to nudge stubborn bubbles toward the rim so they pop or float away. - Prepare silicone molds by placing them on a flat tray, threading with eye pins if needed.
Place the shells on a level tray so pour stays even. If you want to hang them later, carefully thread an eye pin through the mold where it will sit.
Press the pins in so they stay upright while you pour, and double check they do not shift. - Pour the mixture into molds, filling to the rim and tapping the tray to release air bubbles.
Use a fine-point syringe or a small pouring spout for control, especially for tiny shell details.
After filling, tap the tray gently on the table a few times so small bubbles rise to the surface. - Use a heat gun briefly to smooth the surface.
A quick pass with a heat gun or small torch will pop surface bubbles and even the top.
Keep the heat moving and do not linger. If you used a crystal medium, low heat works fast. - Cover the molds and allow them to cure undisturbed as per product instructions.
Place a cover or a dust-free box over the molds to keep dust out while they set.
Follow the cure time on your resin or crystal medium; avoid touching or moving the tray. - Once cured, unmold slowly and sand sharp edges if necessary.
Gently flex the silicone mold and push the shells out, supporting the larger parts to prevent snapping.
If any edges feel sharp, use fine sandpaper to smooth them lightly until they feel safe for fingers. - Attach hanging hardware or add a thin coat of clear varnish for shimmer.
Screw in small eye pins, tie ribbon, or thread string through the prepared holes.
A very thin brush coat of clear varnish can add extra shine; let it dry fully before handling. - Arrange or hang your crystals where they will catch the light.
Use a sunny window, a porch beam, or a backlit shelf for the best sparkle.
Rotate placement until the subtle pink shows up at the angle you like.
The Simple Science or Skills at Work

This project teaches a few simple ideas while you make something beautiful. The clear medium hardens because its molecules link together during cure. You do not need to know the chemistry to get it right, but you do need patience while the material sets.
You practice fine motor skills with small movements. Pouring into tiny shell grooves, threading eye pins, and coaxing bubbles with a toothpick all build steady hand control.
You see cause and effect quickly. Stir too fast and you get bubbles. Heat on the surface removes bubbles. Letting mixes rest makes the surface calmer. Those small experiments help kids learn how small changes change the result.
Troubleshooting Common Issues
If your color looks blotchy, you probably added mica unevenly or stirred too quickly.
Solution: Remix a fresh small cup and pour a drop into the unsettled area with a syringe, then rest to let it level.
If bubbles stay trapped inside tiny shell grooves, they often come from stirring too fast or from the mix being too warm.
Solution: Let the mix cool a little before pouring and use a syringe to inject into small areas gently.
If pieces stick in the mold or tear on removal, the mold may not be flexible enough or the pour was thin in places.
Solution: Press gently from the back of the silicone, and next time add a touch more material so the shell fills fully. A thin coat of release spray made for resin can help, but only use it if your mold instructions allow it.
If the surface cures dull or with dust bits, you likely started cure without a cover.
Solution: Sand lightly with very fine sandpaper and add a thin varnish coat. In future, cover the molds right after pouring.
If an edge feels sharp, that is normal with detailed molds.
Solution: Sand gently and wear gloves while sanding. Start with 320 grit and finish with 600 grit for a safe, glossy edge.
Easy Variations to Try
Add a touch of pearl white mica with the pink for a pearlized shell. Mix a whisper of white with the pink for a sandy, iridescent look.
Make tiny sets and glue them to a simple barrette base for beachy hair clips. This step happens after full cure and a light varnish.
Use different hanging lengths and place several shells on the same string to create a mobile. Vary how far they hang so they catch light at different angles.
Press a small real shell or a tiny bead into the uncured surface for texture. Do this gently and only if you plan to keep the piece as a decorative object.
Seasonal twist: add a speckle of gold or silver mica for holiday ornaments that still feel light and summery.
Discover Easy Kids Activities
Looking for simple, fun ideas for kids? Explore our Low Prep Kids Activities and find quick projects that spark creativity without long prep time.
Storing or Reusing This Project
Store finished crystals in a small box lined with tissue paper.
They stack well without scratching, but keep soft materials between pieces for long-term shine.
Leftover resin or crystal medium usually cures in its cup and is not reusable.
Plan small batches. If you do have leftover that stays fluid and uncured, seal it in its original container and follow the product instructions for storage.
Keep silicone molds clean and away from heat and sunlight.
Wash them in warm soapy water after use and dry fully. They will last many pours if you treat them gently.
If a mold tears, you can repurpose it for small craft glues or putty uses, but do not use a damaged mold for resin if it will alter the shape.
If you used a heat gun, let it cool completely before storing. Clean any drips off the tool as soon as it cools so hardened residues do not build up.
FAQs About Pink Seashell Crystals
Will this be messy for my kitchen table and how do I clean it up?
Expect a few drips and a small mess near the mold. Cover your table with cardboard or a tray and keep a soft cloth and mild soap handy. If something drips and cures, it will peel or sand off later. I wipe spills within a few minutes and rinse tools right away, and that keeps cleanup calm.
Is this safe for kids to help with?
Kids can help safely with certain parts. Let them pick mica colors and stir gently with the wooden sticks when the adult has handled the measuring. Do not let children handle raw resin or the melting medium. If resin is in use, keep them out of the mixing area and make sure the adult wears a mask rated for organic vapors.
Can I substitute something else for the pink mica powder?
For this exact effect, the pink mica powder gives that light shimmer you see in the photos. You can use a small pastel pigment that is compatible with your chosen clear medium, but do not add liquids like paint or food coloring. Those can interfere with curing. Small amounts of permitted pigments work best.
What if my shells come out cloudy or not clear?
Cloudiness can happen if you stir too fast or the resin is not fully mixed. It can also occur if the room is cool and the product is not at the right temperature. For most products, bring the material to room temperature first and stir slowly until glossy. If a piece cures cloudy, a light sanding and a thin brush of clear varnish can restore the shine.
How long do they take to cure and can I speed it up?
Cure time depends on the product you use. Low-heat crystal mediums harden much faster than many casting resins. Do not rush the cure by heat or touching; that can leave fingerprints or warps. If you used resin and need speed, check the manufacturer instructions; some have fast-cure versions. In general, plan for overnight handling to be safe.
A Final Helpful Note
Take a breath before you begin and set yourself up so the work feels calm. Line a tray, put supplies in order, and keep a small garbage bowl close for used sticks and cups. Remember that small imperfections add charm. A tiny bubble or a slightly off-center pin makes these pieces feel handmade.
Trust your hands and your eyes. If something looks off, you can often fix it with a gentle pass of a heat gun, a tiny top-up pour, or a light sand and varnish. You will find a rhythm after the first couple of shells and the project becomes easier and more relaxing.
Most of all, enjoy the process. The kids will love the shimmer, and you will enjoy how a few simple supplies and a short burst of focused time turn into keepsakes that highlight light and memory.
Conclusion
If you want a ready-made look for inspiration, the style of sequined shell designs in fashion can help set your color tone, as seen in pieces like the Crystal Pink Seashell Bikini Shirt, which captures the same delicate sparkle we aim for here. For gift ideas and presentation, look at accessory examples such as the Powder Satin Shell Clutch Bag Swarovski Crystals to see how small sparkles can elevate a simple piece into something special.
PrintPink Seashell Crystals

Create beautiful and delicate pink seashell crystals with simple supplies. Perfect for a calm and creative project with kids.
- Prep Time: 20 minutes
- Cook Time: 0 minutes
- Total Time: 20 minutes
- Yield: Varies by mold size
- Category: Craft
- Method: Mixing and Molding
- Cuisine: N/A
- Diet: N/A
Ingredients
- Clear casting resin or low-heat melting crystal medium
- Pink mica powder or pastel pigment
- Small seashell-shaped silicone molds
- Mixing cups and wooden stir sticks
- Disposable gloves
- Fine-point syringe or small pouring spout
- Toothpick or pin for coaxing bubbles
- Mask rated for organic vapors if using resin
- Heat gun or small torch (optional)
- Soft cloth and mild soap for cleaning
- String, ribbon, or small eye pins for hanging (optional)
- Small tray or cardboard to protect work surface
Instructions
- Clear and calm your space. Gather all your supplies and put on gloves and your mask.
- Lay a small tray or piece of cardboard on your work surface and set each supply in reach.
- Open windows or run a fan for airflow if you use resin, and keep curious hands at a safe distance.
- Measure the resin or crystal medium into a mixing cup as per product instructions and stir until glossy.
- Add a pinch of pink mica powder and fold in slowly.
- Let the mix rest, coaxing bubbles to the edges with a toothpick.
- Prepare silicone molds by placing them on a flat tray, threading with eye pins if needed.
- Pour the mixture into molds, filling to the rim and tapping the tray to release air bubbles.
- Use a heat gun briefly to smooth the surface.
- Cover the molds and allow them to cure undisturbed as per product instructions.
- Once cured, unmold slowly and sand sharp edges if necessary.
- Attach hanging hardware or add a thin coat of clear varnish for shimmer.
- Arrange or hang your crystals where they will catch the light.
Notes
Keep a soft cloth and mild soap for quick cleanup. Kids can help with stirring and choosing colors, but should avoid direct handling of resin.
Nutrition
- Serving Size: 1 crystal
- Calories: N/A
- Sugar: 0g
- Sodium: 0mg
- Fat: 0g
- Saturated Fat: 0g
- Unsaturated Fat: 0g
- Trans Fat: 0g
- Carbohydrates: 0g
- Fiber: 0g
- Protein: 0g
- Cholesterol: 0mg