

A busy afternoon, a sudden rainstorm, or the moment the kids declare they need a craft right now those are the times a quick, hands-on project saves the day. How to Make DIY Dragon Eggs fits that feeling: simple prep, everyday materials, and a result that looks like it took more time than it did. I once pulled this out for a last-minute costume craft; the kids dug in, the living room got a little floury, and by bedtime we had three different colored eggs lined up like tiny treasures. If you are the sort of person who likes short setup and real payoff, you will enjoy this project. For a different kind of easy, sparkly activity you can try our frozen bubbles winter activity later on.
Why This How to Make DIY Dragon Eggs Works So Well

This project works because it uses things you probably already have at home. The dough mixes fast, the shaping is forgiving, and the painting hides small bumps. You do not need fancy tools or long drying times if you plan a bit. That makes it easy to fit into an afternoon, a rainy morning, or a half-hour before dinner.
It is approachable because kids can take part in every step. Little hands can press scales, while older kids or adults handle the mixing and final paint. It is low-prep: one bowl, one spoon, and a sheet of wax paper get you started. Cleanup is straightforward if you line your work surface.
It is reliable because the base recipe is forgiving. If the dough feels sticky, a little extra flour works. If the paint looks uneven, another coat or a dry brush technique adds texture. Those small fixes keep the results feeling crafted, not fragile, so you get a proud display piece without fuss.
This also fits real life. You can pause and return to the project between naptime and homework. If you want a matching set for a party, you can double the batch easily and keep the same steps. The method scales without new tools or complicated timing.
A Quick Look Before You Begin
Before you mix or paint, here is a calm overview so you know what to expect. This craft takes about 45 minutes of hands-on time plus drying. If you plan to bake your eggs for a sturdier finish, add an hour of oven time and cooling.
Setup is simple: cover your table, set out bowls, and have paint and brushes nearby. Expect light mess on the table and flour on hands. Keep a damp cloth and a trash bowl nearby to catch scraps.
If kids join, plan for adult presence during the mixing and any oven steps. Younger children do great with pressing scales and painting. Older kids can follow the whole process start to finish.
The overall mess level is low to medium. You will have flour or dough residue and maybe a few paint splatters. A little patience with cleanup makes this feel quick and satisfying rather than chaotic. For a quieter afternoon, make one egg per child to avoid crowding.
You can also pause between steps. Let dough rest, or wait for a painted layer to dry before adding effects. That flexibility keeps this project manageable amid daily life. If you want a winter twist, try ideas inspired by our magical snowstorm in a jar to create a themed display.
Materials You’ll Need
What You’ll Use for This DIY
Flour common household item
Salt common household item
Water common household item
Mixing bowl kitchen bowl works fine
Spoon or spatula for mixing
Small balloons or egg-shaped molds easy substitute: crumpled foil wrapped in plastic
Acrylic paint budget-friendly craft paint
Paintbrushes a few sizes helps texture work
Clear sealer or varnish optional, makes eggs last longer
Wax paper or parchment protects your table
Sandpaper (fine) optional, for smoothing after drying
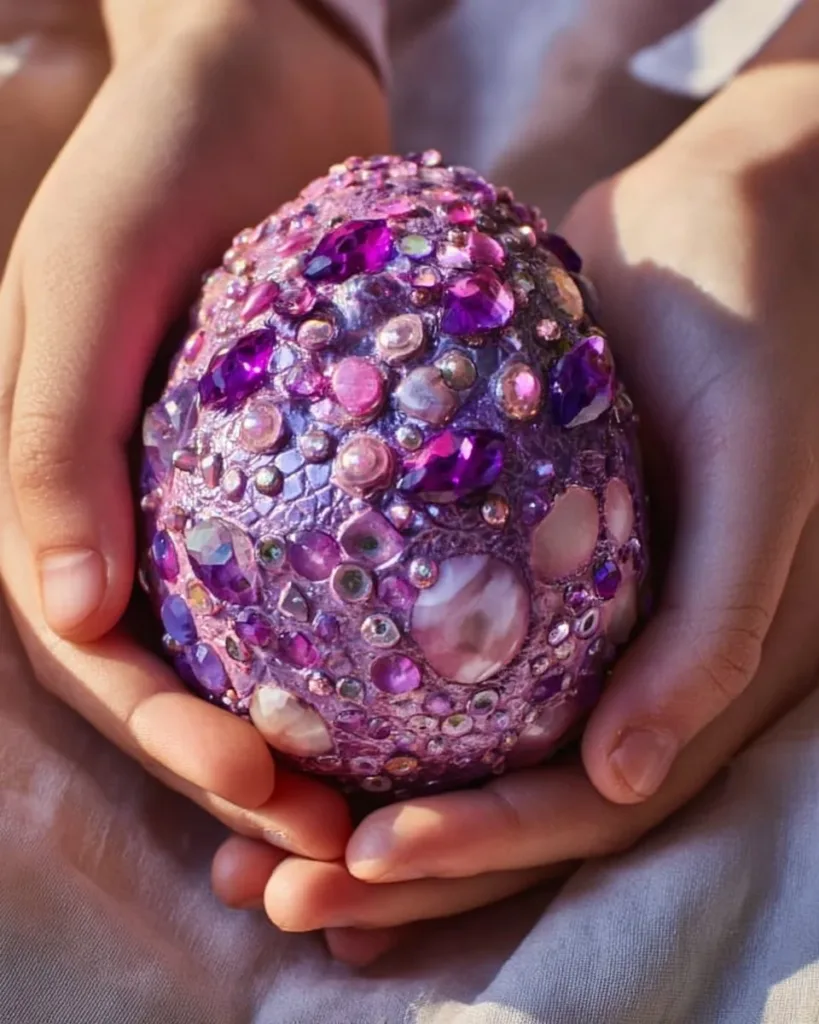
Glitter or metallic paint optional for special effect
These materials keep things simple and cheap. If you do not have balloons, small rubber or plastic eggs from a toy store make a fine mold. If you do not want to use a clear sealer, a strong second layer of paint works for indoor display.
Step-by-Step Directions

- Mix the dough by combining two cups of flour and one cup of salt in a bowl, then slowly add about one cup of water until you form a firm, slightly tacky dough. Knead briefly until it feels even.
- Divide the dough into portions one per egg then roll each into a rough ball to get started. Keep unused dough covered so it does not dry out.
- Stretch a small balloon and wrap the dough around it, shaping the dough into an egg form. Smooth seams with a wet finger and press gently to get an even thickness. The balloon gives you a hollow shell.
- Use a spoon end, the back of a paintbrush, or a ball tool to press scale shapes into the dough. Start at the bottom and overlap scales like fish scales, working your way to the top.
- Let the eggs dry on a sheet of wax paper for 12 to 24 hours until firm to the touch. For a quicker set, bake at a low temperature (about 200°F) for 1 hour, then cool slowly. Check often if baking to avoid cracking.
- Once dry and cool, pop the balloon and gently remove it from the inside. If the inside feels soft, let the shell sit out a bit longer to finish drying.
- Lightly sand any rough spots with fine sandpaper, then wipe off dust with a dry cloth. This gives a smoother surface for paint.
- Paint a base color and let it dry. A dark base, like deep green or black, makes metallic top layers pop. Apply an additional dry brush or metallic wash to highlight scales.
- Add details like glitter, tiny painted cracks, or a glossy sealer to protect the finish. Let the final coat dry completely before handling.
- Display your eggs on a small nest of shredded paper or in a bowl. They make fun centerpieces or party favors and can last for years if you keep them dry.
Each step has a simple cue to guide you. For example, feel the dough if it sticks to your fingers too much, add a little flour. If paint looks patchy, wait until the layer is fully dry then add another thin coat. These little pauses give you a better final look without extra tools.
The Simple Science or Skills at Work

Making dragon eggs touches many small learning moments. Kids learn cause and effect when they see how adding more flour changes dough texture. They practice fine motor skills while pressing scales and painting small details.
The project also introduces basic materials science in a friendly way. Salt and flour form a drying dough that becomes firm as water leaves. Baking speeds this by giving water molecules energy to evaporate faster. Painting adds a barrier that protects the dried dough from humidity.
You also build visual-spatial skills. When creating overlapping scales, children think about patterns and symmetry. When they sand and paint, they learn about surface finish and how texture affects color.
Finally, this project encourages creative decision making. Choosing colors, deciding where to add highlights, and planning a display all involve planning and problem solving. These are small wins that feel satisfying and useful.
Troubleshooting Common Issues
If Something Doesn’t Go as Planned
If your dough feels too sticky, it likely has too much water. Add flour a tablespoon at a time until it is tacky but not sticky. If it feels too dry and cracks while shaping, add a teaspoon of water and knead briefly.
If the egg cracks while drying, the shell may be too thick in some spots or the drying was too fast. Smooth the crack with a little water and press the edges together, or patch with a thin strip of fresh dough. For baked pieces, lower the oven temperature and extend the time to dry more gently.
If your paint peels, the shell may still have moisture or dust. Let the egg dry fully and sand gently, then apply a primer coat of watered-down paint before your final color. For a mottled metallic look, try dry brushing: dip a dry brush into paint, wipe most off, and skim the surface so only raised edges pick up color.
If the inside feels soft after popping the balloon, the shell needs more drying time. Place it on a warm, dry shelf and give it several more hours. Avoid direct hot air like a hair dryer; heat can warp or crack the shell.
If kids press too deeply and make holes, keep a small piece of dough handy to patch holes. Press gently with a damp fingertip to blend the patch. Small imperfections often disappear under paint, so do not worry if things are not perfect.
Easy Variations to Try
Simple Ways to Change It Up
Try metallic layers. Paint a dark base coat, then dry brush with bronze, gold, or silver for an antique look. This gives instant depth without advanced techniques.
Make glow eggs. Mix small amounts of glow-in-the-dark paint into your final coat. Charge them under a lamp and place them in a dark corner for a magical night display.
Scale patterns can change the mood. Use larger, rounded scales for a cute, cartoon look, or small tight scales for a realistic, reptilian feel. Let kids choose their scale size to personalize their eggs.
Use different molds. Instead of balloons, shape dough around a crumpled paper ball, a plastic egg, or even a small bottle for taller dragon eggs. Each mold gives a slightly different silhouette.
Turn this into a story activity. Each child names their dragon and writes a one-line origin tale on a card to accompany their egg. That adds an imaginative layer that makes the craft part of a game.
Storing or Reusing This Project
What to Do With It After
Keep finished eggs dry and out of direct sunlight to preserve colors. Store them in a covered box with tissue paper between pieces if you plan to keep them long term.
If paint chips after long use, you can touch up with the same colors or give the egg a new full coat. Clear varnish helps protect paint and can be reapplied if the finish dulls.
Unused dough can be kept in an airtight container in the fridge for several days. If it dries out, mix in a small amount of water and knead until soft again. For leftover painted eggs that you no longer want, break them apart and compost the dough bits if you used natural ingredients and no plastic sealer.
If you plan to reuse molds, thread them through with a paper towel to prevent sticking and wash with mild soap. Balloons are single use, so plan for replacements or use reusable egg molds when possible to reduce waste.
FAQs About How to Make DIY Dragon Eggs
Can this craft be messy?
I have a toddler and I worry about cleanup.
Yes, it can be a little messy, especially when you mix dough. Expect flour on the table and paint on fingers. I find a lined table, a trash bowl for scraps, and a damp cloth nearby make cleanup quick. If you want to keep things tidier, let kids handle shaping and decorating while an adult mixes the dough.
Is this safe for young children? What about small parts?
This craft is great for supervised children. The dough ingredients are non-toxic, but balloons and small paint pots are choking hazards for toddlers. Keep balloons and small brushes out of reach of very young children and supervise at all times. If you want an all-ages option, use paper-based molds and non-toxic paint.
Can I substitute ingredients if I do not have salt or flour?
Salt and flour make the classic dough that dries hard. If you lack one ingredient, you can try a simple air-dry clay or pre-made modeling clay instead. Those work for shaping and painting but change drying time and finish. Be honest about the texture: substitutions may make eggs smoother or less durable.
How realistic will they look on the first try?
I am worried about failing.
They will look handmade, and that is the charm. Small bumps, uneven scales, or paint streaks often read as texture once the finish dries. If something does not look right, a light sanding and a second paint coat usually fixes it. Remember, kids value the making more than perfection.
How should I store the eggs if we want to keep them?
Store finished eggs in a dry box away from direct sun. Wrap each egg in tissue paper or bubble wrap for long-term storage. If an egg gets dusty, wipe gently with a dry cloth; avoid water on painted or sealed surfaces.
A Final Helpful Note
One Last Tip Before You Go
Keep this project flexible. If you need a quick win, shape one egg and paint it with a single metallic wash. If you have more time, add layers and storytelling to make an afternoon event. The goal is simple: enjoy the hands-on part and get a pleasing result without stress. If something goes sideways, take a deep breath, patch it, and remember most fixes happen in paint.
Conclusion
If you want another step-by-step reference to compare techniques, see this detailed guide on How to Make DIY Dragon Eggs for an alternative shaping method. For more decorative finishing ideas and tutorials, this resource offers extra inspiration: A DIY Guide to Dragon Eggs – Polish Thy Dragon Eggs – Tutorials.
PrintDIY Dragon Eggs

Create your own stunning DIY dragon eggs using simple household materials. This hands-on project is perfect for a fun afternoon with kids.
- Prep Time: 15 minutes
- Cook Time: 60 minutes
- Total Time: 75 minutes
- Yield: 4–6 eggs 1x
- Category: Craft
- Method: Crafting
- Cuisine: N/A
- Diet: N/A
Ingredients
- 2 cups flour
- 1 cup salt
- 1 cup water
- Small balloons or egg-shaped molds
- Acrylic paint
- Paintbrushes
- Clear sealer or varnish (optional)
- Wax paper or parchment
- Fine sandpaper (optional)
- Glitter or metallic paint (optional)
Instructions
- Mix the dough by combining flour and salt, then slowly add water until a firm dough forms.
- Divide the dough into portions and shape into balls for each egg.
- Wrap dough around small balloons and shape into egg forms.
- Press scale shapes into the dough using various tools.
- Let the eggs dry on wax paper for 12 to 24 hours, or bake at low temperature for 1 hour.
- Once dry, pop the balloons and remove the shell.
- Smooth any rough spots with sandpaper if desired.
- Paint a base color and let dry, then apply metallic layers or details.
- Allow final coats to dry before displaying your eggs.
Notes
Cleanup is straightforward if you line your work surface. Supervision is recommended for younger children.
Nutrition
- Serving Size: 1 egg
- Calories: 50 (estimated per egg based on flour and salt used)
- Sugar: 0g
- Sodium: 1000mg
- Fat: 0g
- Saturated Fat: 0g
- Unsaturated Fat: 0g
- Trans Fat: 0g
- Carbohydrates: 12g
- Fiber: 0g
- Protein: 1g
- Cholesterol: 0mg