

A busy afternoon. The kids shout they need something to do right now. You clear a small spot on the kitchen counter, gather a few simple things, and decide to try How to Make Crystal Eggshell Geodes. It feels like a tiny science surprise that fits between snacks and homework. You can do it with eggs you already cracked for breakfast, a pinch of salt, and a warm cup of water. It will take patience more than prep, and the payoff is a delicate, light-catching geode that makes both kids and grown-ups pause.
If you want another egg-based craft to try later, our DIY dragon eggs tutorial pairs well with this project and keeps the momentum going.
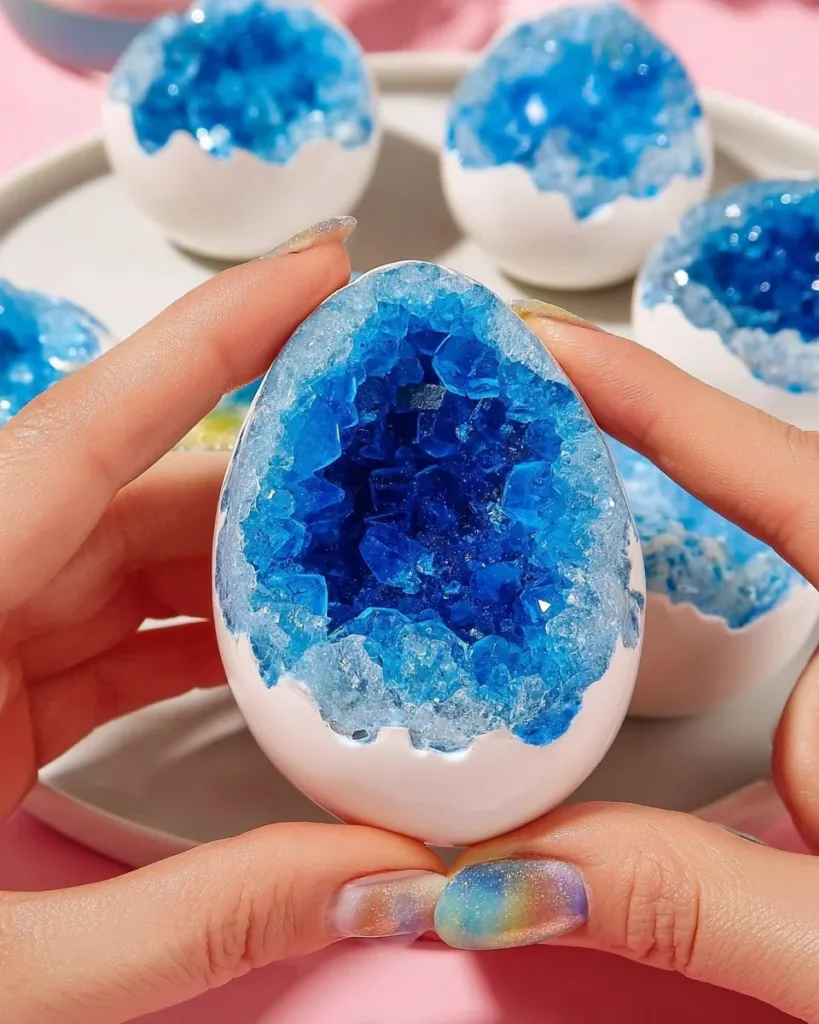
Why This How to Make Crystal Eggshell Geodes Works So Well

This project sits neatly between craft and kitchen science. The materials come from one or two different spots in the house, and the steps stay simple so you can do them with children or during a short stretch of free time. It does not demand fancy tools or special training.
Salt dissolves in warm water and then comes back out as crystals when the water cools and evaporates. The hollow eggshell gives a natural bowl and a pretty curved surface for crystals to grow on. That combination makes the project reliable and satisfying, even for a first try.
You do not need perfect conditions to get results. A warm, steady room will work. You will see differences depending on the salt you use and how quickly the liquid evaporates, and those small variables make the outcome interesting, not fragile. Most of the time you will get lovely little facets and a translucent sparkle that catches light in a way kids notice right away.
A Quick Look Before You Begin
How This DIY Comes Together
This craft usually fits into an afternoon with most of the time spent waiting. Active setup takes about 15 to 30 minutes from cleaning shells to pouring the solution. Then you check the shells over the next one to three days while crystals form.
Plan a calm workspace that can stay undisturbed for at least 24 hours. Expect a little dampness in the tray as the solution dries. You will need an adult for the steps that use warm water and for careful membrane removal if kids are helping.
Mess stays low. A shallow tray catches drips, and a paper cone or small funnel keeps pouring neat. Cleanup is mostly a rinse and a quick wipe down. The shells and crystals make tidy little decorations or gifts when done.
Materials You’ll Need
What You’ll Use for This DIY
Clean eggshell halves, washed and dried
Note: Use shells from eggs you already used. Remove membrane and let them dry fully.
White vinegar or warm soapy water for cleaning
Note: Common household item. Vinegar helps loosen membrane quickly.
Epsom salt or table salt
Note: Either works. Epsom often gives larger crystals; table salt gives a different texture.
Warm water
Note: Use comfortably warm tap water to help dissolve more salt.
Food coloring (optional)
Note: Small drop changes look. Totally optional.
Clear craft glue or water-based sealer (optional)
Note: Optional seal for a smoother inner surface. Use only a thin coat.
Cotton, rolled paper, or modeling clay for stabilization
Note: Easy supports to keep shells upright while crystals form.
STEP-BY-STEP DIRECTIONS

- Clean and dry each eggshell half gently.
Place shells in warm soapy water or a vinegar rinse to remove membrane.
Let air-dry until completely dry to the touch. - Stabilize the shells in a shallow tray using rolled paper, cotton, or soft clay so they sit open-side up.
Nestle each shell so it will not tip when you add solution.
Make small cradles from paper or use soft clay you can reshape. - Make a warm, saturated salt solution by stirring Epsom salt into warm water until no more dissolves.
Add food coloring if desired.
You want the solution visibly dense with salt and a few undissolved grains at the bottom. - (Optional) Seal the inside lightly with a thin coat of clear glue or water-based sealer.
Let the sealer dry fully before continuing.
A thin coat can help prevent tiny membrane bits from trapping crystals oddly. - Seed the inner surface of the shell with a fine brush or a tiny pinch of dry salt to encourage crystal growth.
Work gently so you do not crack the shell.
The seed points give crystals somewhere to begin. - Slowly pour or drop the solution into each shell using a funnel or paper cone.
Fill the shell only partway if you like more dramatic rim crystals.
Pour steadily and avoid fast splashes that could dislodge seeded salt. - Place the tray in a warm, still spot with soft light and avoid drafts.
Keep it out of direct sun that might speed evaporation unevenly.
A warm shelf or a quiet corner of the room works well. - Watch and wait for 24 to 72 hours, checking gently for crystal formation.
Look for tiny sparkles along the shell interior and small needles rising from seed points.
Avoid moving the tray while crystals form; motion can ruin delicate structures. - Remove excess solution if necessary without disturbing the crystals.
Use a pipette, folded paper, or a careful tilt of the tray to drain extra liquid.
Take your time so you do not wash away newly formed crystals. - Let the shells dry fully before handling and enjoy the light passing through the tiny facets.
Drying can take a day or more depending on humidity.
Hold the finished geodes to the window and watch color and texture change with angle.
The Learning Behind This DIY

This simple craft teaches a few small science ideas without a lecture. You see solubility when salt dissolves into warm water and crystallization when the water leaves again. The process shows cause and effect in a very visual way: change the salt, and the crystals look different.
Kids practice fine motor skills while cleaning shells, pinching tiny salt bits, and pouring slow streams of solution. They learn patience as they check the shells over hours and days. The project also helps with observation skills note how crystals form at different spots, how color spreads if you used dye, and how humidity slows drying.
You can use names like evaporate and crystal in a casual way that matches a child’s curiosity. Keep explanations simple: warm water holds more salt; when water goes away, salt comes back out as crystals. That is enough to spark more questions and experiments.
Troubleshooting Common Issues
If Something Doesn’t Go as Planned
If crystals do not appear after 72 hours, the solution may not have been saturated enough. Make a new batch and stir in more salt into warm water until you see undissolved grains settle at the bottom.
If crystals form flat or powdery, the solution likely evaporated too quickly. Move the tray to a slightly cooler spot or out of direct sun and try again with a fresh shell.
If crystals fall off or look messy, the shell may have shifted. The best fix is to let everything dry, gently clean the shell, stabilize it better, and reseed before pouring.
If you see bubbles in the solution, those are usually air or tiny membrane pieces. Wait for bubbles to dissipate before pouring. A thin coat of clear glue or sealer can reduce membrane bits and make the inner surface smoother.
If colors run or fade, you may have used too much food coloring. A tiny drop gives gentle color. For more vivid results, add a small amount of dye to the salt before dissolving instead of flooding the solution with food coloring.
Easy Variations to Try
Simple Ways to Change It Up
Try different salts. Epsom salt often gives needle-like crystals, while table salt makes more granular clusters. Running both in separate shells turns the tray into a small crystal lab.
Make tiny geodes by filling only the inner curve and leaving a thicker rim of shell visible. These miniature geodes look pretty in a shadowbox or glued into a craft frame.
Use small amounts of food coloring to tint crystals. One drop in a cup of solution gives a soft wash of color. Have kids mix colors in small cups to see how hues blend as crystals form.
Turn shells into little gifts. Once dry, glue a ribbon loop to the back and hang them as delicate ornaments. Keep expectations modest these hangers look handmade and charming, not factory perfect.
Seasonal tweak: place shells on a tray near a bright window for a holiday display, or pair them with painted cardboard geode slices for a mixed-media project that looks grown-up but stayed simple.
Storing or Reusing This Project
What to Do With It After
Store finished eggshell geodes in a small box with tissue between them. They stay fragile, so wrap them gently. Keep them out of damp places so crystals do not soften.
If a crystal cluster flakes over time, you can preserve it with a light misting of clear spray sealer or a thin brush of water-based glue. Test the sealer on one piece first to see how it changes the sparkle.
Reuse leftover solution carefully. If you have a lot left and it still has undissolved salt at the bottom, you can pour off the clear top layer into another dish for a second try. Otherwise, safely pour the salty water down the sink with plenty of running tap water.
Save the tray, funnels, and stabilization material. Cotton and rolled paper pieces can be reused if they stay clean and dry. Soft clay can be reshaped for the next batch.
FAQs About How to Make Crystal Eggshell Geodes
Will this project make a big mess in the kitchen?
It usually stays tidy if you plan a small workspace and use a shallow tray. Expect a little dribble while pouring use a funnel or paper cone to keep it neat. Have a damp cloth and a bowl of soapy water nearby. Most spills rinse away easily, and drying the tray right after helps prevent salt stains.
Is this activity safe for young children?
With supervision, yes. Adults should handle the warm water and help remove the eggshell membrane. Young children can do seeding and slow pouring with guidance. Keep an eye on tiny pieces if toddlers are around. Work at the kitchen table and make safety part of the fun.
Can I use any kind of salt or substitute ingredients?
Epsom salt and table salt work well and give slightly different textures. Do not add ingredients outside the list in an attempt to speed results; that can change how crystals form and may not be safe. If you do not have Epsom or table salt, pause the project until you can get one of them for reliable results.
What if my crystals look dull or not very sparkly?
Light makes a big difference. Move the finished geodes into soft, indirect light to see facets better. If crystals look dull while forming, that is often because the solution evaporated too fast or the shell moved. Try again with a steadier spot and a thicker, fully saturated solution.
How long will the finished geodes last?
They last as decorative pieces for months to years when kept dry and handled gently. They stay fragile. Avoid moisture, bumps, and high humidity. A little seal with clear glue can give extra durability but may slightly change how sparkly they look.
A Final Helpful Note
One Last Tip Before You Go
Start small and stay curious. You do not need perfect tools to get a satisfying result. When something goes sideways, frame it as an experiment: what changed, what could we try next time? Those small adjustments are part of the making process.
Keep expectations practical. These geodes look handmade and delicate. Celebrate the quirks. They make great small gifts or a display on a shelf where light can do the rest.
Conclusion
If you want more step-by-step inspiration for crystal geodes, this Instructables guide gives a complementary approach that can spark ideas: How to Make Crystal Egg Geodes – Instructables. For a chemistry-focused explanation and classroom-safe version, check the clear write-up here: How to Make Crystal Eggshell Geode Chemistry Science Experiment.
If you try this with kids, leave time to enjoy the slow reveal. If you try it alone, set it on a shelf and check back with a cup of tea. Either way, the project keeps things simple and satisfying, and it fits into a busy day better than many crafts. And when you want another quick winter-friendly experiment, consider making frozen bubbles next our guide on frozen bubbles pairs well with this one for seasonal fun.
PrintHow to Make Crystal Eggshell Geodes

Create sparkling crystal geodes using empty eggshells, warm water, and salt. A fun and educational DIY project for kids and adults.
- Prep Time: 30 minutes
- Cook Time: 0 minutes
- Total Time: 72 hours
- Yield: Variable, based on number of eggshells used
- Category: Craft
- Method: DIY Craft
- Cuisine: None
- Diet: None
Ingredients
- Clean eggshell halves, washed and dried
- White vinegar or warm soapy water (for cleaning)
- Epsom salt or table salt
- Warm water
- Food coloring (optional)
- Clear craft glue or water-based sealer (optional)
- Cotton, rolled paper, or modeling clay for stabilization
Instructions
- Clean and dry each eggshell half gently.
- Place shells in warm soapy water or a vinegar rinse to remove membrane.
- Let air-dry until completely dry to the touch.
- Stabilize the shells in a shallow tray using rolled paper, cotton, or soft clay so they sit open-side up.
- Make a warm, saturated salt solution by stirring Epsom salt into warm water until no more dissolves.
- Optionally, seal the inside lightly with a thin coat of clear glue or water-based sealer and let dry.
- Seed the inner surface of the shell with a fine brush or a tiny pinch of dry salt.
- Slowly pour or drop the solution into each shell using a funnel or paper cone.
- Place the tray in a warm, still spot with soft light and avoid drafts.
- Watch and wait for 24 to 72 hours for crystal formation.
- Remove excess solution if necessary and let the shells dry fully before handling.
Notes
This project teaches solubility and crystallization in a fun, hands-on way. Expect variations in crystal appearance based on the salt type and conditions.
Nutrition
- Serving Size: 1 geode
- Calories: 0
- Sugar: 0g
- Sodium: 0mg
- Fat: 0g
- Saturated Fat: 0g
- Unsaturated Fat: 0g
- Trans Fat: 0g
- Carbohydrates: 0g
- Fiber: 0g
- Protein: 0g
- Cholesterol: 0mg