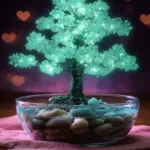
Glow-in-the-Dark Crystal Tree
A simple and creative craft project for kids to make their own glowing crystal tree keepsakes.
- Prep Time: 10 minutes
- Cook Time: 30 minutes
- Total Time: 40 minutes, plus 24 hours curing
- Yield: 1 crystal tree
- Category: Craft
- Method: Crafting
- Cuisine: N/A
- Diet: N/A
Ingredients
- Thin craft wire (18 to 22 gauge), about 3 to 6 feet
- Small base (wood disc, stone, or jar lid)
- Air-dry clay or epoxy putty for the trunk and base
- Clear resin or thick PVA glue that dries clear
- Glow-in-the-dark pigment powder or pre-made glow beads (optional)
- Small glass beads, quartz chips, or salt crystals
- Tweezers and round-nose pliers
- Small paintbrush
- Sandpaper (fine grit)
- Small tray or silicone mat
- Disposable mixing cups and stirring sticks
- Protective gloves
- A desk lamp or sunlight for charging glow pigment
Instructions
- Gather your workspace and materials. Lay a soft cloth or silicone mat.
- Put on gloves if using resin and open a window for fresh air.
- Organize beads and tools on a tray.
- Form the wire armature by twisting several wires together for the trunk.
- Separate the top into branches by spreading and bending the ends.
- Securing the trunk to the base using clay or epoxy putty.
- Build branch texture with clay or putty by applying small ropes along each branch.
- Prepare your adhesive or resin and mix carefully.
- Add glow pigment to resin and mix until evenly distributed.
- Apply adhesive where you want crystals using a toothpick or brush.
- Place beads or crystals with tweezers.
- Coat with a thin gloss layer once beads are set.
- Charge the glow parts under lamp light for 15 to 60 minutes.
- Let everything cure fully for at least 24 hours.
- Do a final check and smooth edges if needed with fine sandpaper.
Notes
Make sure to supervise children when using resin and handle small beads carefully to avoid choking hazards.
Nutrition
- Serving Size: 1 finished tree
- Calories: N/A
- Sugar: N/A
- Sodium: N/A
- Fat: N/A
- Saturated Fat: N/A
- Unsaturated Fat: N/A
- Trans Fat: N/A
- Carbohydrates: N/A
- Fiber: N/A
- Protein: N/A
- Cholesterol: N/A
Find it online: https://www.diymadeeasy.com/glow-in-the-dark-crystal-tree/