

A busy afternoon. The kids burst in after school asking to do something messy but fast. You have a jar, a few pantry items, and exactly thirty minutes. The DIY Salt Volcano Science Experiment: Fun for Kids & Adults! fits this moment perfectly. It needs little prep, uses things you likely already have, and gives an exciting bubbly finish that feels like a mini-lab in your kitchen. If you like simple, low-stress experiments, this is one to try now and if you want another hands-on eruption idea to compare afterward, check this baking soda volcano project that pairs well with today’s activity.
Why You’ll Love Making DIY Salt Volcano Science Experiment: Fun for Kids & Adults!

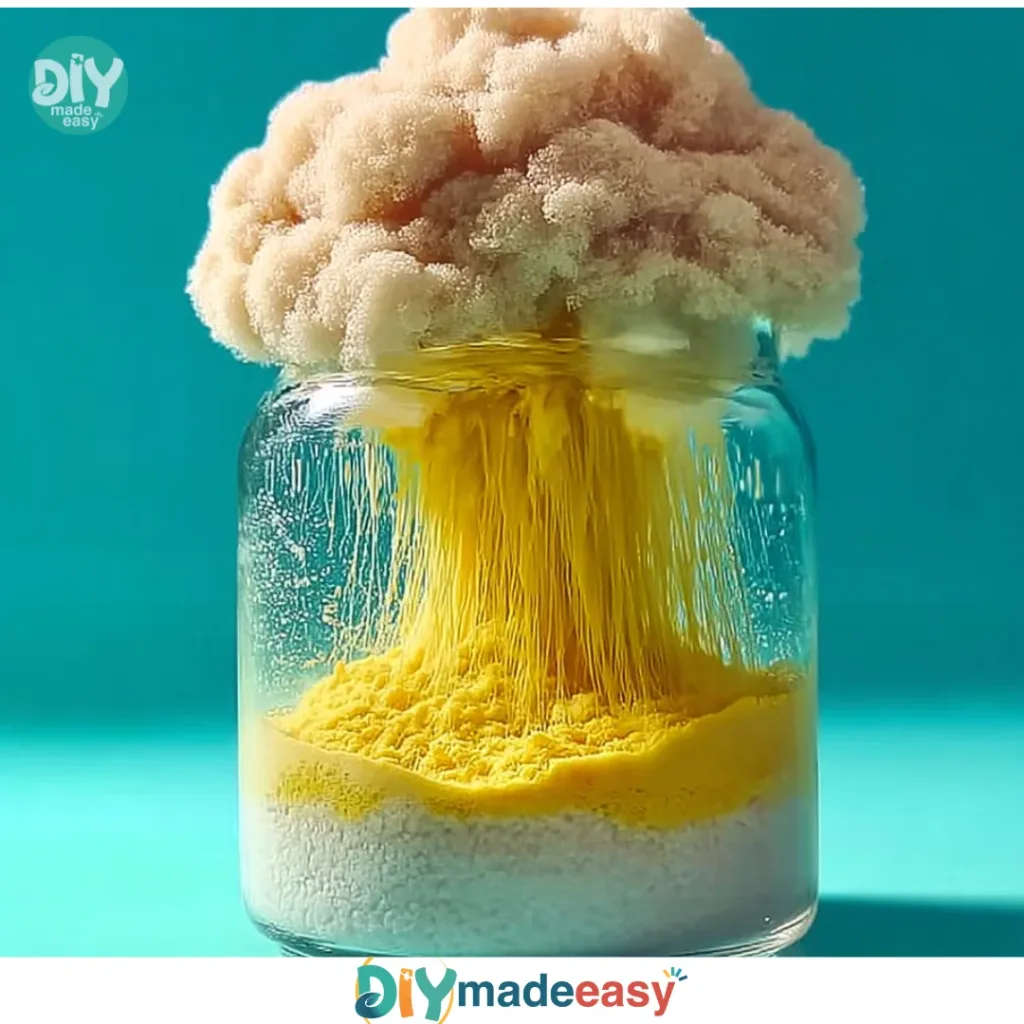
This project keeps prep small. You mix water and a little food coloring, add oil that naturally floats, then let salt trigger bubbly motion. It works with common kitchen items, so you don’t need a trip to a specialty store. It also gives a quick payoff: you’ll see movement and foamy texture within seconds after adding the salt.
This activity suits busy schedules. Set up on a tray, and you can run the whole thing in less than 30 minutes. Cleanup stays manageable because most of the mess stays in a single jar. You can repeat the experiment with the same supplies, so one quick session often turns into several rounds of testing and comparing.
The steps feel approachable for kids and adults. Children can pour and sprinkle, while adults supervise and offer small tips. The result looks impressive without fancy tools. That mix of easy setup and real results is why families come back to this one.
A Quick Look Before You Begin
This experiment takes about 10 to 20 minutes from setup to cleanup. You will work on a flat surface and the mess level stays low if you use a tray or a washable mat. Expect a little splash when the salt goes in, so move anything you do not want splashed away.
Adult help is useful for measuring and for supervising small children who might taste things. Once the water and oil sit together, you will see two clear layers. The fun part starts when you add the salt and watch it sink and create bubbly motion. If you want to repeat the experiment, let the jar settle for a few minutes and then try again.
Materials You’ll Need
1 cup room temperature water (filtered water enhances clarity)
1/4 cup vegetable oil (can substitute with canola oil)
1 tablespoon salt (table salt or rock salt) (essential for generating foam and bubbles)
2-3 drops food coloring (optional, for added color)
1 tablespoon glitter (for added sparkle)
1 tablespoon fine sand (for interesting texture)
All of these are common household items. The food coloring and glitter are optional extras that make the volcano more visually fun. The sand adds texture and little movements as it falls. Keep everything on a tray to catch spills and make cleanup quick. If you want more experiments like this later, explore other easy ideas in this collection of kitchen science experiments.
STEP-BY-STEP DIRECTIONS

- Pour 1 cup room temperature water into a clear jar or bottle so you can watch the layers form. Watch for air bubbles and give it a moment to settle so the water looks clear.
- Add 2-3 drops food coloring to the water and gently stir. The color gives the eruption more drama and helps kids see movement inside the jar.
- Pour 1/4 cup vegetable oil slowly over the colored water. You will see the oil float and form a separate layer on top. Let the jar sit for a few seconds until the layers look clearly separated.
- Sprinkle 1 tablespoon glitter and 1 tablespoon fine sand into the jar. The glitter catches the light and the sand adds texture that shifts when the salt moves through the oil.
- Slowly add 1 tablespoon salt to the top of the oil. Watch closely. The salt sinks through the oil into the water below and creates bubbly, foamy movement that looks like a tiny volcanic eruption.
- Observe the bubbles and foam as they rise and fall. Talk with kids about what they see shimmering glints, tiny sand grains dancing, and foam forming at the top of the colored water layer.
- When the action slows, let the jar settle. You can add a bit more salt to restart the motion or wait a few minutes and try different amounts to compare what happens.
The Simple Science or Skills at Work

This experiment shows simple cause and effect. The oil floats because it is less dense than water. When you add salt, the grains sink through the oil and carry tiny pockets of water with them. That motion disturbs the layers and makes the colored water move upward in little bursts that look like a volcanic eruption.
Kids practice careful pouring, stirring, and measuring. They learn to watch for visual cues like separate layers or how bubbles change over time. The glitter gives immediate feedback when the glitter moves, kids know something changed. The sand brings in a tactile cue; it clumps, falls, and sometimes settles in patterns that invite curiosity.
You do not need technical terms to explain this. You can say that salt acts like a trigger that wakes up the liquids and makes them dance. That simple explanation helps children connect cause and effect without overwhelming detail.
Troubleshooting Common Issues
If the jar looks cloudy, let it sit for a minute. Tiny bubbles from pouring or stirring clear up quickly. Use filtered water if you want the clearest view.
If nothing happens when you add the salt, make sure you added the oil after the water and that you used a clean, dry spoon to add the salt. Wet salt can clump and float instead of sinking. If the salt sits on top, try tapping it gently or adding a little more salt sometimes a small extra amount helps it sink and start the motion.
If the glitter or sand clumps, they might be wet or static-charged. Use a dry spoon and shake them lightly into the jar. If glitter sticks to the sides, tilt the jar and swirl a little to free it; the motion often restarts the activity.
If kids pour too quickly and splash, pause and set a slower pace. Show them how to pour along the jar’s inside so the liquids do not mix violently. Using a tray keeps the mess contained and makes cleanup faster.
Easy Variations to Try
- Color layers: Try the experiment twice with different food coloring in each jar. Let kids predict which color will show more movement and why. Use the same salt amount and compare.
- Glitter storms: Swap the fine sand for extra glitter to see how shimmer changes the look. The glitter makes every bubble catch light and look like tiny lava drops.
- Salt size test: Use table salt in one jar and rock salt in another. Watch how the different grain sizes change the speed and strength of the action. The larger grains often sink differently, making slightly different bubbly patterns.
- Slow-motion demo: Record the eruption on a phone camera in slow motion. Playing it back shows tiny details and helps kids see subtle motions they missed the first time.
Present each idea as a friendly suggestion. Let children choose what to try next so they feel ownership and stay engaged.
Storing or Reusing This Project
You can let the jar sit on a shelf to watch how the layers settle over a day or two. The water and oil remain separated, but glitter and sand may sink or gather at the bottom. If you want to reuse the jar for another round, pour the oil and water into a container for disposal and rinse the jar with warm, soapy water.
If you plan to keep the supplies, store the salt, glitter, and sand in small sealed containers so they do not clump. Reuse the same jar for many experiments; a clear jar works well for observations over time. To reduce waste, scoop glitter and sand back into their containers with a funnel or piece of paper folded into a chute.
When the experiment is done, wipe the tray clean with a damp cloth and wash any utensils. Oil rinses clean with hot, soapy water. If glitter scatters, use a damp paper towel to pick it up; dry sweeping can spread glitter further.
PrintDIY Salt Volcano Science Experiment: Fun for Kids & Adults!

A quick and exciting science experiment creating a bubbly salt volcano using common household items, perfect for kids and adults.
- Prep Time: 10 minutes
- Cook Time: 20 minutes
- Total Time: 30 minutes
- Yield: Multiple experiments
- Category: Science Experiment
- Method: Mixing
- Cuisine: N/A
- Diet: N/A
Ingredients
- 1 cup room temperature water
- 1/4 cup vegetable oil (or canola oil)
- 1 tablespoon salt (table salt or rock salt)
- 2–3 drops food coloring (optional)
- 1 tablespoon glitter (optional)
- 1 tablespoon fine sand (optional)
Instructions
- Pour 1 cup room temperature water into a clear jar or bottle.
- Add 2-3 drops of food coloring and gently stir.
- Pour 1/4 cup vegetable oil slowly over the colored water.
- Sprinkle in 1 tablespoon of glitter and 1 tablespoon of fine sand.
- Slowly add 1 tablespoon of salt to the top of the oil.
- Observe the bubbly, foamy movement as the salt sinks.
- Let the jar settle, then add more salt to restart motion if desired.
Notes
Use a tray to contain spills and make cleanup easier. Supervise children closely during the activity.
Nutrition
- Serving Size: 1 experiment
- Calories: N/A
- Sugar: N/A
- Sodium: N/A
- Fat: N/A
- Saturated Fat: N/A
- Unsaturated Fat: N/A
- Trans Fat: N/A
- Carbohydrates: N/A
- Fiber: N/A
- Protein: N/A
- Cholesterol: N/A
FAQs About DIY Salt Volcano Science Experiment: Fun for Kids & Adults!
Will this make a big mess on my countertop?
It can splash if kids pour too fast, but most of the action stays inside the jar. Set the jar on a tray and use a damp cloth nearby. If a little oil or water splashes, warm soapy water cleans it right away. I have done this many times and a simple tray stops nearly all cleanup stress.
Is this safe for toddlers and preschoolers?
This activity uses food-safe items, but it is not for toddlers who put things in their mouths. Supervise closely. Keep salt, glitter, and sand out of reach when little hands get curious. For preschoolers, an adult should handle the salt adding and the oil pour.
Can I substitute any ingredient if I run out?
You can use canola oil instead of vegetable oil and table salt or rock salt for the salt. Food coloring is optional. I do not recommend swapping out the salt for another chemical because salt plays a specific role in the movement you want. If you lack glitter or sand, try small beads or tiny paper confetti from a punch just know results will look different.
How long will the bubbly action last?
Each addition of salt gives you a short, exciting burst that usually slows after a minute or two. If you want more bursts, add another tablespoon of salt after the jar settles. It feels satisfying to experiment with timing: add small amounts, watch, and pause. Expect a few rounds before the jar settles completely.
What if we want to do this again tomorrow?
You can reuse the jar, but discard the liquids if they get dirty. Wipe and rinse the jar, let it dry, and set up fresh water and oil. Store the dry supplies separately so they stay ready for the next session. This routine makes it easy to do a quick repeat the next day without a lot of prep.
A Final Helpful Note
This experiment is forgiving and fun. If the first try looks different than you expected, that’s normal. Small changes in temperature, grain size of the salt, or how fast you pour create different results. Encourage kids to try little tweaks and make observations. Remember that the goal is curiosity and hands-on play, not perfection. Keep it light, keep it safe, and enjoy the small wins.
Conclusion
If you like this salt-and-oil activity, you might also enjoy exploring other classic eruptions and simple science demos. For more ideas that use common household items and give hands-on learning you can try today, the article on baking soda and vinegar STEM activities gives several fun options that pair nicely with this project. If you want family-friendly science events and seasonal programs near you, check out the offerings at Science! (Winter Edition) at Thanksgiving Point for inspiration and hands-on exhibits.