

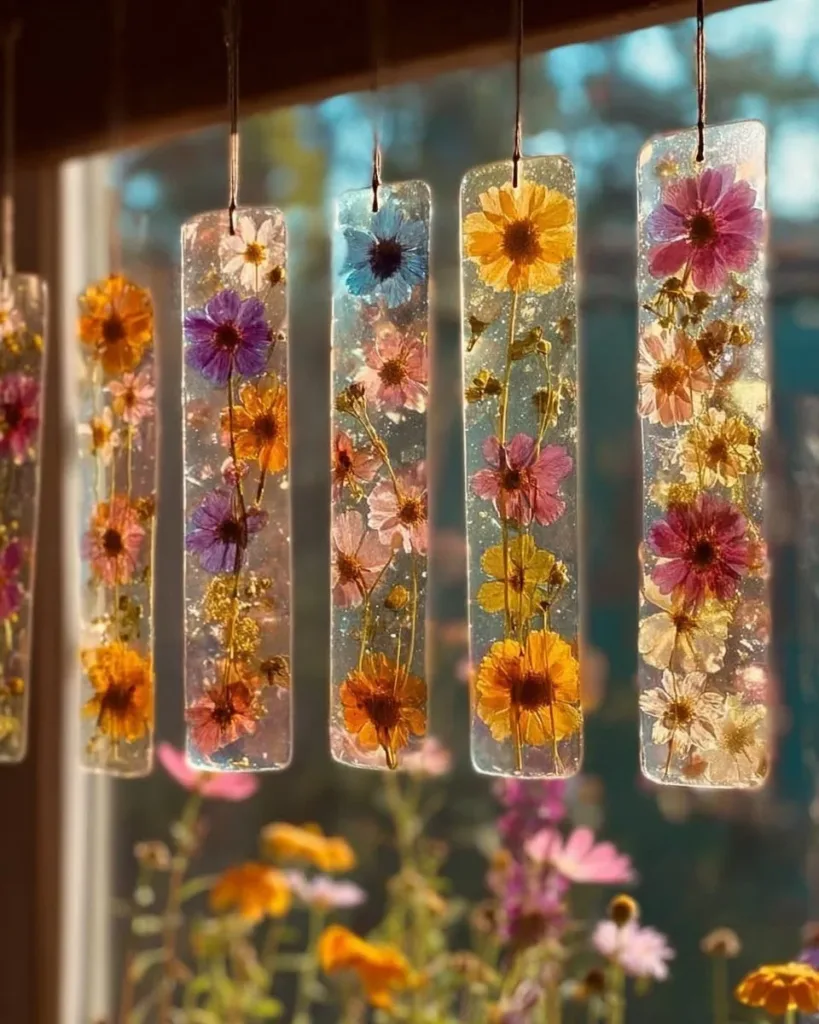
A busy afternoon, three kids asking to make something now, and a small pile of pressed flowers on the counter. That is how I first tried DIY Bioplastic Suncatchers with my kids quick to set up, gentle on the kitchen table, and oddly satisfying as the warm mixture turned clear and glossy. These little suncatchers pack a lot of charm into a short amount of time.
They let kids tuck a tiny petal or a favorite drawing into a translucent keepsake that catches light on a windowsill. If you need a short, hands-on project that feels crafty but stays tidy, these suncatchers work well and they play nicely alongside other kitchen experiments like our quick salt volcano project when you want more science-focused fun.
Why This DIY Bioplastic Suncatchers Works So Well

This project fits into real life because it needs very little prep and uses items you often have at home. The recipe calls for one tablespoon of gelatin or agar-agar and a few tablespoons of water. That makes it fast to mix and quick to warm, so you do not sit at the stove for long. You can add a drop of diluted watercolor or food coloring to make soft, jewel-like tones without messy paints.
The materials stack up as family-friendly. Parchment or a silicone mat keeps the table clean. Cookie cutters and small molds turn shaping into a simple step rather than a craft complication. The process gives kids clear, small tasks: stir, pour, press a petal, poke a hole. That means they stay busy and proud, without a long cleanup afterward.
This makes the project reliable. The mix becomes clear and glossy when it reaches the right heat and consistency, so you can tell when it’s ready. It dries into sturdy, slightly flexible pieces that hold small decorations well. For busy days, that predictability matters. You can expect real, visible results with minimal fuss.
A Quick Look Before You Begin
This project takes about 20 minutes of active time and several hours to dry. Most families do the mixing and shaping in one sitting, then leave the suncatchers to dry on the counter or a sunny window. Plan the drying time into your day so it does not feel rushed.
Set aside an hour for setup, mixing, and cleanup, but know that the drying step happens with almost no effort. Mess stays light if you use parchment or a silicone mat. Adults should handle the stovetop warming step. Kids can do stirring, pressing decorations, and poking the hanging hole under supervision.
You will notice changes along the way that tell you what to do next. The powdered gelatin or agar-agar dissolves in warm water. The mix turns clear when it reaches the right heat. The glossy sheen after adding glycerin signals good flexibility. Those cues keep the process calm and obvious.
Materials You’ll Need
1 tablespoon gelatin powder or agar-agar
Common household pantry item; agar-agar works for a vegan option.
2 tablespoons warm water
Warm, not boiling; helps dissolve the powder quickly.
1 teaspoon glycerin (optional)
Optional for flexibility and shine; small bottles are common in craft sections.
1 tablespoon water
Used to adjust texture and shine as directed.
Diluted watercolor or food coloring (optional)
Optional for gentle color; a little goes a long way.
Small pressed flowers, leaves, or thin paper cutouts
Pressed bits that lie flat work best; keep them as dry as possible.
Parchment paper or silicone mat
Protects the table and makes peeling easy.
Cookie cutters or small round molds
Simple shapes help with neat edges.
Heatproof saucepan
Use a small pan for gentle warming.
Wooden or silicone spoon
Nonreactive and gentle on the pan.
Fine brush
Handy for smoothing the surface and nudging small bits in place.
Small hole punch or needle
Make a tiny hole near the top while soft to hang later.
Scissors
Trim edges and tidy up after drying.
Ribbon or twine for hanging
Choose colors that match your suncatchers.
If you are curious about other fun sensory crafts while you let these dry, try our version of shaving cream play dough for a different kind of messy, slow-play activity. It uses a different set of skills and gives kids a chance to practice gentle hand strength.
Step-by-Step Directions

- Measure one tablespoon of gelatin or agar-agar and two tablespoons of warm water.
Stir slowly until the powder dissolves. Watch for any graininess; keep stirring until smooth. - Add a teaspoon of glycerin and one tablespoon of water.
Stir until glossy. The mixture should look a bit shiny and feel smoother on the spoon. - Warm the mix gently over low heat, stirring often until it turns clear.
Go slow and keep the heat low to avoid bubbling. Clear means the powder has fully dissolved. - If using color, add a drop or two of diluted watercolor or food coloring and stir gently.
Start with one drop and add more if you want deeper color. Stir just enough to spread the tint. - Prepare your tray with parchment or a silicone mat and set your cookie cutters or templates.
Press the cutters down so the mix stays contained. Have decorations ready to place. - Pour a thin layer of the warm bioplastic into each shape and spread evenly.
Thin layers dry faster. Tilt the tray slightly if needed to level the mix inside the cutter. - Press small pressed leaves, petals, or paper cutouts onto the surface and smooth them with a fine brush.
Press gently so the items lay flat. Use the brush to remove air bubbles or nudge edges into place. - Make a small hole at the top with a needle or skewer while the material is still soft.
This hole should be large enough for your ribbon but not so big it tears the edge as it dries. - Let the pieces dry in a warm, ventilated place for several hours or overnight.
Avoid very cold or humid spots. A sunny windowsill speeds things up but do not leave them in direct heat. - Test flexibility gently by bending; trim uneven edges with scissors.
Bend slowly. If the piece cracks, it needs more drying time or the layer was too thin. - Hang using ribbon or twine.
Thread your ribbon through the hole and tie a simple knot. These hang best where they catch gentle light.
The Learning Behind This DIY

This activity teaches simple cause and effect. Kids see powder dissolve, the mix turn clear, and a soft sheet become more solid as it dries. Those changes make the science feel real and visible.
You also practice fine motor skills. Pressing small petals, smoothing with a fine brush, and poking the hanging hole all help hand control. Trimming edges with scissors builds careful cutting skills.
There is a bit of kitchen chemistry too. Gelatin and agar-agar form a network that traps water as they cool and dry. Glycerin helps the finished pieces stay flexible by holding onto moisture. You do not need to explain all the chemistry unless your kids ask. Simple descriptions like “the mix sets into a soft plastic” work well.
Troubleshooting Common Issues
If the powder stays grainy, it did not fully dissolve. Warm the mix a bit longer and stir until it smooths out. If you still see bits, let the mix sit a minute and stir again before warming.
If your mixture bubbles, the heat is too high. Turn the stove down and stir more gently. Bubbles make uneven surfaces and tiny holes in the final piece.
If pieces crack while bending, the layer may be too thin or too dry. Try pouring a slightly thicker layer next time or allow a slower drying spot. A thin skim dries fast and can become brittle.
If decorations float or shift, press them gently into the mix and smooth with a brush right after pouring. Slightly heavier paper cutouts may stay put better than airy petals.
If the hole rips, the opening was too close to the edge or too large. Make the hole while the mix is soft and don’t make it much bigger than the ribbon. If it tears after drying, trim a small border and try again with a new hole a little farther in.
Easy Variations to Try
- Layered color. Pour one thin color, let it set to tacky, then add a second thin layer for a banded look. This creates soft, stained-glass effects as the layers dry.
- Tiny collages. Use small bits of thin paper, confetti, or safe craft glitter sealed under a thin layer to make playful patterns. Keep pieces flat and thin so the mix covers them fully.
- Seasonal shapes. Change cookie cutters by season: leaves and acorns for fall, simple stars for winter, flower shapes for spring. This keeps the activity fresh across the year.
- Kid-made drawings. Use thin paper cutouts of small drawings made with permanent markers. They hold color better and will not bleed into the wet mix.
- Use varying textures for older kids. Try mixing tiny pressed fern bits with a small strip of tissue paper for interesting contrasts. Use caution with very thick items; they can slow dry time.
If you want a different suncatcher style that uses crayons and a similar window glow, try our guide to Enchanting Crayon Suncatchers for another gentle project idea.
Storing or Reusing This Project
Finished suncatchers last best indoors away from direct heat. Prolonged sun will fade delicate colors over months. If a suncatcher collects dust, wipe it gently with a soft, dry cloth. Do not scrub with water; water can soften older pieces.
Store extra materials like glycerin and agar-agar in a cool, dry place. Keep pressed flowers between sheets of paper inside a book if you plan to make more later.
Parchment or silicone mats wash easily. Rinse mats with warm soapy water and dry flat. Wooden spoons and utensils go back to the drawer once cooled and wiped. If you used a pan for warming, wash it right away while it is still warm so the thin residue does not set.
If a small piece breaks, you can use the scraps as a starting point for a tiny keychain or mix them into a craft collage. Think of leftover bits as mini decorations rather than waste.
FAQs About DIY Bioplastic Suncatchers
Can this be messy?
Yes, it can get a little messy, but the mess stays small and easy to manage. Use parchment or a silicone mat and have a damp cloth handy. The warm mix stays contained and peels clean from the mat. If a spill happens, wipe it up while warm for the easiest cleanup.
Is this safe for young kids?
The ingredients are common kitchen items, but the warming step uses heat. Have an adult handle the pan and spoon. Kids can do the stirring, smoothing, and decorating under supervision. If you use glycerin, keep it out of small hands until mixed in.
What if I do not have glycerin?
Glycerin is optional. Without it, suncatchers will still set but may feel a touch stiffer. That is okay for simple decorations. If you want more flexibility, a little glycerin helps, but it will still work fine without it.
Will the colors bleed or fade?
Diluted watercolor and food coloring give soft shades that will hold while the piece dries. Very bright or very saturated inks might change slightly as water evaporates. Over months, colors from natural petals can fade in strong sunlight. Place suncatchers where they get gentle light rather than blazing sun.
Can we reuse the molds and decorations?
Yes. Cookie cutters, parchment, and brushes clean up well. Pressed petals and paper cutouts may be delicate after use. If you plan to reuse pressed flowers, press extra ahead of time so you have backups.
A Final Helpful Note
Take your time and keep the mood relaxed. The steps are simple and forgiving. Expect small imperfections; they give each suncatcher character. If a piece does not turn out as planned, use it as a chance to talk about what changed and try a little tweak next time. Your kids will enjoy the hands-on work and the payoff of something pretty to hang in the window.
Keep extra materials on hand when you plan a session. That way you can try a second pour if a layer breaks or experiment with a different shape without a big pause. Most of all, enjoy the quiet moments stirring the warm mix and pressing tiny bits into place. Those are the parts kids remember.
Conclusion
If you want more step-by-step versions and a slightly different take on making a bioplastic suncatcher, this How To Make A Bioplastic Suncatcher – Chemistry for Kids guide offers a clear companion view that complements this recipe. For ideas focused on botanical styling and creative photos of finished pieces, see the inspiration at Botanical Bioplastic Sun Catchers – Wineberry Woods.
PrintDIY Bioplastic Suncatchers

A fun and crafty project to create beautiful bioplastic suncatchers using simple ingredients and household items.
- Prep Time: 20 minutes
- Cook Time: 0 minutes
- Total Time: 120 minutes
- Yield: 5–10 pieces 1x
- Category: Craft
- Method: Crafting
- Cuisine: N/A
- Diet: Vegan
Ingredients
- 1 tablespoon gelatin powder or agar-agar
- 2 tablespoons warm water
- 1 teaspoon glycerin (optional)
- 1 tablespoon water
- Diluted watercolor or food coloring (optional)
- Small pressed flowers, leaves, or thin paper cutouts
- Parchment paper or silicone mat
- Cookie cutters or small round molds
- Heatproof saucepan
- Wooden or silicone spoon
- Fine brush
- Small hole punch or needle
- Scissors
- Ribbon or twine for hanging
Instructions
- Measure one tablespoon of gelatin or agar-agar and two tablespoons of warm water. Stir until smooth.
- Add a teaspoon of glycerin and one tablespoon of water, stirring until glossy.
- Warm the mix gently over low heat, stirring often until it becomes clear.
- If using color, add a drop or two of diluted watercolor or food coloring and stir gently.
- Prepare your tray with parchment or a silicone mat and set your cookie cutters or templates.
- Pour a thin layer of the warm bioplastic into each shape and spread evenly.
- Press small pressed leaves, petals, or paper cutouts onto the surface and smooth them with a fine brush.
- Create a small hole at the top with a needle or skewer while the material is still soft.
- Let the pieces dry in a warm, ventilated place for several hours or overnight.
- Test flexibility gently by bending; trim uneven edges with scissors.
- Hang using ribbon or twine.
Notes
This project is perfect for kids and teaches them about cause and effect. Ensure adult supervision during the warming step.
Nutrition
- Serving Size: 1 suncatcher
- Calories: 0
- Sugar: 0g
- Sodium: 0mg
- Fat: 0g
- Saturated Fat: 0g
- Unsaturated Fat: 0g
- Trans Fat: 0g
- Carbohydrates: 0g
- Fiber: 0g
- Protein: 0g
- Cholesterol: 0mg