

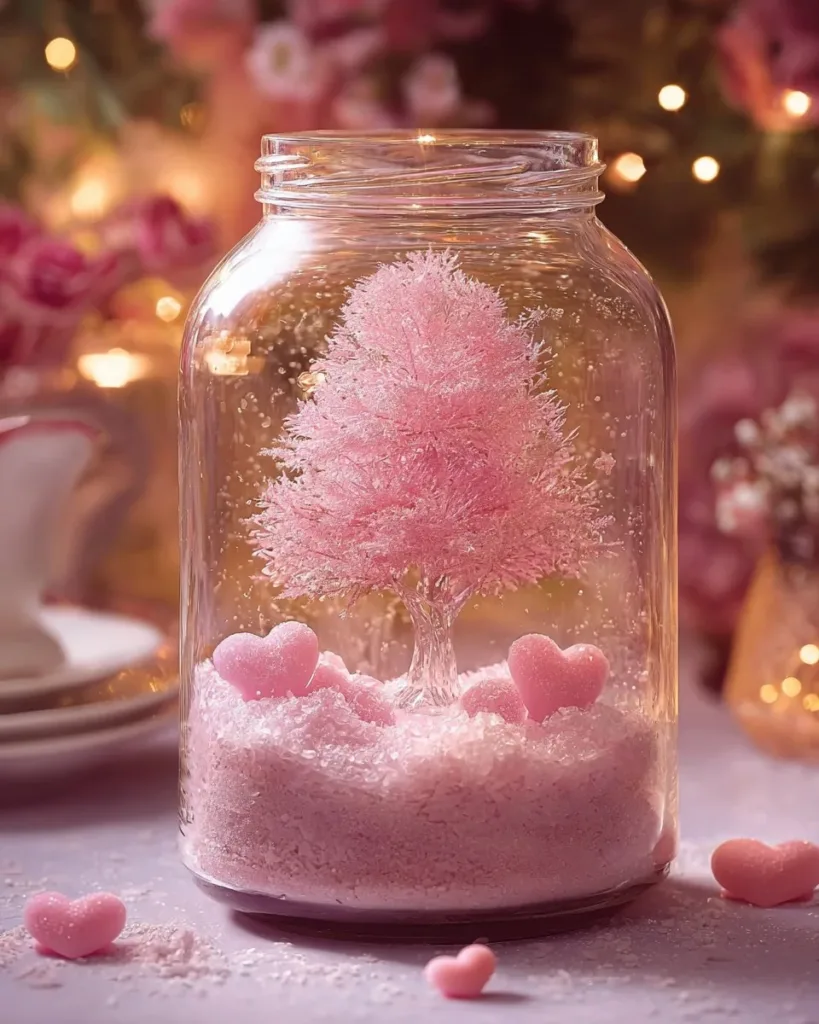
A busy afternoon turned into a quiet kitchen moment when the kids asked for something to make right now. I pulled out a spool of thin craft wire, a clean jam jar, and a packet of baking soda, and we set up a small experiment that felt like decoration and science in one. This Crystal Tree project fit into a short window between errands and dinner. It took only a little prep, a warm kettle, and a calm corner on the counter. By the end of the day we had tiny sparkly beads starting to form along the branches, and the kids carried the jar around like a small treasure. Crystal Tree makes a satisfying, hands-on activity that suits busy families because it gives real results with familiar materials and a gentle pace.
Why You’ll Love Making Crystal Tree

This project works because it keeps things doable. You do not need special tools. The list uses items you likely have at home or can buy cheaply. The wire frame takes minutes to shape. The crystal solution needs a little time to do its work. That timing is its friend. You get a calm making window that still leaves room for dinner, homework, or a quick walk.
It stays low-prep. You make the frame, mix a warm solution, and set the jar in a quiet spot. The crystals grow while you do other things. That hands-off growing part makes Crystal Tree great for families. Kids see immediate action when the first beads appear, and adults appreciate that the cleanup stays small.
The method also feels reliable. Warm water dissolves the crystal mix better than cold water. A wire skeleton gives the crystals something to cling to. These simple, predictable moves give consistent results most of the time. If it does not look perfect on the first try, you can add another layer or make a second frame. The project invites small fixes rather than total starts over.
A Quick Look Before You Begin
This activity takes about 20 to 40 minutes of active work plus several hours or a day of quiet growing time. Plan to shape the wire and mix the solution in one quick session. Then move the jar to a place where it will not be bumped.
Set up on a tray or an old towel. Expect small splashes while pouring the solution. The tray protects the counter and makes cleanup easy. Keep paper towels and a small bowl handy for discarded liquid when you check the jar.
Mess level stays low if you work calmly. Children can help with stirring and placing the frame, but an adult should handle the hot water and shaping the wire. You will check the jar once or twice a day. Most changes happen slowly, so you do not need to babysit it.
Materials You’ll Need
Thin craft wire (18-22 gauge)
Sturdy but bendable wire for the tree frame. Easy to shape and holds crystals well.
A small glass jar or bottle (clean and clear)
A clear container shows the growth. Clean it so crystals form on the wire, not on residue.
Hot water (from a kettle, not boiling)
Use hot water from the kettle and let it cool slightly. It helps dissolve the crystal mix faster.
Crystal-forming mix (baking soda or simple crystal packet)
Baking soda is a household option. Crystal packets from kits work too if you prefer ready-made mixes.
Clear glue or white craft glue (optional)
Use tiny dots to secure delicate crystals if you want a permanent piece later.
Small pebbles or marbles (optional)
These help anchor the wire base and add a decorative touch.
Tweezers or chopsticks (helpful for placing crystals)
Great for nudging fragile crystals or holding branches while cleaning.
A spoon or stir stick
For mixing the solution and stirring slowly.
A tray or shallow dish (to catch spills)
Protects your table and keeps the mess contained.
Paper towels and a small bowl (for discarded water)
For quick cleanup and safe disposal of used solution.
A pair of needle-nose pliers (for shaping wire)
Helps make tight twists and tidy branch ends safely.
An old towel (to protect work surface)
Lay it down first so you can work without worrying about dents or scratches.
Step-by-Step Directions

- Make the wire frame: Bend the wire into a trunk with many small branch tips and twist the base to fit snugly into your jar.
Work slowly while you shape the trunk and branches. Leave enough stem length so the base reaches the bottom of the jar. - Prepare a calm work area: Lay an old towel and set the jar in the center with all supplies within reach.
A tray helps catch spills and keeps paper towels handy. Keep children nearby but not handling the hot water. - Warm the water gently: Pour hot water into your mixing cup and let it cool for a few minutes until it is warm to your wrist.
You want hot, not boiling water. Hot water dissolves the mix more thoroughly and speeds early growth. - Mix the crystal solution slowly: Add your chosen crystal mix to the warm water a little at a time, stirring in gentle circles until clear.
Stop adding mix when the solution clears or slightly cloudy. Stir until the grains dissolve or the packet instructions are followed. - Pour the solution into the jar: Set the wire frame into the jar and ensure branches do not touch the jar walls too much.
Tilt the jar slightly if needed and pour slowly to avoid splashing. Keep branches mostly free so crystals grow evenly. - Anchor the frame if needed: Add pebbles or marbles around the base to keep the tree upright.
Press the stones in gently so the base sits stable. The wire should not move when you lift the jar slightly. - Find a quiet place to let it rest: Move the jar to a soft light area and cover it lightly if needed.
Avoid direct sun and places where pets or small hands might knock it. A shelf or corner table works well. - Watch the first crystals form: Check after a few hours to notice tiny beads along branch tips.
Look for small sparkly points at the highest tips first. That shows nucleation has started. - Return slowly and mindfully: Glance at your tree once or twice a day.
Open the room gently and avoid moving the jar. If you must adjust, do it slowly to prevent breaking early crystals. - Add layers for a fuller look: Mist lightly to encourage more growth and reposition if needed.
A light spray from a distance can help crystals grow thicker. Do not pour extra solution directly on the branches. - Finish with glue if permanence is desired: Add tiny dots of glue and let it dry fully.
Use clear glue for a discreet finish. Apply only where needed so the crystals keep their sparkle. - Trim and refine: Use pliers to snip excess wire and tidy the silhouette.
Take small cuts and step back to check the shape. Wear safety glasses if wire springs while cutting.
Discover Easy Kids Activities
Looking for simple, fun ideas for kids? Explore our Low Prep Kids Activities and find quick projects that spark creativity without long prep time.
The Simple Science or Skills at Work

This project gives little science moments that are easy to talk about. The warm water dissolves the crystal mix and creates a solution that wants to change back into solid crystals as it cools and loses moisture. The wire provides a surface for the crystals to latch onto. Those lock points on the branch tips start the visible growth.
You also practice fine motor skills. Shaping the wire, twisting small branches, and placing pebbles all help hand-eye coordination. Children learn to control pressure while twisting or cutting wire. Stirring slowly and gently builds care and patience.
Watching the tree grow teaches cause and effect. You see how a simple warm solution becomes tiny crystals over time. You also notice that movement can disrupt growth. That observation helps kids learn to respect gentle processes and the value of letting things rest.
Troubleshooting Common Issues
If the solution looks cloudy and never clears, you likely added too much mix. Heat helps dissolve ingredients, but too much will stay suspended. The fix is simple. Pour off a little solution into your small bowl and add more warm water to the jar. Stir gently and let it settle again.
If crystals form on the jar walls more than on the branches, the branches probably touched the glass. Try a second frame with the branches free from the sides. You can also place a thin support in the center to keep branches centered while the crystals start.
If growth seems slow, room humidity and temperature make a difference. Cooler, still air helps crystals form steadily. Move the jar to a slightly cooler shelf and give it time. Avoid direct sunlight and heaters that speed evaporation too fast and cause brittle crystals.
If the wire collapses or leans, the base needs more anchoring. Add a few marbles or pebbles and press gently around the stem. Check the twist at the base and tighten it with pliers if it slips.
If crystals break off when you touch them, they are still delicate. Let the tree grow longer before trying to move it. If you want a lasting piece, use clear glue dots applied after most growth has finished and dry time has passed.
Easy Variations to Try
Try a multi-tree display by making two or three small frames and placing them in the same jar. Space them evenly so crystals grow around each tree without crowding.
Use different crystal mixes if you have them. Baking soda gives a classic look. A crystal packet from a science kit may produce different sizes and textures. Compare the results side by side.
Make a seasonal version by changing the container. A narrow bottle makes tall, spindly crystals. A wider jar gives a bushier silhouette. Pick jars you like so the finished piece fits your shelf style.
Add a base color under the stones. Place a small ring of colored pebbles around the base before you pour the solution. The color shows through the clear crystals for a subtle decorative effect.
Scale the project for age. Younger kids can shape big loops for branches while adults do the fine twisting. Older kids can handle the wire shaping and pour while supervised with hot water.
Storing or Reusing This Project
If you like the look, store the finished Crystal Tree in a dry place. Keep it in a glass dome or on a shelf away from humidity and direct sunlight. The crystals can stay intact for months if you do not move them often.
To reuse materials, dissolve the crystals and make a fresh batch. Warm water will break down many baking soda crystal formations. Pour gently into your small bowl and discard in the sink while following your local disposal rules. Rinse the jar and wire frame and start again.
If you want to keep the wire shape for later use, remove most of the crystals and rinse the wire carefully. Use tweezers to protect delicate areas. You may find an old towel and a toothbrush helpful during cleanup.
Recycle broken crystals and packs responsibly. Glass and metal reuse well. Marbles and pebbles go back into craft boxes for future projects. Keep glue and packet labels with your supplies so you know what worked best for next time.
FAQs About Crystal Tree
Will this project make a big mess on my counter?
A little mess is likely if kids help and excitement runs high. Lay an old towel and a tray before you begin. The towel catches small spills and the tray keeps your jar stable. Most spills wipe up with a damp paper towel. If some solution drips, rinse the area with warm water and a little soap.
Is it safe for younger children?
Kids enjoy this with supervision. An adult should handle the hot water and the wire shaping. Let children stir and watch the crystals form. Keep small pebbles and finished crystal pieces away from toddlers who might mouth items. Safety glasses and gentle reminders about hot water keep things calm.
Can I use other ingredients if I do not have a crystal packet?
Yes. Baking soda often works and gives a clear result. It is gentle and common in kitchens. Follow the same steps for dissolving and avoid adding colors or extras that the original mix does not recommend.
What if my tree does not look like the picture?
Real talk, it might not. Crystal growth depends on small factors you cannot always control. If it looks sparse, you can add another layer later or make a second tree and combine them. The imperfect results still teach a lot and often look charming on a shelf.
How long can I keep the finished tree?
If you leave it alone, the crystals can hold their shape for many weeks. Avoid humid spots and moving the jar frequently. If you want a permanent keepsake, add small dots of clear glue to key junctions and let it dry fully. That seals the look and makes handling safer.
A Final Helpful Note
You do not need perfection to enjoy this project. Small cracks or uneven growth simply remind you that you made it by hand. Take photos as the tree grows so kids can see the change day by day. These photos become part of the memory and make the process feel special.
Give yourself permission to pause. The best results come when you work calmly and let the solution do its part. If something does not go as planned, celebrate the parts that did work. You can always rinse and try again another afternoon.
If you want to repeat the activity, change one thing at a time. Try a different jar or adjust the amount of mix. Those small changes teach a lot and keep the project fresh. The next time you set up the tray and warm the kettle, you will know exactly what to expect.
Conclusion
If you want ideas for themed garden names or just enjoy browsing examples of crystal landscaping, this local club page shares a good visual for the phrase Crystal Tree Golf and Country Club 2016 that inspired our name. For shopping inspiration and to see how manufactured crystal trees look compared to your homemade version, take a look at this selection of Crystal Trees on Amazon.
PrintCrystal Tree Project

A fun and hands-on science experiment for the whole family, creating a beautiful crystal tree using simple household materials.
- Prep Time: 20 minutes
- Cook Time: 0 minutes
- Total Time: 1440 minutes
- Yield: 1 crystal tree
- Category: Craft
- Method: Crafting
- Cuisine: N/A
- Diet: N/A
Ingredients
- Thin craft wire (18-22 gauge)
- A small glass jar or bottle (clean and clear)
- Hot water (from a kettle, not boiling)
- Crystal-forming mix (baking soda or simple crystal packet)
- Clear glue or white craft glue (optional)
- Small pebbles or marbles (optional)
- Tweezers or chopsticks (helpful for placing crystals)
- A spoon or stir stick
- A tray or shallow dish (to catch spills)
- Paper towels and a small bowl (for discarded water)
- A pair of needle-nose pliers (for shaping wire)
- An old towel (to protect work surface)
Instructions
- Make the wire frame: Bend the wire into a trunk with many small branch tips and twist the base to fit snugly into your jar.
- Prepare a calm work area: Lay an old towel and set the jar in the center with all supplies within reach.
- Warm the water gently: Pour hot water into your mixing cup and let it cool for a few minutes until it is warm to your wrist.
- Mix the crystal solution slowly: Add your chosen crystal mix to the warm water a little at a time, stirring in gentle circles until clear.
- Pour the solution into the jar: Set the wire frame into the jar and ensure branches do not touch the jar walls too much.
- Anchor the frame if needed: Add pebbles or marbles around the base to keep the tree upright.
- Find a quiet place to let it rest: Move the jar to a soft light area and cover it lightly if needed.
- Watch the first crystals form: Check after a few hours to notice tiny beads along branch tips.
- Return slowly and mindfully: Glance at your tree once or twice a day.
- Add layers for a fuller look: Mist lightly to encourage more growth if desired.
- Finish with glue if permanence is desired: Add tiny dots of glue and let it dry fully.
- Trim and refine: Use pliers to snip excess wire and tidy the silhouette.
Notes
This project is perfect for busy families and requires simple materials. It allows for relaxation while waiting for the crystals to grow. Always supervise children when handling hot water.
Nutrition
- Serving Size: 1 project
- Calories: 0
- Sugar: 0g
- Sodium: 0mg
- Fat: 0g
- Saturated Fat: 0g
- Unsaturated Fat: 0g
- Trans Fat: 0g
- Carbohydrates: 0g
- Fiber: 0g
- Protein: 0g
- Cholesterol: 0mg