

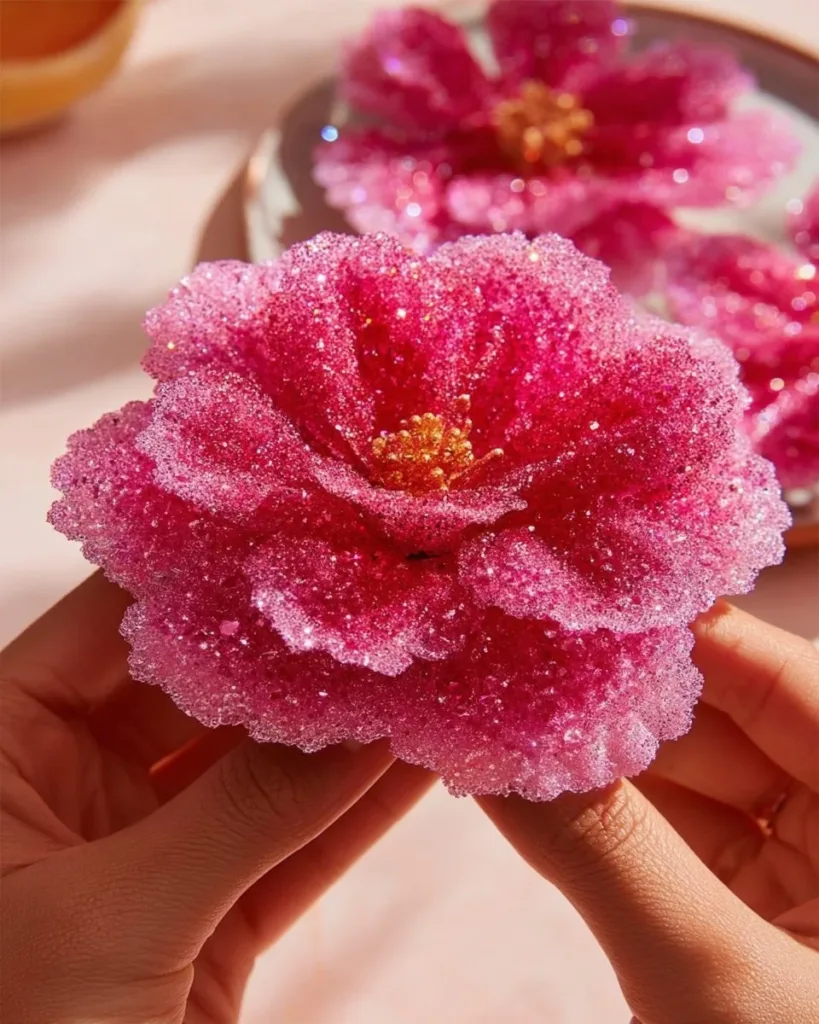
A busy afternoon. The kids ask for something to make right now. You have coffee filters, a glass jar, and a kettle that just boiled. Crystal Growing Flower fits that exact moment. It turns simple coffee-filter petals into sparkly keepsakes with a few pantry supplies and a little patience. If you like small, low-prep projects that still look special, this one sits in the sweet spot between fast setup and impressive results, and it pairs nicely with other gentle crystal crafts like our rainbow crystal heart project for when you want a second activity.
Why This Crystal Growing Flower Works So Well

This project needs very little prep and gives visible results quickly. The materials come from the kitchen or a local store, so you do not hunt for odd parts. The chemistry behind the growth happens in the jar while you do something else, which makes it ideal for busy afternoons or short attention spans.
It stays approachable because you control the effort. Cut a few petals and make a hot solution. That is the heart of it. You do not need exact lab tools. A regular spoon and a jar do the trick. The method also gives reliable results when you follow the ratio and use hot water. That makes this one a good choice for a first-time crystal activity with kids.
This project fits real-life schedules. It has a short hands-on window of about 20 minutes and then a watching period of a few days. That balance makes it doable between snack time and bed time, and satisfying the next morning when crystals begin to show up.
A Quick Look Before You Begin
This activity takes about 15 to 25 minutes of active work and then two to five days for crystals to grow fully. Most of your time is hands-off. You will need an adult for heating water and handling the alum safely, so plan for a grown-up to do the hot-water steps.
Setup is low-mess if you protect the table with a tray or paper towel. The solution can splash while you pour, so keeping everything on a tray makes cleanup faster. Expect a few drips on fingers or a small spill if a child is excited; that is normal and fixable with a damp cloth.
You will check the jar gently in the first few hours to watch tiny seeds form, then leave it alone for the main growth. This pattern fits well into family routines: quick setup, a little peek later, and finished crystals in a couple of days.
Materials You’ll Need
- White or light-colored absorbent paper (coffee filters or paper towels)
- common household item, easy to shape into petals
- Clear glass jar or small clear vase
- good for watching crystal growth
- Alum powder or a crystal-growing packet
- the active ingredient that forms crystals
- Hot water (nearly boiling)
- adult supervision required for heating and pouring
- Spoon for stirring
- simple kitchen utensil
- Small scissors
- for cutting petal shapes
- Measuring spoons or a kitchen scale
- helps keep the solution balanced
- Food coloring or watercolor (optional)
- adds faint tinting if you want color
- Tweezers or chopsticks
- helps hold delicate petals for dipping
- Paper towel or tray to protect your work surface
- keeps cleanup quick and easy
- Small clip or clothespin (optional)
- useful to steady a petal over the jar
- Safety items: oven mitts or heat-resistant gloves
- use when handling hot water and the jar
Step-by-Step Directions

- Prepare your petals by cutting the paper into petal shapes.
Cut coffee filters or paper towel into petals that feel sturdy but lightweight.
Make a few sizes to see how crystal patterns change with petal shape. - Make the crystal solution by measuring about two parts hot water to one part alum and stirring until mostly dissolved.
Pour nearly boiling water into a heat-safe bowl or cup, then add alum gradually.
Stir until the alum mostly dissolves; small grains may remain but do not worry. - Pour the hot solution into the clear jar until it fills about two thirds and let it cool.
Move slowly and use a tray to catch drips while you pour into the jar.
Leave space at the top so petals hang without touching the rim as it cools. - Attach petals for dipping using tweezers or a clip.
Hold petals at the top edge with tweezers or a small clothespin so fingers stay dry.
Arrange petals so they will enter the solution cleanly and not bend or fold. - Dip the petal into the solution, letting its tip sit just above the liquid if you want gradient growth.
Lower the petal so the part you want crystals on meets the solution, leaving tips out for a fade.
If you want full coverage, submerge the petal more deeply for a stronger crystal layer. - Place the jar in a steady spot, free from drafts and direct sunlight.
Pick a flat table away from windows, vents, and high traffic.
Keep the jar still so crystals grow undisturbed and form neat shapes. - Observe the first hours for crystalline seeds forming; check gently and infrequently.
Look for tiny sparkles and thin threads after a few hours, but do not touch the petals.
Limit checks to once or twice in the first day to avoid disturbing early growth. - Let crystals mature for two to five days based on desired density.
Leave the jar untouched while crystals thicken and grow on the paper.
Check daily to watch growth and decide when the texture looks right to you. - Remove and dry the petals on a protected tray.
Use tweezers to lift petals out and set them on clean paper towels or wax paper.
Blot gently if needed, and let them air dry fully so the crystals harden. - Optionally seal or display the crystals with a light coat of craft sealer.
Spray or brush a thin sealer if you plan to handle the petals often.
Use a light touch so the sealer does not dissolve delicate crystal points. - Clean up the workspace responsibly, diluting leftover solution before disposal.
Pour any leftover alum solution into a sink with plenty of running water to dilute.
Wipe surfaces and wash tools with warm soapy water, keeping pets and kids away until cleanup finishes.
The Learning Behind This DIY

This activity mixes simple observation with careful hands-on work. Kids practice fine motor skills when they cut petals and use tweezers. They learn steady hand control as they lower a paper petal into the solution without folding it. Watching crystals form teaches patience and cause and effect. Small seeds appear, and with time they grow into larger structures. That pattern is easy for children to follow and rewarding to see.
The science is simple and safe to explain. Alum dissolves in hot water and carries extra molecules. As the solution cools, those molecules come out of the water and arrange into crystal shapes. You do not need precise chemistry words to enjoy this; noticing texture changes and sparkles makes the learning feel natural.
This project also builds basic planning skills. Kids learn to set up a spot that stays undisturbed and to clean up afterward. Those are practical life lessons that come with a fun result.
Troubleshooting Common Issues
If crystals stay sparse after a few days, the solution probably had too little alum or cooled too quickly. You may not fully dissolve the alum in very hot water. Gently warm and stir until you see fewer grains. If the petal folded in the solution, crystals may clump oddly. Try a stiffer petal or use a clip to hold it straight next time.
If growth looks fuzzy or the crystals are very small, that often means the jar got a draft or someone checked the jar too often. Move the jar to a calmer spot and resist peeking. Small fibers or dust can also affect shape, so handle the paper with clean hands or tweezers.
If the petals lost color or blurred, the petal may have soaked too long or the water was too hot when you dipped it. Let the solution cool a bit before dipping colored paper and use minimal soaking time for thinner materials.
If you want a reference for a slightly different material approach, my experience with paper-shell geodes helped here, and you might enjoy the eggshell crystal geodes tutorial for more troubleshooting tips on delicate substrates.
Easy Variations to Try
- Color fades. Add a drop of food coloring to the alum solution for a soft tint or dab watercolor near the petal tips before dipping for a gradient look.
- Layered petals. Glue or stack two thin petals together before dipping to create thicker, more structured flower petals that hold larger crystals.
- Mini bouquet. Make several petals in different sizes and arrange them on a small stem or wire, then glue them together after they dry for a keepsake bunch.
- Seasonal shapes. Cut petals into hearts or stars for a holiday twist, or make long, skinny leaves for a more botanical look.
- Group activity. Let each child design one petal and dip it into the same jar. This makes a shared display and helps when adults cannot supervise everyone dipping water at once.
Storing or Reusing This Project
Finished crystal petals make fragile decorations. Store them in a shallow box with soft paper layers between pieces. Avoid high humidity and direct sunlight that can dull sparkles. If crystals break, you can reuse the jar and leftover solution for a small follow-up batch if the solution still looks clear and you dilute it with fresh hot water before reheating. Otherwise, discard the used solution responsibly as described earlier, and save the jar, tweezers, and scissors for the next round.
You can also press a dried crystal petal gently between wax paper and a heavy book to make a flatter keepsake for cards. That flattens some crystals but keeps the pattern.
FAQs About Crystal Growing Flower
Will this make a big mess in the kitchen?
It will not if you plan ahead. I always set a tray under the jar and keep a damp cloth nearby. Little drips happen during pouring, but they wipe away easily. The most likely messes are alum grains on the counter. Sweep them into the trash and then wipe down the area. Expect at most a few small drips when kids are involved.
Is this safe for kids to do?
Yes for older children with supervision. An adult must handle the hot water and measure the alum. I recommend no one younger than five dip papers alone. Kids can design and cut petals and watch the jar while an adult does the hot steps. I always use oven mitts when handling a hot jar and ask children to keep a two-step distance during the boiling water parts.
What if I do not have alum?
Can I use something else? Alum is the main crystal-forming ingredient in this method because it dissolves well in hot water and forms pretty crystals. Other crystal kits use salt or borax for different looks, but do not swap ingredients in this exact recipe. If you want to explore alternatives, there are safe kits that use different materials and clear instructions. For another no-borax option that I have tried and liked, see this rainbow crystal rocks guide to compare approaches.
What happens if the crystals look different from the pictures?
That is normal. Paper type, water temperature, and small drafts change crystal shape. Results may vary from delicate needles to chunky clusters. None are wrong; they just show how conditions changed. If you want more uniform crystals next time, use the same paper for all petals, keep the jar still, and follow the two-to-one water-to-alum ratio closely.
A Final Helpful Note
One last tip before you go: keep the first try small and relaxed. Make three to five petals instead of a big batch and treat the project like a slow reveal. That lowers pressure and makes the surprise of crystals more delightful. Expect variety, and celebrate the unexpected shapes. You will likely get a mix of tiny star points and larger clumps, and that variety makes a charming display.
Conclusion
If you want a themed gift idea or a store-bought comparison, you can see a playful take on flower crystals over at the fan-made item page for Growing Flower Crystals, which shows creative ways others display similar items. For a ready-made option that uses kit materials and clear instructions, check the popular crystal growing kit on Amazon to compare what a packaged set includes versus this simple home version.
You will get the best results if you set aside a calm corner, use a tray, and let the jar work quietly for a few days. This project fits busy lives because it requires only a little hands-on time and gives a lovely, tangible payoff. Have fun, stay safe with hot water, and enjoy watching simple paper turn into sparkling petals.
PrintCrystal Growing Flower

A fun and simple craft project that turns coffee filters into beautiful crystal flowers using basic kitchen supplies.
- Prep Time: 20 minutes
- Cook Time: 2880 minutes
- Total Time: 2900 minutes
- Yield: Multiple petals
- Category: Craft
- Method: Crafting
- Cuisine: N/A
- Diet: N/A
Ingredients
- White or light-colored absorbent paper (coffee filters or paper towels)
- Clear glass jar or small clear vase
- Alum powder or a crystal-growing packet
- Hot water (nearly boiling)
- Spoon for stirring
- Small scissors
- Measuring spoons or a kitchen scale
- Food coloring or watercolor (optional)
- Tweezers or chopsticks
- Paper towel or tray to protect your work surface
- Small clip or clothespin (optional)
- Safety items: oven mitts or heat-resistant gloves
Instructions
- Prepare your petals by cutting the paper into petal shapes.
- Make the crystal solution by measuring about two parts hot water to one part alum and stirring until mostly dissolved.
- Pour the hot solution into the clear jar until it fills about two thirds and let it cool.
- Attach petals for dipping using tweezers or a clip.
- Dip the petal into the solution, letting its tip sit just above the liquid if you want gradient growth.
- Place the jar in a steady spot, free from drafts and direct sunlight.
- Observe the first hours for crystalline seeds forming; check gently and infrequently.
- Let crystals mature for two to five days based on desired density.
- Remove and dry the petals on a protected tray.
- Optionally seal or display the crystals with a light coat of craft sealer.
- Clean up the workspace responsibly, diluting leftover solution before disposal.
Notes
Make sure to supervise children during the hot water steps to ensure safety.
Nutrition
- Serving Size: 1 finished flower
- Calories: 0
- Sugar: 0g
- Sodium: 0mg
- Fat: 0g
- Saturated Fat: 0g
- Unsaturated Fat: 0g
- Trans Fat: 0g
- Carbohydrates: 0g
- Fiber: 0g
- Protein: 0g
- Cholesterol: 0mg