Crystal Forest
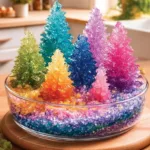
Create a magical crystal forest using baking soda and hot water. Watch as tiny crystals grow on twigs or cardboard shapes over 24 to 48 hours.
- Prep Time: 10 minutes
- Cook Time: 1440 minutes
- Total Time: 1450 minutes
- Yield: Multiple displays
- Category: Activity
- Method: Crafting
- Cuisine: N/A
- Diet: N/A
Ingredients
- Baking soda
- Hot water
- Clear jars or shallow dishes
- Twigs, cardboard shapes, or floral foam
- Food coloring or liquid watercolor (optional)
- Small tray or baking sheet
- Tongs or chopsticks (optional)
- Gloves (optional)
- Paper towels
- Masking tape or string (optional)
Instructions
- Prepare your space and base by setting a tray on the table and arranging twigs or shapes upright. Keep paper towels nearby to catch drips.
- Lay out jars on the tray so each has room. Use cardboard or floral foam for stable shapes.
- Heat water and measure baking soda, warming the water until it’s hot but not boiling. Stir in the baking soda until it won’t dissolve anymore.
- If desired, add gentle color by dropping one or two drops of food coloring into the mixture and stirring slowly.
- Lower your base into the solution, leaving part above the liquid to catch light as crystals grow.
- Find a quiet waiting spot for the jars with steady air and soft light, avoiding dust.
- Watch for signs of growth, looking for tiny sparkles and thin threads forming overnight.
- Allow 24 to 48 hours for good crystal development, checking gently and refilling solution if needed.
- Once ready, lift bases slowly, letting excess liquid drip off and patting them dry.
- Arrange the finished crystals on a plate or near a window and take a moment to enjoy their beauty.
- Clean up by disposing of leftover solution and wiping your workspace.
Notes
Ensure adult supervision when handling hot water. It’s a great project for the family to engage in patience and science together.
Nutrition
- Serving Size: N/A
- Calories: N/A
- Sugar: N/A
- Sodium: N/A
- Fat: N/A
- Saturated Fat: N/A
- Unsaturated Fat: N/A
- Trans Fat: N/A
- Carbohydrates: N/A
- Fiber: N/A
- Protein: N/A
- Cholesterol: N/A
Find it online: https://www.diymadeeasy.com/crystal-forest/