

A busy Saturday afternoon, a handful of restless kids, and the fridge half emptied for lunch. You want something easy, quick to set up, and a little bit magical. That is exactly the kind of moment that Crystal Forest fits into.
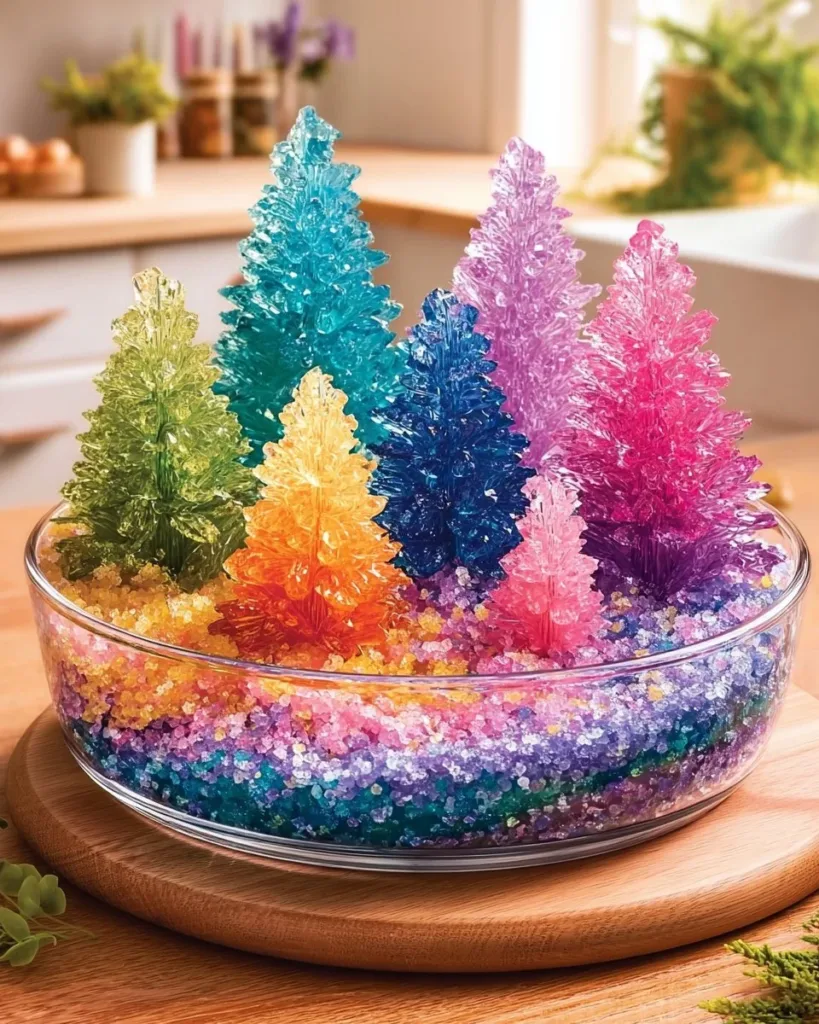
This project turns ordinary baking soda and hot water into glittering crystals on twigs, cardboard shapes, or floral foam, and it rewards patience with slow, lovely growth. You can set it up in ten minutes, let it rest while you make snacks, and come back to real results that feel special without any fuss. Gather the simple items, clear a small patch of table, and enjoy the quiet thrill of watching tiny crystals appear. The whole family can take part, and the mess stays small enough for a calm clean up.
Why This Crystal Forest Works So Well

This activity uses things you already have at home, so you do not need a long shopping list. The chemistry stays simple: hot water dissolves a lot of baking soda, and as the solution cools and evaporates a bit, crystals form on the surfaces you place in it. That process makes the project reliable even when you do it with kids.
You do not need precision measurements to see results. A comfortable rhythm, quick setup, and steady patience do more than exact science for a fun outcome. The method also keeps the mess contained on a tray or baking sheet, so cleanup feels fast. That low-prep, low-stress setup makes Crystal Forest a weekday rescue or a weekend experiment you can enjoy together.
The materials feel familiar, and the steps stay short. You can start this activity in spare minutes between soccer practice and dinner. The results tend to look satisfying in a day, which keeps interest high without taking over your schedule.
A Quick Look Before You Begin
This project takes about 10 to 20 minutes to set up and then 24 to 48 hours to grow nice crystals. Expect small spills and dripping while you lower pieces into the solution, so protect your table with a tray and keep paper towels close. The growing phase runs on its own, so adults can step away once the jars sit in a calm spot.
The mess level stays low. The baking soda solution feels slimy when it’s saturated, and it leaves white mineral residue as it dries, but that wipes up easily with a damp cloth. You will want someone to supervise younger kids when you use hot water. Older children can measure and stir with gentle guidance.
Plan to check the jars after the first night. You will see tiny threads and sparkles before anything dramatic happens. If the solution level drops, add a little hot water to keep surfaces submerged. The quiet, patient part of this project makes it calming and great for families who want a simple, hands-off experiment.
Materials You’ll Need
- Baking soda
common household item, the main ingredient for crystals - Hot water
use hot tap water or warmed water that is hot but not boiling - Clear jars or shallow dishes
easy to find and helpful for watching growth - Twigs, cardboard shapes, or floral foam
choose something upright for crystals to grow on - Food coloring or liquid watercolor (optional)
adds gentle color if you want it - Small tray or baking sheet
catches drips and keeps your table clean - Tongs or chopsticks (optional)
helps lower bases into the solution without splashing - Gloves (optional)
use if you want to avoid touching concentrated solution - Paper towels
essential for catching drips and quick cleanups - Masking tape or string (optional)
use to hold shapes upright or secure twigs
STEP-BY-STEP DIRECTIONS

- Prepare your space and base by setting a tray on the table and arranging twigs or shapes upright. Keep paper towels nearby to catch drips.
Lay out jars on the tray so each has room. Use cardboard or floral foam for stable shapes. - Heat water and measure baking soda, warming the water until it’s hot but not boiling. Stir in the baking soda until it won’t dissolve anymore.
You will see a fine white sediment when the water holds as much as it can. That tells you the solution is saturated. - If desired, add gentle color by dropping one or two drops of food coloring into the mixture and stirring slowly.
Start with very small color amounts. The crystals pick up color lightly, not as strong as you might expect. - Lower your base into the solution, leaving part above the liquid to catch light as crystals grow.
Use tongs or chopsticks if anything feels hot. Arrange each twig or shape so a bit stays out of the liquid. - Find a quiet waiting spot for the jars with steady air and soft light, avoiding dust.
A shelf or corner of the table works well. Keep full drafts and busy hands away from the jars. - Watch for signs of growth, looking for tiny sparkles and thin threads forming overnight.
You will often see the first signs in 12 to 24 hours. Tiny spikes and filaments appear before full cover forms. - Allow 24 to 48 hours for good crystal development, checking gently and refilling solution if needed.
If liquid levels drop, add more hot water to keep the base partially submerged. Avoid stirring or moving jars. - Once ready, lift bases slowly, letting excess liquid drip off and patting them dry.
Hold shapes over the tray so drips fall in. Use paper towels to blot, not rub, the crystals. - Arrange the finished crystals on a plate or near a window and take a moment to enjoy their beauty.
Place them where light can hit and highlight the sparkle. They make a nice centerpiece for display. - Clean up by disposing of leftover solution and wiping your workspace.
Pour the used liquid down the sink with plenty of water. Wipe jars and the tray with a damp cloth.
Discover Easy Kids Activities
Looking for simple, fun ideas for kids? Explore our Low Prep Kids Activities and find quick projects that spark creativity without long prep time.
The Simple Science or Skills at Work

Crystal Forest shows cause and effect in a very clear way. When water warms, it carries more baking soda. As the water cools and slowly evaporates, it no longer carries all that baking soda. The particles come together and make crystals. You do not need to memorize terms to enjoy the idea. Kids learn by watching the change over hours and making careful guesses.
The project also builds fine motor skills. Measuring, stirring, pouring, and lowering shapes into the jars give kids practice with steady hands. Older kids can time and compare jars, noting which ones grow faster. You can talk about patterns, symmetry, and how different surfaces change the crystal shape.
The activity supports patient focus too. It rewards waiting and checking carefully. Those small waits and repeat visits teach kids how small changes add up. You also get a gentle science lesson about solubility and evaporation without heavy words.
Troubleshooting Common Issues
If crystals do not appear, the solution might not be saturated enough. You will see clear water without the white tips of undissolved baking soda. Warm more water, add a little more baking soda, and stir until you see a tiny residue at the bottom.
If crystals form only on the jar rim or the water line, your shapes may not have dipped far enough. Lower them more deeply next time, but leave a bit above the surface to catch light. You can also tilt a twig slightly so the solution travels along it while evaporating.
If the crystals look dull or powdery, you might have moved the jars too much while they grew. Place them in a quieter spot and resist peeking. If dust lands on the solution, dab it gently with a clean spoon; do not stir.
If color runs or looks weak, use less added color next time or drop it directly into the jar rather than mixing the whole batch. A single drop makes a soft tint, which often looks more like crystal than painted sugar.
Easy Variations to Try
Try a row of short twigs and tall twigs together so kids can see height change how crystals build. Plant the shapes a little closer and watch how crystals sometimes link from twig to twig.
Use cardboard shapes like stars or hearts for a seasonal display. Tape a string loop to hang a dried piece near a window. Keep the shapes light and porous so the solution can wick up.
Make a color gradient across jars by adding a faint drop of different colors to each jar. The result looks like a miniature rainbow forest when the crystals develop.
Let older kids test different solution strengths by making one slightly weaker and one stronger. They can record how the crystals differ and talk about why stronger solutions produce faster or thicker growth.
Try floral foam if you want a denser, bushier crystal base. It soaks up solution well and gives a fuller look when crystals build around it.
Storing or Reusing This Project
If you want to keep the crystals as a display, let them dry completely on a tray and then move them gently to a shallow dish. Store them out of direct humidity and away from curious hands. They will look best in a dry room.
You can reuse jars and the tray after a good wash. The used baking soda solution leaves a white residue. Wash everything with warm, soapy water and rinse well. The twigs or cardboard shapes will not survive more than one run if they soak too much. Save floral foam or sturdier shapes for a second round.
If you want to reuse some of the leftover solution, strain it through a coffee filter to remove settled residue, then reheat and add a little more baking soda. That refresh can work for a small follow-up batch. When you dispose of the solution, run plenty of water down the drain and wipe the area with a damp cloth to avoid sticky spots.
FAQs About Crystal Forest
Will this make a big mess on my table?
I understand that worry. Expect small drips and a little white dust after the jars dry. The tray keeps the mess small. Wipe spills with a damp paper towel right away and wash the tray when you finish. The cleanup usually takes less than ten minutes.
Is this safe for young kids?
This project suits elementary-age kids with adult supervision because the water gets hot. Keep hot water handling to adults or older kids. Baking soda is safe in small home experiments, but avoid ingestion. Use gloves if you want to keep hands dry and let toddlers watch from a safe distance.
Can I swap baking soda with something else?
Baking soda makes predictable, gentle crystals and reads as a household-safe choice. If you are curious about other materials, this project works from an educational angle with different salts, but the instructions here match baking soda. Stick to the materials listed for the best first-time results.
What if I do not see crystals after a day?
That can feel disappointing, but it often resolves with a small change. Warm the solution, add a touch more baking soda until a bit settles at the bottom, and make sure the shapes sit in the jar long enough. Pick a quieter spot with steady air and avoid moving the setup. The next 24 hours usually bring progress.
How long will the crystals last on display?
They keep their look for a long time if you place them somewhere dry and away from heavy humidity. Over time they can shed tiny particles, so put them on a plate or tray. If you want a longer-lasting keepsake, consider photographing them and keeping the photos where you can see the detail every day.
A Final Helpful Note
Remember that the most enjoyable part of Crystal Forest comes from trying and watching. The project rewards you for slow curiosity, not perfection. If one twig does not sparkle the way you hoped, set it aside and celebrate the ones that do. You can repeat parts of the process easily with small tweaks.
Give yourself permission to experiment. If the first batch feels shy, change one thing at a time. The simple steps make it easy to learn as you go. Keep the workspace tidy, involve the kids in measuring and checking, and enjoy the small, steady surprises the crystals bring.
Conclusion
If you want a little background on the real Crystal Forest that inspired this name, the National Park Service has a nice overview at Crystal Forest Trail (U.S. National Park Service), which highlights natural rock and wood fossils worth seeing. For a photography-focused take on exploring similarly named landscapes and how light plays on minerals, check this thoughtful photo essay at Hiking the Crystal Forest Trail in Petrified Forest National Park.
If you try this at home, take a few photos and enjoy showing the kids how patience leads to something lovely. Clear steps, simple materials, and real results make this an easy family win.
PrintCrystal Forest

Create a magical crystal forest using baking soda and hot water. Watch as tiny crystals grow on twigs or cardboard shapes over 24 to 48 hours.
- Prep Time: 10 minutes
- Cook Time: 1440 minutes
- Total Time: 1450 minutes
- Yield: Multiple displays
- Category: Activity
- Method: Crafting
- Cuisine: N/A
- Diet: N/A
Ingredients
- Baking soda
- Hot water
- Clear jars or shallow dishes
- Twigs, cardboard shapes, or floral foam
- Food coloring or liquid watercolor (optional)
- Small tray or baking sheet
- Tongs or chopsticks (optional)
- Gloves (optional)
- Paper towels
- Masking tape or string (optional)
Instructions
- Prepare your space and base by setting a tray on the table and arranging twigs or shapes upright. Keep paper towels nearby to catch drips.
- Lay out jars on the tray so each has room. Use cardboard or floral foam for stable shapes.
- Heat water and measure baking soda, warming the water until it’s hot but not boiling. Stir in the baking soda until it won’t dissolve anymore.
- If desired, add gentle color by dropping one or two drops of food coloring into the mixture and stirring slowly.
- Lower your base into the solution, leaving part above the liquid to catch light as crystals grow.
- Find a quiet waiting spot for the jars with steady air and soft light, avoiding dust.
- Watch for signs of growth, looking for tiny sparkles and thin threads forming overnight.
- Allow 24 to 48 hours for good crystal development, checking gently and refilling solution if needed.
- Once ready, lift bases slowly, letting excess liquid drip off and patting them dry.
- Arrange the finished crystals on a plate or near a window and take a moment to enjoy their beauty.
- Clean up by disposing of leftover solution and wiping your workspace.
Notes
Ensure adult supervision when handling hot water. It’s a great project for the family to engage in patience and science together.
Nutrition
- Serving Size: N/A
- Calories: N/A
- Sugar: N/A
- Sodium: N/A
- Fat: N/A
- Saturated Fat: N/A
- Unsaturated Fat: N/A
- Trans Fat: N/A
- Carbohydrates: N/A
- Fiber: N/A
- Protein: N/A
- Cholesterol: N/A