

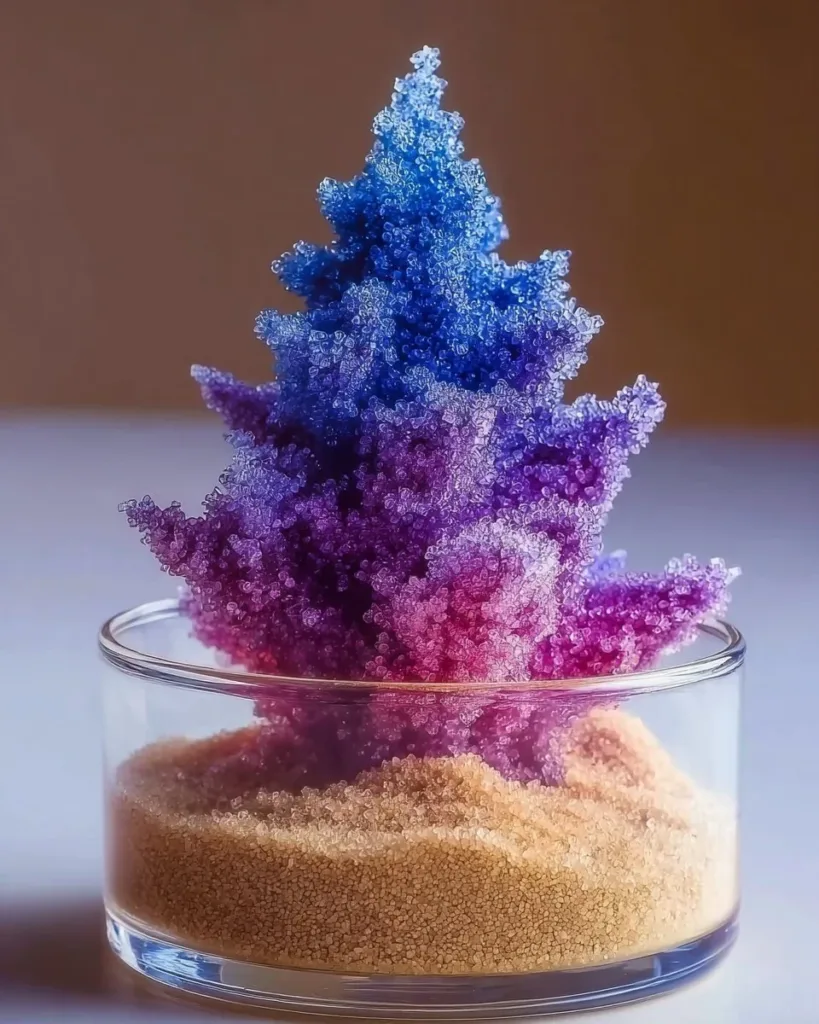
A busy afternoon, a blank table, and little voices asking to make something now can turn into a calm science moment with just a few things from the kitchen. The Baking Soda Growing Tree fits that window perfectly. It asks for simple items you already have, a short setup, and a slow, satisfying reveal as crystals bloom along a pipe cleaner or twig. I often set this up when kids need a focused activity between errands or after school. It fills the room with quiet curiosity, a few small spills that wipe up easily, and a sense of real, visible progress without a long cleanup.
If you want a few more quick, hands-on ideas to pair with this, try our soda volcano take on fizz or a colorful fizzy painting for the same afternoon of low-prep kitchen science that starts with baking soda.
Why This Baking Soda Growing Tree Works So Well

This project stays low-prep because it uses things you already keep in the kitchen and needs almost no special tools. Baking soda dissolves into warm water and then comes back out of solution as solid crystals when the water slowly evaporates. The process takes time, so you get long stretches to do other things while you periodically check on the tree.
It is approachable because the steps feel like making a simple syrup. You measure, stir, shape a little tree, and pour. That familiarity keeps kids calm and helps adults stay relaxed. You do not need exact lab equipment. The results are reliable if you use warm water, enough baking soda, and a steady spot where the dish can sit undisturbed.
This activity fits real-life schedules. The active work takes about 10 to 20 minutes. Then you watch over a few hours. You can leave the piece overnight and come back to thicker crystals. It gives a satisfying reveal without demanding the whole day from you.
A Quick Look Before You Begin
This makes-or-wait project usually takes three parts: a quick 10 to 20 minute setup, short checks every 15 to 30 minutes at first, and then a longer rest period of several hours for the crystals to thicken. You do not need to watch it constantly. Check in for the first signals, then let it rest for deeper growth.
Setup is gentle. Lay a towel down, work on a clear tabletop, and choose a low-traffic shelf or corner to let the tree sit. Expect small drips when you pour the solution; keep paper towels handy. Adult help will keep things steady for very young kids, but older kids can do most of this on their own.
Mess is minimal. Baking soda brushes or wipes away with water. If a spill dries, a quick damp cloth removes it. If you want to avoid any mess on a special surface, do the whole activity on a tray or an old plate.
Materials You’ll Need
Baking soda (sodium bicarbonate)
Common household item. The star ingredient.
Warm water
Comfortable to touch, not boiling. Helps dissolve baking soda faster.
Table salt (optional)
Optional. A pinch can change how crystals form.
A shallow glass dish or small jar
Stable base for your tree.
A small glass or plastic cup for mixing
Easy to measure and stir in.
A spoon for stirring
A regular kitchen spoon works fine.
Pipe cleaners or a small twig (optional)
Optional. Pipe cleaners are easy to shape. A twig gives a natural look.
Food coloring or liquid watercolor (optional)
Optional. Adds color to the crystals.
Tweezers or a toothpick (optional)
Optional. Fine adjustments and removing stray bits.
Step-by-Step Directions

- Prepare a calm space and gather all materials. Keep the surface clean and lay a towel down.
Arrange everything within reach. A tidy setup makes the rest feel simple. - Warm the water to a comfortable heat, avoiding boiling.
Warm water helps dissolve baking soda faster. Test with your wrist to be sure it is safe. - Measure and pour baking soda into the mixing cup, starting with about 2-3 tablespoons for a cup of water.
You can scale up, but keep the same roughly 2:1 to 3:1 ratio of baking soda to a cup of water for a strong solution. - Slowly add warm water and stir to dissolve until the solution looks clear.
Stir steadily. A cloudy mix should clear as the baking soda dissolves. Small granules that do not dissolve mean you need a touch more water or more stirring. - If desired, add a pinch of salt or a drop of color.
Salt can encourage different crystal shapes. Color makes the crystals pop. Stir gently after adding. - Shape your tree in the shallow dish or jar using pipe cleaners or a twig, ensuring it is anchored in the solution.
Twist pipe cleaners or wedge a small twig so it stands steady. The tree should not fall over when you pour. - Pour the baking soda solution around the base of the tree.
Pour slowly to avoid dislodging the tree. The solution should cover the base but not flood the top of the tree. - Wait and watch for initial crystals to form, checking every 15-30 minutes.
You will see tiny white crystals form first along the base and branches. Take photos if you like. - Make gentle adjustments with tweezers as necessary.
If a branch tips or a clump grows oddly, use tweezers or a toothpick to nudge it. Move slowly to avoid breaking delicate crystals. - Let the piece sit undisturbed for several hours for crystals to grow thicker.
The longer you leave it, the bigger and denser the crystals will become. Overnight often gives strong results. - Once satisfied with the crystals, remove and let dry, or keep in the dish for longer observation.
If you remove the tree, let it dry on a towel. If you keep it in the dish, cover lightly if you want to protect it from dust.
The Simple Science or Skills at Work

This project shows simple cause and effect in a very clear way. When you dissolve baking soda in warm water, the water holds more dissolved baking soda than it will when it cools or when water evaporates. As the water leaves, the baking soda returns to a solid form and builds up on any rough spot it can cling to. The pipe cleaner or twig gives those spots and the crystals form there.
Kids practice fine motor skills when they shape the tree and use tweezers or a toothpick for small adjustments. They learn patience as they check and wait. They practice observation by noting times, sizes, and shapes of crystals. All of this is hands-on and low-pressure.
If you want another easy baking soda activity that blends art and fizz, try our fizzy painting idea for indoor messes that still feel like play kids love.
Troubleshooting Common Issues
If crystals do not form quickly, the solution may not have enough baking soda or it may not be warm enough. Try stirring a bit more or letting the solution sit in a warmer spot. You will usually see the first tiny crystals within 30 to 60 minutes in a warm room.
If the tree falls over when you pour, the base may not be anchored. Use extra pipe cleaner twists or wedge the twig against the dish rim for stability. Pour very slowly to reduce movement.
If you get a cloudy slurry that never clears, you probably added too much baking soda for that amount of water. Stir in a little extra warm water until it clears, then pour again.
If crystals form inconsistently, dust or grease on your tree can interfere. Rinse a twig or new pipe cleaner in water and dry it before using. Slight changes like a pinch of salt or a drop of food coloring can also change how and where crystals appear.
Easy Variations to Try
Add color in layers. Pour a little plain solution first, allow a few crystals to form, then add a colored solution in a different spot to create bands of color on the tree. It lets you see how new crystals attach to older ones.
Try different tree shapes. Use tightly twisted pipe cleaners for dense branches or bend them loosely for airy shapes. A natural twig gives rough surfaces so crystals catch easily.
Make a mini forest. Use several small twigs in the same dish. They compete for crystals and create a tiny landscape.
For a painting twist, dip the tip of a twig or pipe cleaner in dilute food color before you build to tint the first growths and let them spread.
If you want to experiment more with baking soda in art projects, our baking soda painting ideas show how the texture plays with water and color for creative outcomes.
Storing or Reusing This Project
If you want to keep the crystals, let them dry fully on a towel for at least 24 hours. Store them in a small box or display on a shelf away from direct humidity. Crystals may slowly fade in wet conditions.
You can reuse the dish and cup after washing with warm water. Baking soda washes away easily. If the dish has stuck crystals, soften them with warm water for a few minutes, then scrub gently.
Leftover baking soda solution will eventually lose potency as it evaporates. Pour it down the drain and rinse. If you want to save a little for later, store it in a sealed jar in the fridge and use within a day or two.
To reduce waste, use only the amount of water you need for one batch. Pipe cleaners can be rinsed and reshaped for another go. Twigs can go in the compost if they break.
FAQs About Baking Soda Growing Tree
Will this make a big mess that I will regret?
It will make small, easy messes. Expect a few drips when you pour and some residue if the solution spills and dries. I usually put a towel under the dish and keep a damp cloth ready. Clean up feels fast and simple, not like paint or glue cleanup.
Is this safe for young kids to do?
Yes, with supervision. The ingredients are common kitchen items. Make sure kids do not taste the solution. Warm water should be checked by an adult. For steady hands and pouring, preschoolers may need an adult to help. Older kids can manage most steps calmly.
Can I use regular water or cold water?
Warm water helps dissolve baking soda faster and gives clearer results. You can use room temperature water, but it may take longer for the solution to dissolve and crystals to appear.
What if I want prettier colors?
A drop or two of liquid watercolor or food coloring works well. Do not add too much because very strong dye can mask the white crystal look. Adding color can create lovely, delicate shades as the crystals grow.
How long do the crystals last?
They last if kept dry. In humid places they can slowly lose shape. Dry them fully before storage and keep them in a cool dry place for the longest life.
A Final Helpful Note
This activity rewards gentle care and patience. The first time you make a Baking Soda Growing Tree you may feel unsure about exact measurements or crystal size. That is normal. Treat the first try as practice. Notice the textures, the way the solution clears, and the first tiny sparkles of crystal. Those small wins teach more than one perfect outcome.
If something tips or a branch breaks, you can often nudge it back with tweezers or let new growth cover the gap. Children enjoy returning to check progress and will feel proud watching tiny changes over hours. Relax, make it a slow, shared moment, and enjoy the clear steps and real results.
Conclusion
If you want more tips for caring for trees and helping real plants thrive on your property, read this state extension guide on how to care for apple trees after a purchase at how to care for apple trees on a new property. For help with pests or unexpected visitors around home-grown trees, this note about ants in lemon tree systems offers practical, research-based advice at general guidance on ants in lemon trees.
PrintBaking Soda Growing Tree

A fun, hands-on kitchen science activity where kids can grow crystals on a tree made from pipe cleaners or twigs using baking soda.
- Prep Time: 15 minutes
- Cook Time: 240 minutes
- Total Time: 255 minutes
- Yield: 1 baking soda growing tree
- Category: Science Activity
- Method: Growing
- Cuisine: N/A
- Diet: N/A
Ingredients
- Baking soda (sodium bicarbonate)
- Warm water
- Table salt (optional)
- A shallow glass dish or small jar
- A small glass or plastic cup for mixing
- A spoon for stirring
- Pipe cleaners or a small twig (optional)
- Food coloring or liquid watercolor (optional)
- Tweezers or a toothpick (optional)
Instructions
- Prepare a calm space and gather all materials. Keep the surface clean and lay a towel down.
- Warm the water to a comfortable heat, avoiding boiling.
- Measure and pour baking soda into the mixing cup, starting with about 2-3 tablespoons for a cup of water.
- Slowly add warm water and stir to dissolve until the solution looks clear.
- If desired, add a pinch of salt or a drop of color.
- Shape your tree in the shallow dish or jar using pipe cleaners or a twig, ensuring it is anchored in the solution.
- Pour the baking soda solution around the base of the tree.
- Wait and watch for initial crystals to form, checking every 15-30 minutes.
- Make gentle adjustments with tweezers as necessary.
- Let the piece sit undisturbed for several hours for crystals to grow thicker.
- Once satisfied with the crystals, remove and let dry, or keep in the dish for longer observation.
Notes
Adult supervision is recommended for young kids. Cleanup is minimal; baking soda brushes off easily with water.
Nutrition
- Serving Size: 1 tree
- Calories: 5
- Sugar: 0g
- Sodium: 0mg
- Fat: 0g
- Saturated Fat: 0g
- Unsaturated Fat: 0g
- Trans Fat: 0g
- Carbohydrates: 1g
- Fiber: 0g
- Protein: 0g
- Cholesterol: 0mg