

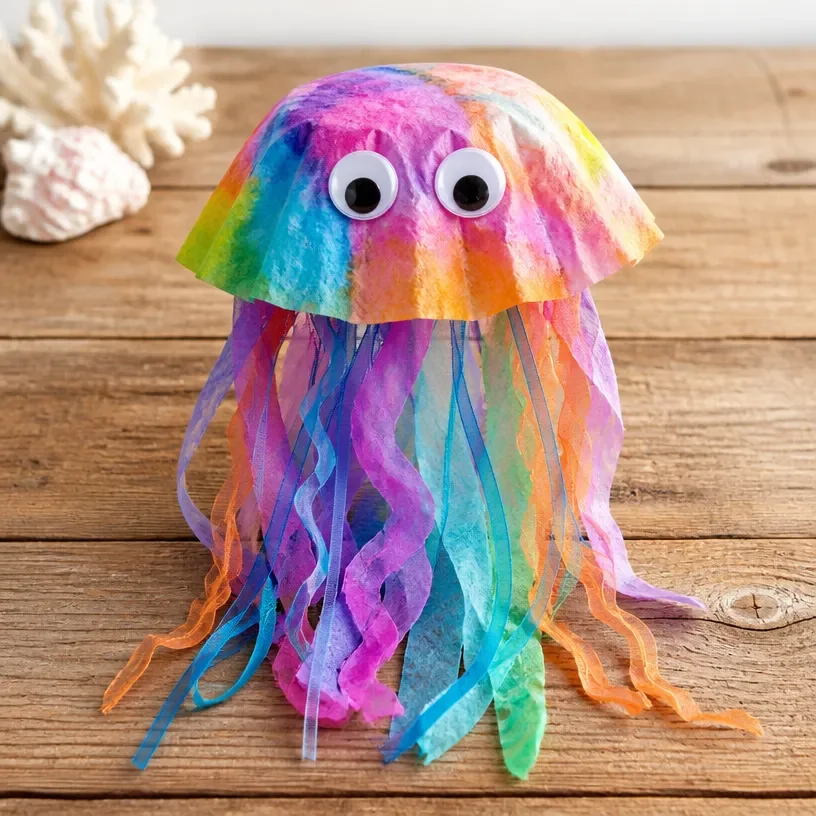
The sounds of laughter filled the room on a busy afternoon, as kids bubbled over with excitement. They needed a creative outlet, something fun to make right away. At that moment, the idea of doing a DIY Coffee Filter Jellyfish Craft: Step-by-Step Tutorial sprang to mind. It’s a fantastic way to channel their energy into a project that’s simple yet impressive. This craft turns everyday coffee filters into whimsical jellyfish that dance in the air, capturing the imagination with just a few supplies and some artistic flair. You may also find Diy Rainbow Coffee Filter Bouquet useful.
Why You’ll Love Making DIY Coffee Filter Jellyfish Craft: Step-by-Step Tutorial
You may also find Diy Watercolor Butterflies Coffee Filters useful.
This DIY project is incredibly appealing for several reasons. First, it requires minimal preparation, so you can easily set it up, even on a hectic day. You won’t need to hunt for a long list of supplies; this project uses items you can likely find at home. The reliable outcome builds confidence as kids see their jellyfish come to life with each fold and twist. It’s an enjoyable craft that balances fun and artistry without overwhelming anyone.
How This DIY Comes Together
Creating DIY Coffee Filter Jellyfish is straightforward and not time-consuming. The entire project can be easily completed in under an hour, making it a perfect activity for an afternoon. You won’t have to worry much about mess since coffee filters are relatively easy to handle and clean up. Adults can join in to help where needed, making this a wonderful bonding experience. Just envision the sparkling creativity flowing effortlessly between you and the kids as you dive into this crafting adventure.
Materials You’ll Need
To make this colorful jellyfish craft, gather the following materials:
- Coffee filters (common household item)
- Markers or food coloring (budget-friendly and easy substitutes)
- Pipe cleaners (easy to find)
- Scissors (make sure they’re safe for kids)
- Googly eyes (optional for extra fun!)
Now that you have everything ready, let’s get crafting!
Step-by-Step Directions
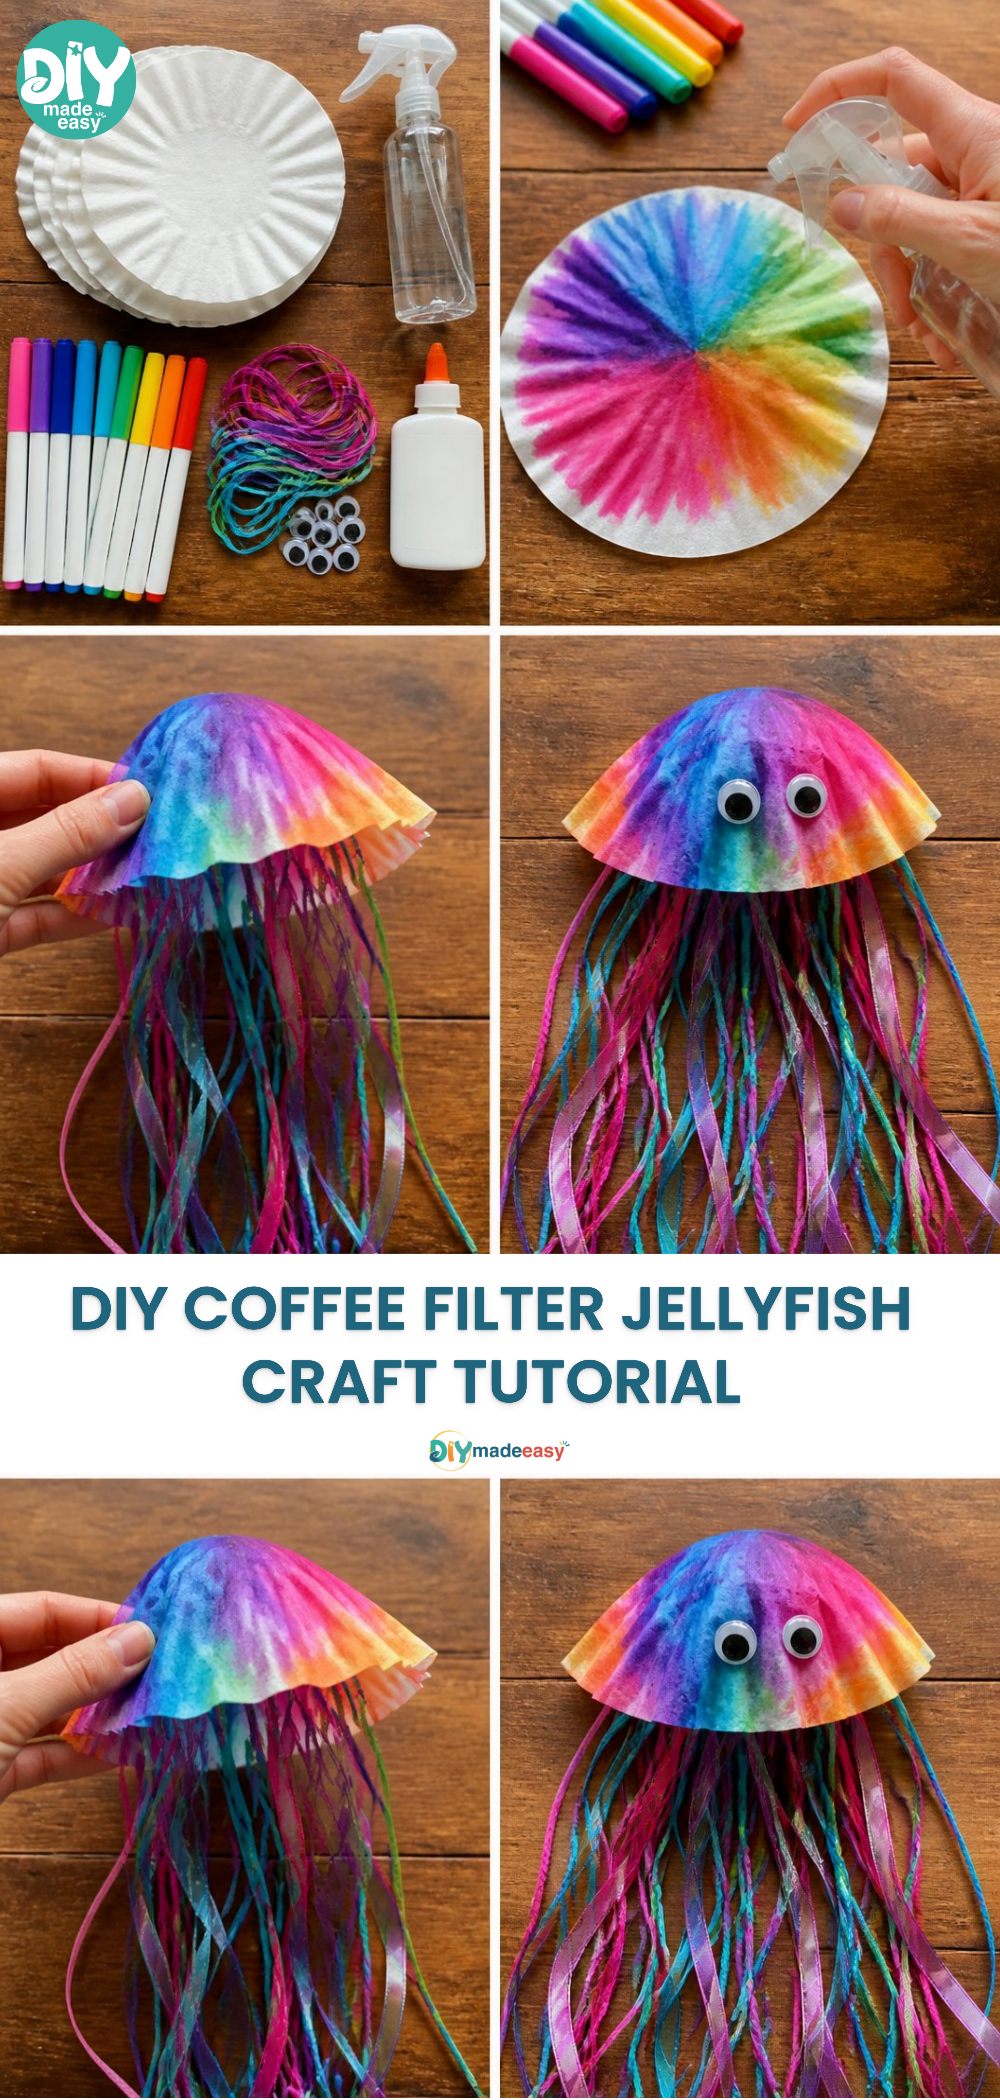
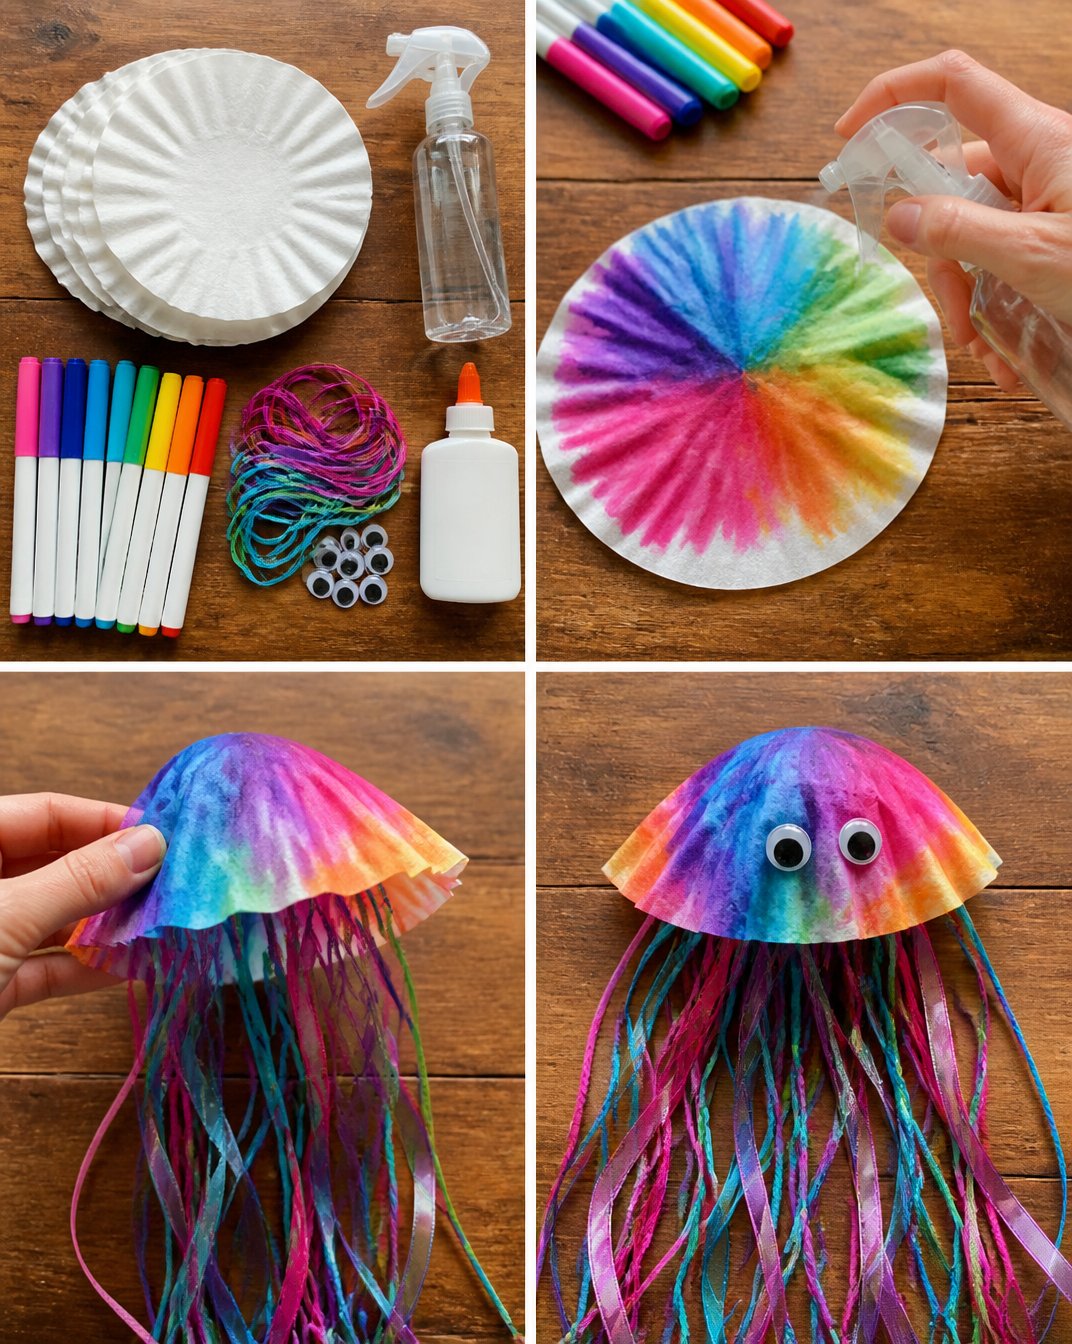
- Start by arranging your coffee filters flat on the table. You can use several, depending on how full you want each jellyfish to look.
- Use markers or food coloring to decorate the filters; let your creativity shine! The colors can be blended for a tie-dye effect, making it visually striking.
- Once the filters are colored, let them dry completely before moving ahead.
- After they dry, stack 2-4 filters on top of each other. Adjust the thickness based on your preference.
- Pinch the center of the stacked filters together and twist gently. This creates the jellyfish’s “head.”
- Take a pipe cleaner and wrap it around the twisted section, creating the jellyfish’s bell.
- Trim the bottom of the filters to create tentacles, allowing some to be longer for effect.
- Optional: glue on googly eyes for a fun touch.
- Attach strings or additional pipe cleaners to hang your jellyfish if you’d like them to dangle.
- Finally, display your creations proudly!
What Kids Practice While Making This
Engaging in the DIY Coffee Filter Jellyfish Craft not only sparks creativity but also supports skill development. Children practicing fine motor skills while coloring and cutting filters may not realize how much they are learning. They can explore color blending, coordination, and even basic concepts of marine life and habitats. It’s a perfect blend of artistic expression and gentle learning.
Troubleshooting Common Issues
Sometimes, things might not go as planned. You may find that the colors bleed too much when wet or that the jellyfish doesn’t hold its shape. Should any colors mix undesirably, remind the kids to embrace the "happy accidents" and see it as a unique jellyfish design! If the jellyfish slumps over, ensure the pipe cleaner is twisted tightly enough to hold the filters in place, and maybe even try adding a little more volume with an additional filter or two.
Easy Variations to Try
Here are a few fun twists to make your jellyfish craft even more exciting:
- Try using different shapes cut from construction paper for a variety of styles.
- Add glitter or sequins for a touch of sparkle that shines under lights or in the sun.
- Consider creating themed jellyfish colors for different holidays, such as orange and black for Halloween, similar to the colorful creations of a Halloween garland.
- You could even incorporate other crafts, such as combining it with a bat garland to decorate your space for a spooky season.
Storing or Reusing This Project
Once your jellyfish are complete, you can keep them displayed as cheerful décor. They are lightweight and easy to store if you decide to pack them away after the fun. If you want to get creative again later, consider removing the decorations gently for a new round of creativity. This aspect reduces waste and encourages kids to think about reusing materials creatively.
FAQs About DIY Coffee Filter Jellyfish Craft: Step-by-Step Tutorial
Q: Is this project messy?
A: While there is some potential for color splashes when using markers or dyes, coffee filters are pretty easy to clean up. Just have some paper towels ready for little spills.
Q: What age group is this suitable for?
A: This craft is perfect for children aged 4 and up, with adult supervision. Younger kids can participate with help from parents or guardians.
Q: Can I use other markers for coloring?
A: Yes! Any washable markers or even watercolor paints work well. Just be mindful of the mess with paints.
Q: How long does this project take?
A: The entire crafting session can be completed in about 30-60 minutes, depending on how detailed you want to be.
Q: What if we want to reuse materials for another craft?
A: Great idea! You can keep the jellyfish intact or consider taking them apart to use the supplies for future projects.
A Final Helpful Note
Crafting should be a stress-free and enjoyable experience. Remember to encourage your kids throughout the process, reminding them that there’s no wrong way to express their creativity. Flexibility can lead to delightful surprises, whether in the designs they create or the shared moments you enjoy together.
Conclusion
Crafting can foster creativity in young minds, as showcased with this wonderful DIY Coffee Filter Jellyfish project. If you’re looking for more easy craft ideas, similar to this one, check out Easy Coffee Filter Jellyfish Craft (Simple for Kids!) and Jellyfish Craft Made from Coffee Filters | Easy Kids Crafts. Embrace the joy of making and watch as your kids develop their skills while having fun!
PrintDIY Coffee Filter Jellyfish Craft
A fun and easy craft project for kids to create colorful jellyfish using coffee filters and simple household items.
- Prep Time: 10 minutes
- Cook Time: 30 minutes
- Total Time: 40 minutes
- Yield: 1 jellyfish
- Category: Crafts
- Method: DIY
- Cuisine: N/A
- Diet: N/A
Ingredients
- Coffee filters
- Markers or food coloring
- Pipe cleaners
- Scissors
- Googly eyes (optional)
Instructions
- Start by arranging your coffee filters flat on the table.
- Use markers or food coloring to decorate the filters; let your creativity shine!
- Once the filters are colored, let them dry completely before moving ahead.
- After they dry, stack 2-4 filters on top of each other.
- Pinch the center of the stacked filters together and twist gently to create the jellyfish’s head.
- Take a pipe cleaner and wrap it around the twisted section.
- Trim the bottom of the filters to create tentacles.
- Optional: glue on googly eyes for a fun touch.
- Attach strings or additional pipe cleaners to hang your jellyfish.
- Finally, display your creations proudly!
Notes
Craft encourages creativity and fine motor skills in children.
Nutrition
- Serving Size: 1 jellyfish
- Calories: 10
- Sugar: 0g
- Sodium: 0mg
- Fat: 0g
- Saturated Fat: 0g
- Unsaturated Fat: 0g
- Trans Fat: 0g
- Carbohydrates: 2g
- Fiber: 0g
- Protein: 0g
- Cholesterol: 0mg