

Woode
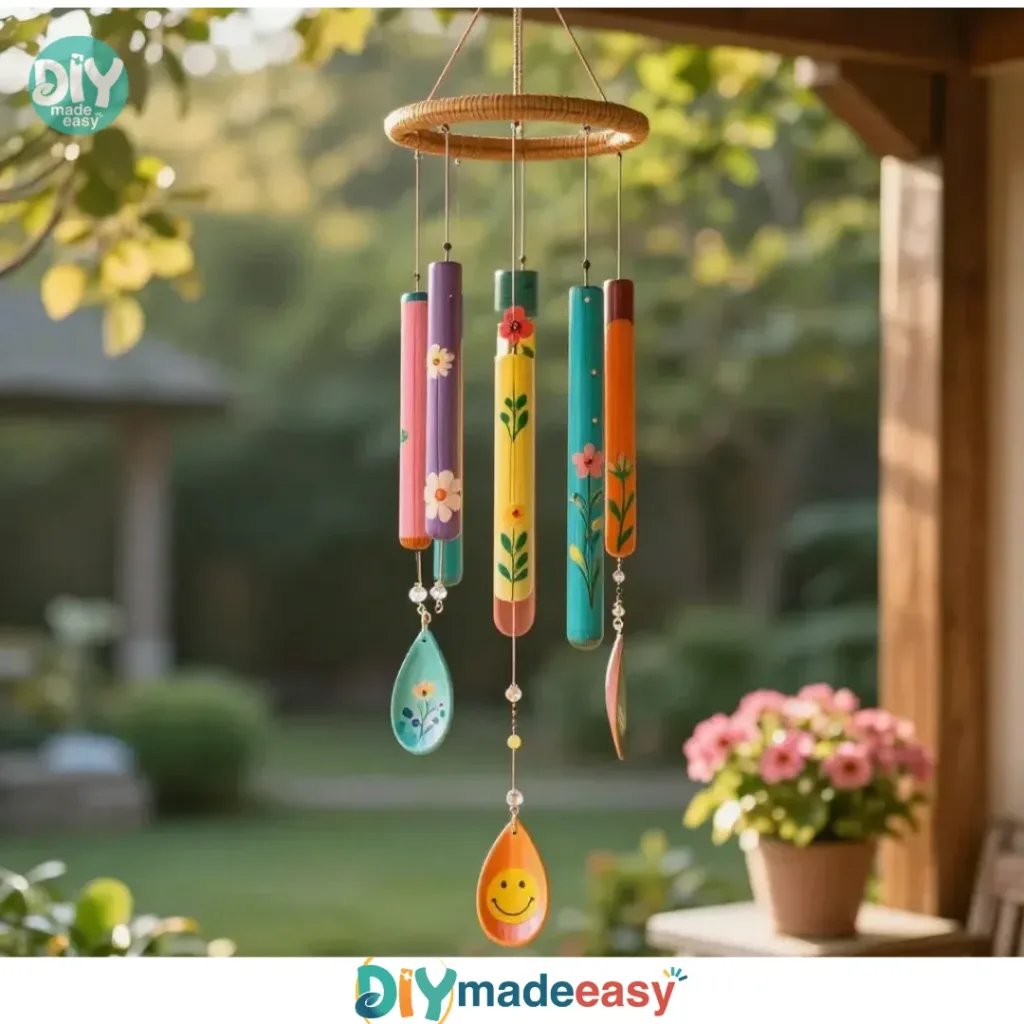
Creating memories with family should always have a spot in our busy lives. Maybe it’s a sunny afternoon, and the kids are eager to craft something unique right away. Or perhaps you find yourself searching for a last-minute activity that can keep everyone engaged. That’s exactly where the idea of Painted Wooden Spoon Garden Chimes shines. With their cheerful colors dancing in the breeze, these charming garden chimes not only add character to your outdoor space but also provide a delightful sound that fills the air, making for a wonderful backdrop to family gatherings.

Why This Painted Wooden Spoon Garden Chimes Works So Well

What makes these Painted Wooden Spoon Garden Chimes such a great project is how approachable they are. You don’t need specialized skills or hours of preparation to get started. These chimes are made with simple materials you likely already have around your home. They are perfect for kids and adults alike, making this a wonderful family activity.
The project is low-prep, meaning you can jump right into the fun without the typical stress of complex DIY projects. With only a few easy steps to follow, everyone can get involved, leading to team bonding. As you paint and assemble the chimes together, you share laughter and creativity without worrying about perfection.
Additionally, this activity is reliable. The materials are inexpensive and easy to find, ensuring you won’t be chasing down hard-to-get items. It’s designed for real-life schedules whether you have a free afternoon or just an hour, you can create something beautiful. Plus, it’s rewarding to see your painted wooden spoon chimes hanging in your garden, catching the wind and making delightful sounds.
Explore Visual Creative Crafts
Get inspired by eye-catching projects. Browse our Visual DIY Creative Crafts and bring your creative ideas to life with simple, visual guides.
The Flow of Making Painted Wooden Spoon Garden Chimes
Before diving into the actual steps, it always helps to have a calm overview of the whole process. Gather your supplies, set up your workspace, unleash your creativity, and enjoy the experience. Painting may take an hour, depending on drying time, but threading the strings and hanging them will be quick once you get everything set up.
As you embark on this DIY journey, keep in mind the potential for a bit of mess. But that’s part of the fun! Have some paper towels or cloths handy for spills. Adult involvement can help with the painting and string threading, especially with younger kids. But even older children can take the lead if they’re excited to express their creativity.
Materials You’ll Need
To make your Painted Wooden Spoon Garden Chimes, gather the following simple supplies:
- Wooden spoons
- Acrylic paint
- Paint brushes
- String or fishing line
- Decorative beads
Each of these items is commonly found around the house, making this project budget-friendly and accessible. You can find wooden spoons in any kitchen. Acrylic paint comes in various colors and offers a great way to express creativity. Using string or fishing line gives your chimes strength, while decorative beads add a lovely touch. These materials make the chimes not only sound great but look good too!
Step-by-Step Directions
- Gather all your supplies and set up a clean workspace. Make sure you have everything laid out where you can easily reach it. A large table or a spot in the backyard will work well. Having a designated workspace keeps things organized and makes for quicker setup and cleanup.
- Use the paint brushes to decorate the wooden spoons with acrylic paint. This is where your creativity can really shine. You can create swirls, stripes, or even letters. Let your colors blend; it’s all about expression. Don’t worry about making it perfect celebrate the individual styles that everyone brings to their spoons!
- Once the paint dries, thread the string or fishing line through the spoons, adding decorative beads to personalize them. This part is satisfying. As you thread your chimes, you can choose the order and style of your beads. This step allows you to personalize each chime according to each person’s taste.
- Hang your garden chimes in a sunny spot and enjoy the delightful sounds! Find a place where they can catch the wind easily, and listen as they make music with little breezes. Sit back, relax, and appreciate the moment you created together.
The Simple Science or Skills at Work

Making Painted Wooden Spoon Garden Chimes doesn’t just provide a fun activity but also supports several important skills and concepts. As you paint, you practice fine motor skills, improving hand-eye coordination with every brushstroke. This precision helps with control, as younger kids learn to manipulate the brush and materials effectively.
There’s also a cause-and-effect relationship at play. As they paint, children start to see how colors mix and change. They may notice how the wind makes the chimes interact, causing them to sound off in delightful ways. This exploration of sound will heighten their appreciation for nature and music.
Troubleshooting Common Issues
Even the simplest projects can have hiccups. You might find your spoon’s paint smudging while threading or the strings tangling together. If your paint runs or doesn’t stick, it could be a sign of not letting it dry adequately. Take it slow and allow plenty of drying time between coats.
If the beads seem too small for the string, double-check the size of both. Choose beads that allow for smooth threading. If something doesn’t turn out as expected, that’s okay! Adjustments are part of creativity. Remember, the process is just as meaningful as the final product.
Easy Variations to Try
Once you’ve made your first garden chimes, think about customizing them further. Here are some easy variations to consider:
- Decorate the spoons with patterns representing seasons: flowers for spring, leaves for fall, and snowflakes for winter.
- Use glow-in-the-dark paint for nighttime fun.
- Add small bells to the strings for an additional layer of sound.
- Create a themed set, such as ocean colors and shapes, or rainbow-inspired designs.
- Invite friends or family over to create their unique set of chimes and host a garden chime art party!
Storing or Reusing This Project
Once you’ve enjoyed your Painted Wooden Spoon Garden Chimes, it’s important to think about how to care for them. They can be reused and repurposed throughout the year, especially during different seasons. Hang them up during summer gatherings and take them down for winter.
If they start to look worn, a quick touch-up with paint will refresh them. When it comes time to store them, keep them in a dry place out of direct sunlight to preserve the colors. Also, consider keeping the materials organized; having extra spoons, paint, and beads ready makes it easy to create more chimes later.
FAQs About Painted Wooden Spoon Garden Chimes
What if my kids make a big mess while painting?
That’s actually part of the fun! Just ensure you have some paper towels handy. Acrylic paint usually washes out easily when dealt with right away. Cover surfaces you don’t want to get paint on with old newspapers or a tarp.
Can younger kids safely do this project?
Absolutely! With some adult guidance, younger children can participate fully. Just supervise the paint and threading portions. Ensure they understand not to put any small beads in their mouths.
What can I use instead of acrylic paint?
If you don’t have acrylic paint, washable markers can be a fun alternative. They might not have the same finish, but they offer another way to express creativity safely.
Will these chimes really make sounds?
Yes! When the wind blows, the chimes will create gentle and delightful sounds. It may not be a loud clanging, but rather a soft, sweet music that adds to the garden atmosphere.
Can you store the chimes outside all year?
You can, but be mindful of harsh weather. Prolonged exposure to rain or snow can wear down the paint and wood. Bringing them inside can help maintain their beauty longer.
A Final Helpful Note
As you set out to create your Painted Wooden Spoon Garden Chimes, remember that the journey matters just as much as the results. Be flexible; allow creativity to flourish without fear of mistakes. Encourage everyone to express themselves, celebrate their individuality, and look forward to those delightful sounds that will resonate within your garden space. Enjoy every moment of connection and laughter as you craft your memories together.
PrintPainted Wooden Spoon Garden Chimes

Craft cheerful and unique Painted Wooden Spoon Garden Chimes with your family for a delightful outdoor decor that fills the air with music.
- Prep Time: 10 minutes
- Cook Time: 60 minutes
- Total Time: 70 minutes
- Yield: 4 chimes
- Category: Craft
- Method: Crafting
- Cuisine: None
- Diet: N/A
Ingredients
- Wooden spoons
- Acrylic paint
- Paint brushes
- String or fishing line
- Decorative beads
Instructions
- Gather all your supplies and set up a clean workspace.
- Use the paint brushes to decorate the wooden spoons with acrylic paint.
- Once the paint dries, thread the string or fishing line through the spoons, adding decorative beads.
- Hang your garden chimes in a sunny spot and enjoy the delightful sounds!
Notes
Have paper towels handy for spills. Adult supervision is recommended for younger children, especially during painting and threading.
Nutrition
- Serving Size: 1 chime
- Calories: N/A
- Sugar: 0g
- Sodium: 0mg
- Fat: 0g
- Saturated Fat: 0g
- Unsaturated Fat: 0g
- Trans Fat: 0g
- Carbohydrates: 0g
- Fiber: 0g
- Protein: 0g
- Cholesterol: 0mg