

The afternoon sun streamed through the windows, illuminating the kitchen where my kids were buzzing with energy. They had just come home from school and were eager to dive into a creative project. I often find myself in need of quick activities that are engaging but don’t take up too much time or prep work. With just a few simple ingredients that we had on hand, I thought about trying out The Faux-Glass ‘Epsom Salt’ Window Crystals. This project not only promised to be easy but also allowed for some hands-on creativity, right in our own home.

Why You’ll Love Making The Faux-Glass ‘Epsom Salt’ Window Crystals

The Faux-Glass ‘Epsom Salt’ Window Crystals stand out as an incredibly approachable project for families. The ingredients are common household items, meaning you likely won’t have to run to the store to gather supplies. This makes it perfect for those spontaneous afternoons when kids are bursting with energy and creative ideas.
The project is low-prep yet delivers delightful results that spark joy. Within just half an hour, kids can see their work transform into beautiful, sparkling crystals on glass. This provides visual satisfaction without requiring extensive crafting experience. The best part is how reliable the process is it’s usually smooth sailing once you have the mixture right. When you keep things simple, even busy days allow for meaningful moments. You can feel confident that everyone can get involved and wrap up the activity quickly.
Discover Easy Kids Activities
Looking for simple, fun ideas for kids? Explore our Low Prep Kids Activities and find quick projects that spark creativity without long prep time.
A Quick Look Before You Begin
The beauty of this DIY project is how straightforward it is. You’ll need about 40 minutes total from start to finish. Setting up takes just a few minutes. Cleaning up is also minimal, thanks to the water-based materials.
As you set everything out, you may want to lay down some old newspaper or a plastic tablecloth to catch any drips, especially if you’re working with little hands. Adult supervision is helpful, especially when applying the liquid, which could get a bit messy depending on how excited the kids are. They’ll surprise you with their creativity, but don’t worry you’ll be there to gently guide them.
Materials You’ll Need
1 cup Epsom salt
1 cup warm water
2 drops dish soap
Epsom salt is a common household item, often used in baths or for gardening. Warm water is easy to access from the tap, and 2 drops of dish soap help the mixture adhere better without bubbling up. You likely have these supplies at home already, which makes jumping into this project even easier.
Step-by-Step Directions
- Start by stirring the Epsom salt into the warm water. Keep stirring until it’s completely dissolved. This creates a clear base for your crystal-making mix. You’ll know it’s ready when you can no longer see any grains or clumps.
- Next, gently stir in the 2 drops of dish soap. Try not to create bubbles at this stage, as you want a smooth, even mixture for the best results.
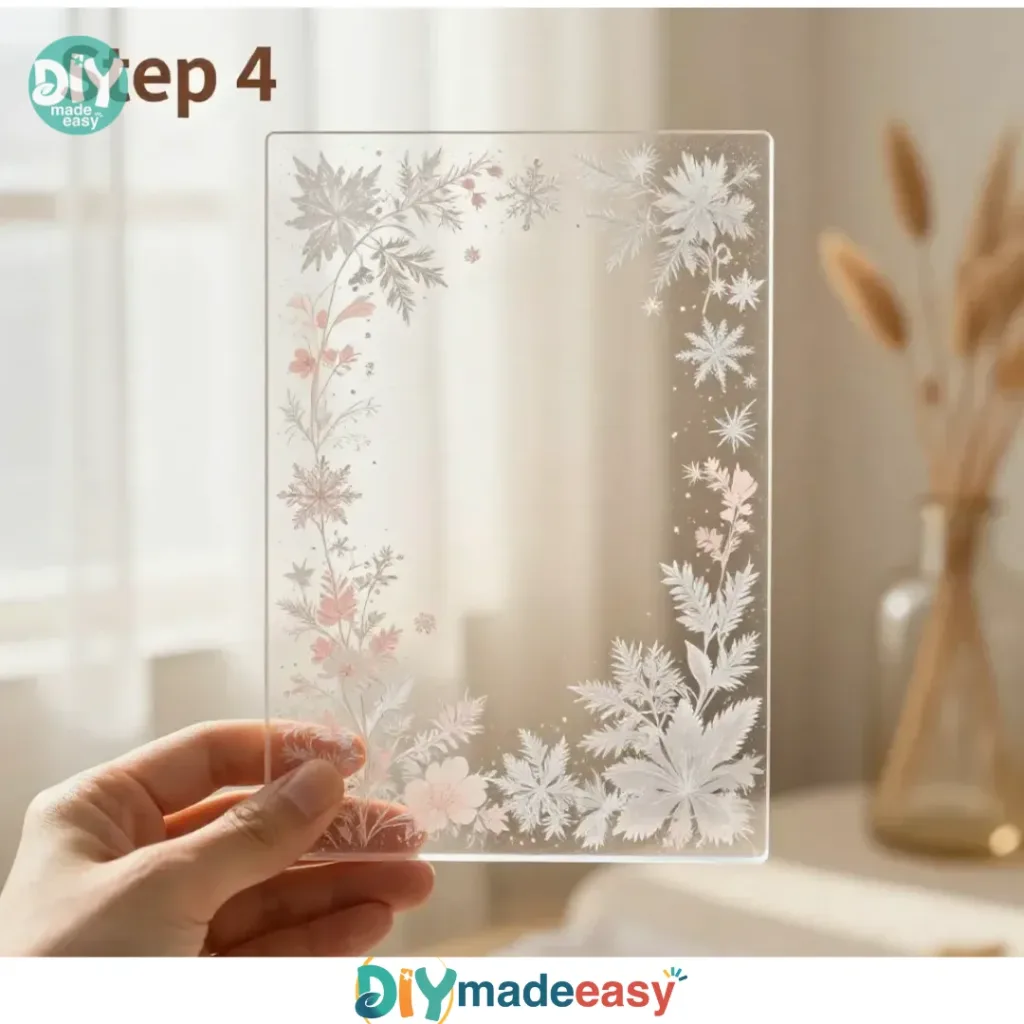
- Now it’s time to use a paintbrush to apply the liquid. Take your clean paintbrush and dip it into the mixture. Apply it to a clean glass window or a picture frame insert. Ensure you cover an area evenly, so you get a nice crystal effect.
- Allow everything to dry for 30 minutes. During this time, you can sneak a peek and watch as the crystallization begins to take shape. You’ll start to see those sparkly formations developing, giving you something lovely to admire.
The Learning Behind This DIY

Making The Faux-Glass ‘Epsom Salt’ Window Crystals is a good opportunity for kids to practice several skills while having fun. They engage in a form of kitchen science, observing how the mixture transforms as it dries. This not only reinforces concepts like cause and effect but also teaches patience as they wait for the crystals to form.
Fine motor skills come into play as they use the paintbrush, helping them develop coordination with each stroke. They get to experience the tactile sensation of working with the mixture, which adds to the excitement.
Furthermore, even though this is a simple project, kids can start to comprehend basic chemistry. They see how solid Epsom salt dissolves in water, and through drying, it forms a solid again this is an easy lesson in states of matter.
Troubleshooting Common Issues
Sometimes, things don’t go perfectly. If your crystals aren’t forming as expected, it could be due to a few reasons.
First, check to ensure the Epsom salt was completely dissolved. If any grains remain at the bottom, it can affect crystal formation. If you added too much dish soap, it can cause excessive bubbles, so keep it minimal just two drops!
Additionally, make sure to apply the mixture evenly. If areas are too thick, you might not see crystallization as effectively. If indeed the mixture dries without crystals, don’t lose heart. You can easily start fresh. Clear off the window or insert, clean your brush, and give it another go.
Easy Variations to Try
- Colored Crystals: Add a drop or two of food coloring to the mixture for a different visual effect. This can make the crystals pop with color.
- Seasonal Themes: Use holiday-themed shapes or frames to apply your mixture on, making engaging decorations for various seasons or holidays.
- Layered Crystals: To create a more intricate design, let one layer dry before applying a thin layer of fresh mixture on top. This can add depth and texture.
- Larger Areas: Instead of small frames, tackle larger surfaces like a glass door. Just be sure to have enough of the mixture to cover the increased area.
- Experiment with Shapes: Use cookie cutters or templates to create fun shapes in the crystals. This adds a creative touch that kids will enjoy.
Storing or Reusing This Project
Once the crystals have dried, you have a beautiful creation that can be displayed or taken down easily. If they begin to lose their sparkle, simply wash the glass with warm water to remove the crystals and try again.
If you want to save the Epsom salt solution for later, store it in a sealed container. Just remember that it should ideally be used soon after mixing for the best results. Keeping this project flexible means you can adjust based on what fits best for you and your family.
FAQs About The Faux-Glass ‘Epsom Salt’ Window Crystals
Can this be messy?
Yes, it can get a little messy, especially with younger children eager to dive in. It’s best to lay down some newspaper or create a designated workspace for this activity. But the cleanup is easy!
Is this safe for all ages?
Absolutely! The materials used are safe and non-toxic, but adult supervision is recommended during application to prevent spills.
What if I don’t have Epsom salt?
You could try using table salt, but results could vary. Epsom salt makes for better crystals, but it’s still worth a shot if you’re in a bind!
How do I store the crystals?
Simply wash the glass surface with warm water. If you want to keep them, store the glass in a safe place to maintain their beauty.
What if we don’t see crystals?
If the crystals don’t form as expected, it might be due to too much soap or incomplete dissolution of the salt. Don’t worry! You can easily start fresh with a new mixture.
A Final Helpful Note
While crafting The Faux-Glass ‘Epsom Salt’ Window Crystals, remember the goal is to have fun together. Messes happen, and not everything needs to be perfect. What matters is the time spent creating, learning, and laughing. Be flexible with the process, and no matter the outcome, celebrate the effort and creativity your family put into this project. It’s all about making memories, not just beautiful crystals. Enjoy the peaceful moments these simple activities can foster connection and joy on even the busiest of days.
PrintFaux-Glass Epsom Salt Window Crystals

Create beautiful faux-glass crystals with just a few simple household ingredients. A fun and easy project for kids that teaches creativity and science!
- Prep Time: 5 minutes
- Cook Time: 30 minutes
- Total Time: 40 minutes
- Yield: 1 project 1x
- Category: Crafts
- Method: DIY Crafting
- Cuisine: N/A
- Diet: N/A
Ingredients
- 1 cup Epsom salt
- 1 cup warm water
- 2 drops dish soap
Instructions
- Stir the Epsom salt into the warm water until completely dissolved.
- Gently stir in the 2 drops of dish soap. Avoid creating bubbles.
- Dip a clean paintbrush into the mixture and apply to a clean glass window or picture frame insert.
- Allow to dry for 30 minutes and watch as the crystals begin to form.
Notes
Adult supervision is recommended during application to prevent spills. Use old newspaper or a plastic tablecloth to catch drips.
Nutrition
- Serving Size: 1 project
- Calories: N/A
- Sugar: 0g
- Sodium: 0mg
- Fat: 0g
- Saturated Fat: 0g
- Unsaturated Fat: 0g
- Trans Fat: 0g
- Carbohydrates: 0g
- Fiber: 0g
- Protein: 0g
- Cholesterol: 0mg