

Creating art can feel like a big task, especially on busy afternoons when you are looking for a quick activity to engage the kids. If your children have been asking for something creative to occupy their time, making Blue Suncatchers could be the perfect answer. This fun project not only allows for creativity but also leads to beautiful results that can brighten up any window.
You’ll find that the process to make these suncatchers is straightforward. Working with simple materials like crayon shavings and parchment paper makes it easy to dive right in, even if you have a hectic schedule. And the best part? The kids will feel excited to see their creations illuminated by the sunlight shining through, creating lovely blue patterns in the air.
Why This Blue Suncatchers Works So Well

The appeal of Blue Suncatchers is rooted in their simplicity. This project is low-prep, relying on materials most families will already have around the house. You don’t need to gather an overwhelming number of supplies or spend hours planning. Just a few easy steps are all it takes to embark on this creative journey.
Making these suncatchers allows kids to experience art in an approachable and reliable way. They will see immediate results as they watch the crayon shavings melt and transform into colorful designs. This instant gratification can boost their confidence, making it easier for them to tackle more complex projects in the future.
Given the minimal mess involved just a few crayon shavings here and there this activity is perfect for a last-minute playtime idea. With a little bit of adult supervision, even young children can participate in creating their very own blue suncatchers.
Explore Visual Creative Crafts
Get inspired by eye-catching projects. Browse our Visual DIY Creative Crafts and bring your creative ideas to life with simple, visual guides.
The Flow of Making Blue Suncatchers
You may wonder how long this project will take or what your workspace will look like once it’s done. Let me reassure you: the entire process can be wrapped up in about an hour. Kids can sprinkle the crayon shavings and help fold the parchment paper. When it comes to using the iron, you’ll want to take the lead, but don’t worry. It all flows smoothly, and it’s a great chance for you to engage with your children while supervising a fun, hands-on activity.
Be prepared for some light cleanup afterward. A few crayon shavings may fall on the table, but they sweep up easily. As for safety, just be mindful of the iron’s heat. With some guidance, children can participate in this activity without any worries.
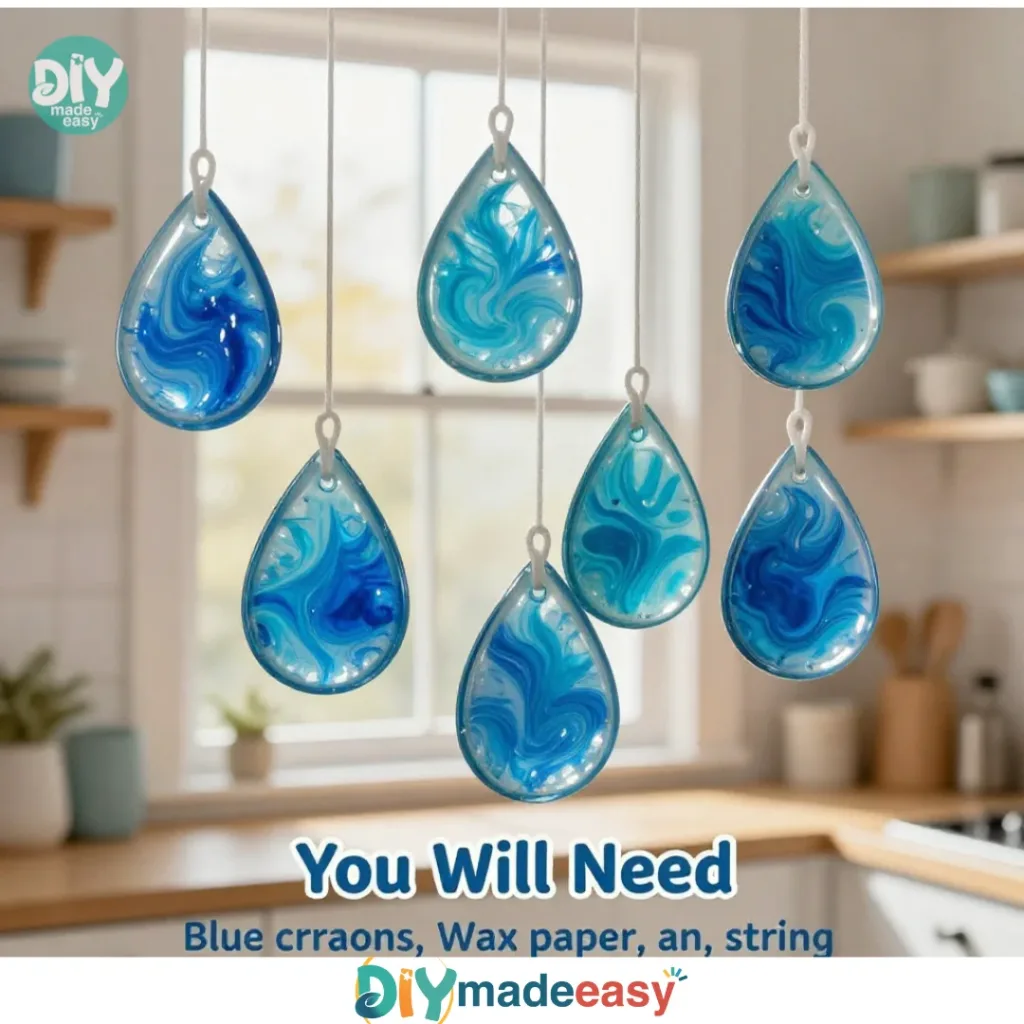
Materials You’ll Need
Gathering your materials is the first step toward making these beautiful Blue Suncatchers. Here’s what you’ll need:
- Clear plastic sheets (common household item)
- Blue crayon shavings (easy to create from old crayons)
- Heat-safe parchment paper (necessary for melting the crayons)
- An iron (adult supervision needed)
- Scissors (for cutting shapes)
- A hole punch (optional)
- String or fishing line (to hang your suncatcher)
By keeping the material list simple, it makes this project approachable, even if you’re short on time or resources.
Step-by-Step Directions

Let’s dive into the steps you’ll need to follow to create your Blue Suncatchers. Don’t worry each step is clear, and I’ll offer a bit of guidance along the way.
- Gather blue crayon shavings. You can create shavings by using the edge of a grater or a peeler to shave off thin pieces of blue crayons. This part can be a delightful moment, with children captivated by the colorful shavings.
- Lay heat-safe parchment paper on a flat surface. Make sure the area is clean and clear of any clutter so you can work without distractions.
- Sprinkle blue crayon shavings across one half of the parchment paper. Kids can enjoy this part as they scatter the shavings, using their artistic judgment for how much they want to use.
- Fold the parchment paper over the crayon shavings. This creates a little pocket that keeps everything contained, which is very helpful as you proceed.
- Heat your iron to a low setting and gently press it on top for a few seconds. This is where the magic happens. The warmth will start to melt the shavings, releasing a lovely blue color. Make sure to gently press and move the iron around; children can watch in awe at the transformation.
- Carefully peel back the parchment paper to reveal the melted crayon layer. Take your time with this step. It’s worth it just to see the stunning patterns that emerge.
- Use a hole punch to create a hole at the top if hanging it. This is an optional step, but it adds a nice touch if you want to display your work.
- Cut your suncatcher into desired shapes. You can go with circles, stars, or any shape that inspires you and your children.
- Attach string or fishing line and hang it in a sunny window. The final reveal is rewarding as the sunlight shines through, showcasing the creativity you all put into your suncatchers.
What Kids Practice While Making This

Creating Blue Suncatchers isn’t just about the end product; it’s about the learning that happens along the way. While making this art, kids practice fine motor skills by handling tiny crayon shavings and maneuvering scissors. These small actions support hand-eye coordination and improve dexterity.
Furthermore, children will observe the process of cause and effect when they see how the heat from the iron transforms the crayon shavings. They’ll understand that their actions lead to specific results, fostering a sense of accomplishment.
As they focus on what they are doing, kids also build concentration. The project keeps their hands busy while nurturing their creativity.
Troubleshooting Common Issues
If something doesn’t go as planned, don’t worry; this is part of the process. Sometimes crayon shavings may not melt evenly, leaving some areas lighter than others. If that happens, simply re-iron those spots briefly, ensuring not to overheat.
You may find that the suncatchers could stick to the parchment paper if left too long. If this happens, gently peel them off, and use a bit of patience. If the shapes fall apart during cutting, that’s okay embrace it as an art piece with character! It’s these little imperfections that often make handmade art unique and special.
Easy Variations to Try
Looking for something new? Here are a few suggestions to change it up a bit:
- Try other colors. You can mix blue with lighter shades or even introduce different colors to create a rainbow effect.
- Layer your colors. You can add multiple colors in sections, allowing layers to create depth in your suncatcher.
- Experiment with seasonal shapes. Create hearts for Valentine’s Day, pumpkins for Halloween, or snowflakes during winter.
- Work with different sizes. Larger or smaller shapes create unique designs that can be tailored for any window space.
- Switch materials. Instead of crayon shavings, consider using colored wax paper for a different textured look.
Storing or Reusing This Project
After making your Blue Suncatchers, consider how you will store them. If you want to keep them safe until they can be hung, make sure to lay them flat in a place where they won’t get bent or damaged.
You might also look into reusing materials from this project. The leftover crayon bits can be melted down into new crayons or used for other creative projects in the future. This helps minimize waste and keeps the creativity flowing long after this particular project ends.
FAQs About Blue Suncatchers
What if my kids make a mess with the crayon shavings?
It’s likely that some shavings will fall on the table or floor, but they can be easily swept away or vacuumed up afterward. Just keep a cloth nearby, and it should be a quick cleanup.
Is it safe for younger kids to help with the iron?
It’s best if an adult handles the iron. Kids can assist with other steps, ensuring they feel involved without the risk of burns.
Can we substitute other crayons if we don’t have blue?
Absolutely! Feel free to use whatever colored crayons you have on hand. Just keep in mind that the primary shade will result in the main color of your suncatcher.
How do I store the suncatcher after we are done?
You can hang them up immediately or store them flat in a box until you find a suitable spot. Just make sure they’re protected from bending.
Will crayon colors mix, or will they stay separate?
If you layer them carefully, the colors typically won’t mix. However, there may be some blending where they touch, giving it a beautiful marbled effect.
Conclusion
Creating Blue Suncatchers is more than just an art project. It’s an opportunity for creativity, learning, and bonding time with your children. So, grab those materials and prepare for some fun. When you feel ready for more art inspiration, consider exploring options like stained glass window hangings or check out other fun activities like the Red White and Blue Bomb Pop Suncatcher. You’re sure to find endless ways to engage and create together!
PrintBlue Suncatchers

A fun and creative project for kids to make beautiful blue suncatchers using simple materials like crayon shavings and parchment paper.
- Prep Time: 15 minutes
- Cook Time: 15 minutes
- Total Time: 30 minutes
- Yield: 1 suncatcher
- Category: Craft
- Method: Art & Crafts
- Cuisine: N/A
- Diet: N/A
Ingredients
- Clear plastic sheets
- Blue crayon shavings
- Heat-safe parchment paper
- An iron (adult supervision needed)
- Scissors
- A hole punch (optional)
- String or fishing line
Instructions
- Gather blue crayon shavings using a grater or a peeler.
- Lay heat-safe parchment paper on a flat surface.
- Sprinkle blue crayon shavings across one half of the parchment paper.
- Fold the parchment paper over the crayon shavings.
- Heat your iron to a low setting and gently press it on top.
- Carefully peel back the parchment paper to reveal the melted crayon layer.
- Use a hole punch to create a hole at the top if hanging it.
- Cut your suncatcher into desired shapes.
- Attach string or fishing line and hang it in a sunny window.
Notes
Supervision is required when using the iron. Cleanup is minimal, just be prepared for some crayon shavings.
Nutrition
- Serving Size: 1 suncatcher
- Calories: N/A
- Sugar: N/A
- Sodium: N/A
- Fat: N/A
- Saturated Fat: N/A
- Unsaturated Fat: N/A
- Trans Fat: N/A
- Carbohydrates: N/A
- Fiber: N/A
- Protein: N/A
- Cholesterol: N/A