

DIY Sparkling Stones can bring a splash of creativity into your home, especially when those busy afternoons roll around, and your kids are longing to make something fun. Picture this: it’s the end of the week, the kids have been cooped up all day, and they come bounding into the kitchen eager to create.
You glance over at the smooth, polished stones you’ve collected from the backyard, and suddenly, an idea pops into your head. Why not transform those stones into colorful works of art? With just a few simple materials like acrylic paint and some glitter, you can create DIY Sparkling Stones that everyone in the family will love. This project isn’t just easy; it’s also a perfect chance to bond with your kids while expressing yourselves artistically.
Why This DIY Sparkling Stones Works So Well

This project is the perfect blend of simplicity and enjoyment. First, it requires minimal prep time, making it suitable for a quick afternoon activity. The materials are easy to find around your home or at a local craft store, so there’s no need for extensive planning. The fun of DIY Sparkling Stones lies in its flexibility; you can express creativity in soothing colors and playful designs.
Moreover, this project is reliable. The steps are straightforward, meaning you can embark on this artistic adventure without feeling overwhelmed. Imagine seeing your children engaged, dipping paintbrushes in vibrant colors, and transforming ordinary stones into beautiful, sparkling displays. It fits seamlessly into real-life schedules and provides a rewarding experience with tangible results.
A Quick Look Before You Begin
Many families find that taking on a DIY project together is a wonderful way to spend quality time. This activity typically takes about an hour, depending on how intricate the designs you and your kids choose to create. You can set up your workspace in less than five minutes, making this a hassle-free option for a last-minute creativity boost.
As for mess levels, expect a little splatter after all, paint and glitter are involved. But consider that part of the joy! Have paper towels ready and embrace the playful chaos. Adult supervision is certainly useful, especially when handling paints or adhesives. You may find yourself stepping in to help with tricky bits, but the goal here is enjoyment, not perfection.
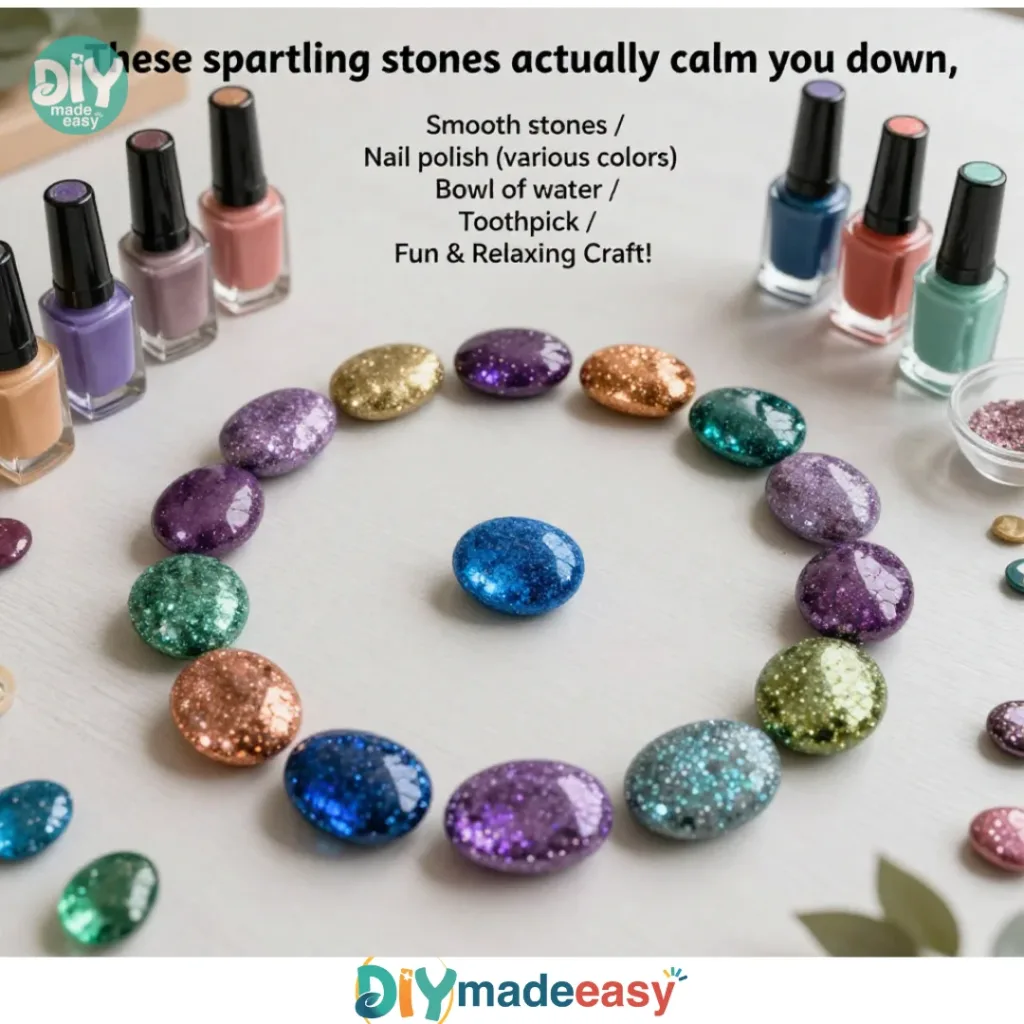
Materials You’ll Need
To create your sparkling stones, you’ll need the following materials:
- Smooth, polished stones
- Acrylic paint (choose soothing colors)
- Paintbrushes (various sizes)
- Small gems or glitter
- Clear sealant
- Bowl of water
- Paper towels
You may already have most of these items at home, especially the stones and the clear sealant. Feel free to pick colors that resonate with you these stones can truly become a reflection of your family’s style.
Step-by-Step Directions

- Prep your workspace with paper towels or a protective covering. Start by covering the surface you’re working on. This will help catch spills and splatters, making cleanup much easier.
- Wash the stones gently in water and dry them thoroughly. Give your stones a rinse to remove any dust. Drying them will help the paint adhere better.
- Pour your chosen paint colors into a dish and mix shades if desired. Take a moment to experiment with your colors. Mixing shades can create unique hues that make your stones even more special.
- Use a brush to apply the paint onto the stones, creating a base coat and adding designs as you go. Start with a base coat for full coverage, then let your imagination flow! Use different brush sizes to create intricate designs.
- Once the paint dries, embellish the stones with glitter or gems, applying clear glue beforehand for better adhesion. Get creative with your designs think stars, stripes, or even little critters!
- Let the stones dry completely before applying a clear sealant to protect your work and enhance shine. Ensure you give your creations ample time to dry, as this step is essential for a polished look.
- Allow the sealant to set for a few hours before handling. This protects your stones and provides a beautiful, shiny finish. Let them sit undisturbed to set properly.
The Learning Behind This DIY

Making DIY Sparkling Stones offers more than just artistic fun. Children will develop fine motor skills as they paint and handle the small gems and glitter. These activities promote hand-eye coordination and dexterity. Plus, there’s a delightful science aspect to this project. Your kids will see firsthand how the paint dries and how the clear sealant adds a glossy finish. Watching their stones transform will reinforce concepts of cause and effect in a hands-on way.
Troubleshooting Common Issues
It’s always wise to anticipate what might go wrong, especially with crafty projects. If the paint doesn’t seem to stick, make sure the stones are dry before applying any paint. Sometimes you might spill paint don’t fret! Just grab a paper towel to wipe it up quickly while it’s still wet. If it dries, you can always touch up the area.
If the glitter is not adhering well, ensure you applied enough glue before adding it to your stones. Sometimes a little extra patience is needed while waiting for everything to dry fully.
Easy Variations to Try
Not sure how to customize your Sparkling Stones? Here are a few fun ideas to consider:
- Paint seasonal themes think pumpkins for fall or snowflakes for winter.
- Use nature-inspired colors, like shades of green and blue, for a calming effect.
- Experiment with different finishes maybe metallic paint or glow-in-the-dark options for nighttime fun.
- Create sets of stones with a message or theme, like “peace” or “joy.”
- For younger kids, consider using broader brushes and larger stones to make the process more manageable.
Storing or Reusing This Project
After your Sparkling Stones are dry, you can display them in a variety of places. Place them in your garden, use them as decorative pieces in the home, or give them as heartfelt gifts. If you find they collect dust, simply rinse them off and refresh the paint whenever you feel inspired. Consider reusing or storing any leftover materials for future projects, reducing waste while keeping creativity alive.
FAQs About DIY Sparkling Stones
How messy is this project?
It can get a bit splattery due to the paint and glitter, but laying down paper towels or a protective covering helps contain the mess. Just have some paper towels handy for easy cleanup.
What age range is appropriate?
This project works well for children aged 6 and up, but younger kids can also join in with adult supervision. Just be cautious with small parts and paint.
Can I substitute materials?
Yes, if you don’t have clear sealant, a non-toxic varnish can provide a similar finish. Feel free to choose any colors you prefer too!
How do I store my stones once they’re done?
Store your stones in a cool, dry place. If you want to display them, consider creating a small arrangement or using them as paperweights.
What if the results don’t look as expected?
Remember, every artist has a learning curve! Embrace the uniqueness of each stone and see it as a part of the creative journey.
Conclusion
Creating DIY Sparkling Stones is not just a fun afternoon activity; it’s an opportunity to engage creativity within your family. The joy of experimenting with colors and designs will yield beautiful, unique stones you can cherish. If you’re looking for more interesting ideas like this, consider exploring other inspiring projects on colorful bioplastic suncatchers. For a different twist, check out these sparkling stones that you can purchase or use as inspiration. Remember to embrace the process and let the little ones enjoy creating this journey is worth every painted stroke.
PrintDIY Sparkling Stones

Transform ordinary stones into colorful art pieces with acrylic paint and glitter in this fun DIY project for the whole family.
- Prep Time: 5 minutes
- Cook Time: 60 minutes
- Total Time: 65 minutes
- Yield: Varies based on the number of stones created
- Category: Crafts
- Method: Crafting
- Cuisine: N/A
- Diet: N/A
Ingredients
- Smooth, polished stones
- Acrylic paint (choose soothing colors)
- Paintbrushes (various sizes)
- Small gems or glitter
- Clear sealant
- Bowl of water
- Paper towels
Instructions
- Prep your workspace with paper towels or a protective covering.
- Wash the stones gently in water and dry them thoroughly.
- Pour your chosen paint colors into a dish and mix shades if desired.
- Use a brush to apply the paint onto the stones, creating a base coat.
- Once the paint dries, embellish the stones with glitter or gems.
- Let the stones dry completely before applying a clear sealant.
- Allow the sealant to set for a few hours before handling.
Notes
Great for children aged 6 and up with adult supervision. Embrace the mess and enjoy the creative process!
Nutrition
- Serving Size: N/A
- Calories: N/A
- Sugar: N/A
- Sodium: N/A
- Fat: N/A
- Saturated Fat: N/A
- Unsaturated Fat: N/A
- Trans Fat: N/A
- Carbohydrates: N/A
- Fiber: N/A
- Protein: N/A
- Cholesterol: N/A