

Creating a little world of creativity often comes together in the most unexpected moments. Picture a busy afternoon, maybe the kids are home from school with energy to spare. They start throwing ideas around, wanting to make something fun right now. Suddenly, you think of a quick kitchen setup, a project that doesn’t need a ton of prep time and can spark their imagination. This is where DIY bioplastic from cornstarch comes into play. With just a few common ingredients, you can keep the kiddos engaged and also teach them a thing or two about science and sustainability.
Why This DIY Bioplastic from Cornstarch Works So Well

Working with DIY bioplastic from cornstarch is a wonderful choice because it sits at the intersection of fun and education. The process is low-prep, meaning it doesn’t require hours to set up. You can gather everything in about fifteen minutes, making it suitable for those busy days full of activities. The materials are approachable, usually found in most kitchens, which means you aren’t running around to specialty stores.
This project is reliable. You get real results without needing intricate instructions or materials that might stress you out. Kids can grab their aprons and dive right in, all while knowing there won’t be overwhelming messes. And if something doesn’t go perfectly the first time, that’s okay. It’s all part of learning. Plus, it’s easy to guide them through adjustments, ensuring everyone leaves with a sense of accomplishment.
A Quick Look Before You Begin
Let’s take a moment to breathe and assess what this project looks like before jumping in. The setup is straightforward and doesn’t consume much time. Most of the actual work takes about 15-20 minutes, depending on how involved the kids get with the shaping and creation parts. Plan for some cleanup afterward, but with a non-stick pot and a few handy tools, messes are manageable.
You may want to be nearby, especially when it comes to the heating part. It’s always wise to supervise little ones closely when they’re working with pots on the stove. Ultimately, this project is perfect for a range of ages, so whether you have toddlers eager to explore textures or older kids ready to create intricate designs, everyone can find joy in crafting their bioplastic.
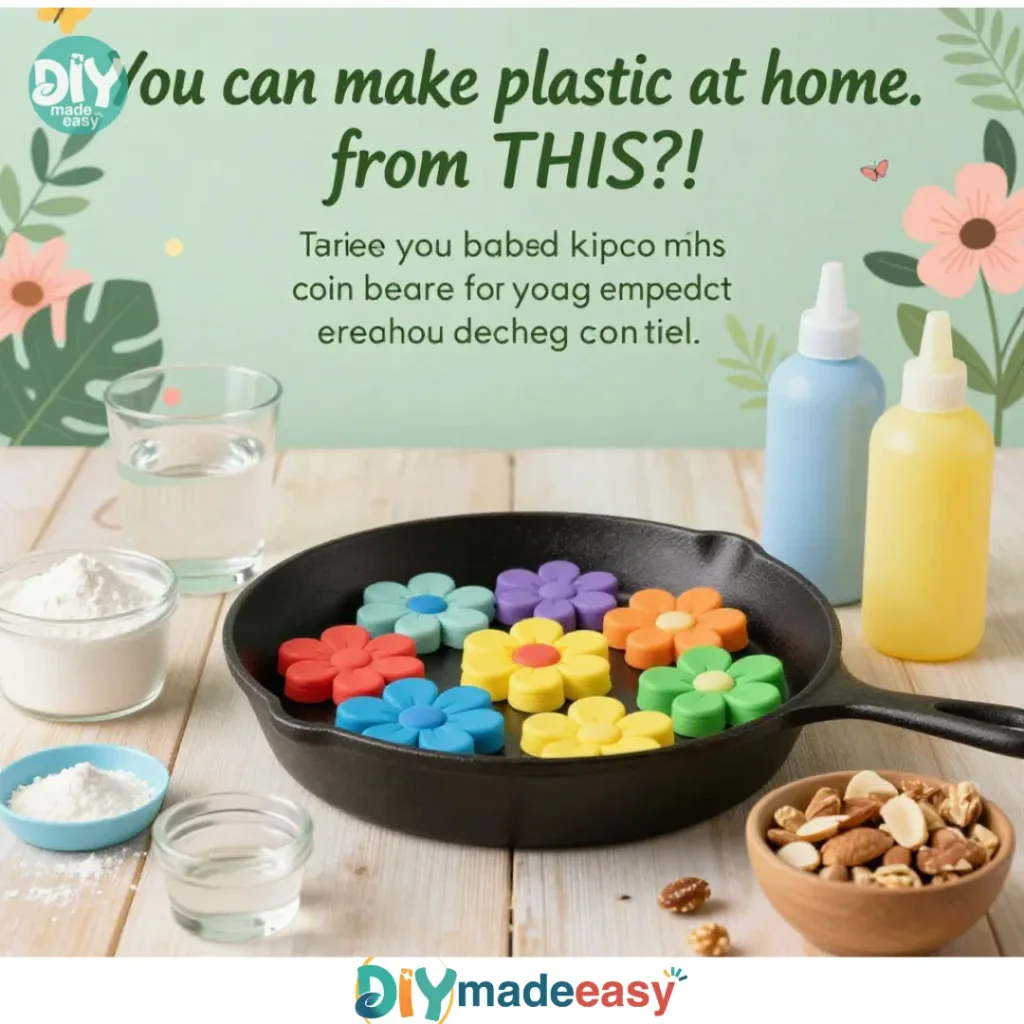
Materials You’ll Need
Making DIY bioplastic requires only a handful of simple ingredients. Here’s what you need:
- 1 cup cornstarch
- A common household item.
- 1 cup water
- Easy to grab from the tap.
- 1 tablespoon white vinegar
- Adds a nice twist; you might already have some.
- 1 tablespoon glycerin
- This can be found at pharmacies or craft stores and is budget-friendly.
- Food coloring (optional)
- A fun way to brighten up your project.
- Baking parchment or silicone mat
- Great for easy cleanup and shaping.
- Non-stick pot
- Helps prevent sticking and makes for less fuss.
- Stirring utensil
- A simple wooden spoon will do the trick.
Gather these items, and you’re ready to begin crafting!
Step-by-Step Directions

Now, let’s get down to the nitty-gritty of making your bioplastic. Remember to take your time and enjoy each step. Here’s how it unfolds:
- Mix the cornstarch and water in a non-stick pot.
Start by combining your cornstarch and water until there are no lumps. You want a smooth mixture that blends well together. - Add white vinegar and glycerin, stirring until combined.
Pour in the vinegar and glycerin. Both of these ingredients will help the mixture become more pliable. Stir until everything is fully mixed. - Place on low heat, stirring slowly until the mixture thickens and bubbles.
This is the magic moment. As you stir, pay attention to the texture it will start to thicken. Watch for bubbles forming, as that indicates the bioplastic is coming together. - Remove from heat and pour onto a baking parchment or silicone mat while warm.
Carefully transfer your thickened mixture onto the baking parchment or silicone mat. Being warm makes it easier to spread, so don’t worry if it’s a little sticky; it will cool down quickly. - Allow to cool completely before shaping.
Let your bioplastic sit until it cools completely. This might take around 30 minutes, but it’s a good time to clean up your space or plan what shapes you want to form. - Store creations in a cool, dry place and reshape as necessary.
Once your creations are cool, store them in a dry spot. They can be reshaped later if needed, so don’t feel like everything must be perfect right away.
Discover Easy Kids Activities
Looking for simple, fun ideas for kids? Explore our Low Prep Kids Activities and find quick projects that spark creativity without long prep time.
What Kids Practice While Making This

This enticing project isn’t just about having fun; it’s also a great chance for kids to practice key skills. As they measure ingredients, they engage with basic math. When they stir the mixture, they develop fine motor skills, improving their coordination and control. Watching the mixture change consistency provides them with a hands-on understanding of cause and effect.
The tactile experience of shaping bioplastic strengthens their creativity and imaginative thinking. Kids learn not only how to create but also develop patience as they wait for their work to cool. It becomes a delightful blend of creativity and science.
Troubleshooting Common Issues
Sometimes, things don’t go exactly as planned, and that’s perfectly fine. If the bioplastic doesn’t thicken, it could be that the heat was too low. Just return it to low heat and keep stirring.
If the bioplastic appears too dry after cooling, you can add a touch more glycerin next time to help it retain moisture. Additionally, if you notice a sticky residue sticking to the mat, that might mean it didn’t cool long enough. Supervision can help here don’t rush the cooling process.
Easy Variations to Try
Once you’ve mastered the basics, consider switching things up a bit. Here are some easy variations you might enjoy:
- Add scents: A drop of essential oils can introduce a lovely aroma.
- Make colorful suncatchers: Use food coloring to bring both beauty and light-catching charm to your creations.
- Experiment with shapes: Use cookie cutters to craft fun forms or challenge older kids to make more intricate designs.
- Create pressed flowers: Add small flowers or leaves into your bioplastic for a decorative touch.
- Seasonal projects: Consider making themed shapes for holidays, like pumpkins for Halloween or hearts for Valentine’s Day.
Storing or Reusing This Project
After the excitement, think about how to store or reuse your bioplastic. Keep your creations in a cool, dry place. If they lose shape or flatten out, you can reshape them by warming them slightly again with your hands. This means you can enjoy your creations multiple times, minimizing waste.
Cleaning up is simple wash your pots and utensils with warm, soapy water. The non-stick coating makes it easier, so don’t stress over pots that are hard to clean.
FAQs About DIY Bioplastic from Cornstarch
Is it messy to make DIY bioplastic?
It’s relatively low mess, but there may be some sticky residue. Keeping some soapy water handy for cleanup makes it easier.
What’s the safest age to start this project?
Even younger kids can join in but make sure to supervise. It’s always good to keep close watch when using pots on the stove.
Can I substitute any of the ingredients?
Yes, if you don’t have glycerin, you can try using a little more vinegar or water, but it may change the texture slightly.
How long do the creations last?
If stored properly in a dry environment, your shapes can last for weeks. If they begin to dry out, they can be reshaped.
Can we make this bioplastic again?
Absolutely! Making bioplastic is a fun activity and learning experience that you can return to anytime.
Conclusion
Trying out DIY bioplastic from cornstarch is a wonderful way to engage children in creativity while teaching them about sustainable materials. The simplicity of this project allows everyone to contribute and learn without feeling overwhelmed. For more detailed step-by-step guides on creating other bioplastic forms, you may find resources like DIY Bio-plastics or how to make a bioplastic in your kitchen handy. Embrace the fun, connect through creativity, and remember, the process is just as important as the results.
PrintDIY Bioplastic from Cornstarch

A fun and educational project for kids to make bioplastic from common kitchen ingredients.
- Prep Time: 15 minutes
- Cook Time: 20 minutes
- Total Time: 35 minutes
- Yield: Varies based on shapes created
- Category: Craft
- Method: Stovetop
- Cuisine: DIY
- Diet: Vegetarian
Ingredients
- 1 cup cornstarch
- 1 cup water
- 1 tablespoon white vinegar
- 1 tablespoon glycerin
- Food coloring (optional)
- Baking parchment or silicone mat
- Non-stick pot
- Stirring utensil
Instructions
- Mix the cornstarch and water in a non-stick pot.
- Add white vinegar and glycerin, stirring until combined.
- Place on low heat, stirring slowly until the mixture thickens and bubbles.
- Remove from heat and pour onto a baking parchment or silicone mat while warm.
- Allow to cool completely before shaping.
- Store creations in a cool, dry place and reshape as necessary.
Notes
Supervise children closely when working with pots on the stove.
Nutrition
- Serving Size: Not applicable
- Calories: 30
- Sugar: 0g
- Sodium: 5mg
- Fat: 0g
- Saturated Fat: 0g
- Unsaturated Fat: 0g
- Trans Fat: 0g
- Carbohydrates: 7g
- Fiber: 1g
- Protein: 0g
- Cholesterol: 0mg