

Frozen Bubbles evoke a sense of magic on a chilly afternoon when kids are eager to create something that sparkles and dances in the air. Imagine bundling up in cozy hats and mittens, stepping into the brisk winter air, and blowing bubbles that freeze into beautiful ice sculptures before your eyes. This delightful activity takes only a few simple ingredients and a tiny bit of know-how. With that, you’re off for an enchanting adventure that transforms an ordinary winter day into something spectacular.
Why This Frozen Bubbles Works So Well

Frozen Bubbles captivate both children and adults alike with their charm. The beauty of this DIY project lies in its simplicity. With only three ingredients, you can create something extraordinary with minimal preparation.
Parents appreciate that this activity requires little time to set up. The hands-on nature of the project allows kids to take charge while enjoying the great outdoors. As they blow bubbles, they become immersed in a world of wonder, captivated by the icy sculptures created by the cold air.
Plus, there’s something so rewarding about watching those bubbles transform into delicate frost. They freeze quickly, providing almost immediate gratification, which is perfect for the busy schedules of families. When life gets hectic, this project fits seamlessly into your routine, allowing for spontaneous fun.
Discover Easy Kids Activities
Looking for simple, fun ideas for kids? Explore our Low Prep Kids Activities and find quick projects that spark creativity without long prep time.
A Quick Look Before You Begin
Making Frozen Bubbles comes together with ease. It only takes a short amount of time to gather materials and prepare your bubble solution. In total, you can have everything set up and be gently blowing bubbles in as little as 20 to 30 minutes. That’s a quick and enjoyable break from the usual hustle.
You’ll want to venture outside for this activity, ideally when the temperature dips below freezing. Look for a day when the thermometer reads 32°F (0°C) or colder. This way, you can witness those mesmerizing icy bubbles and enjoy watching them freeze in mid-air.
The mess level is low; you can easily clean up any small spills during the preparation, and the great outdoors means less to worry about. As an adult, you can guide the project if needed, but the kids can feel the thrill of being the ones blowing the bubbles and watching nature’s art form.
Materials You’ll Need
Creating Frozen Bubbles requires few supplies, making it accessible and budget-friendly.
- 1 part corn syrup (common household item)
- 1 part dish soap (easy to find)
- 6 parts water (tap water works just fine)
These simple materials come together to create a bubble mixture that is both fun and reliable. Corn syrup thickens the solution, allowing bubbles to hold their shape longer in cold temperatures, while dish soap enables them to form easily. Water, as the base, is something we all have on hand.
STEP-BY-STEP DIRECTIONS

- In a mixing bowl, gently combine corn syrup, dish soap, and water. Take your time to measure each ingredient carefully. It helps to get consistent results and ensures your bubbles are hardy.
- Stir carefully to avoid creating bubbles. Use a whisk or spoon but go slow. The goal is to combine the ingredients smoothly without adding extra air.
- Use a bubble wand to blow bubbles outside in the cold. You can use a store-bought wand or even make one from a pipe cleaner. Dip it into your solution and take a deep breath as you gently blow outward.
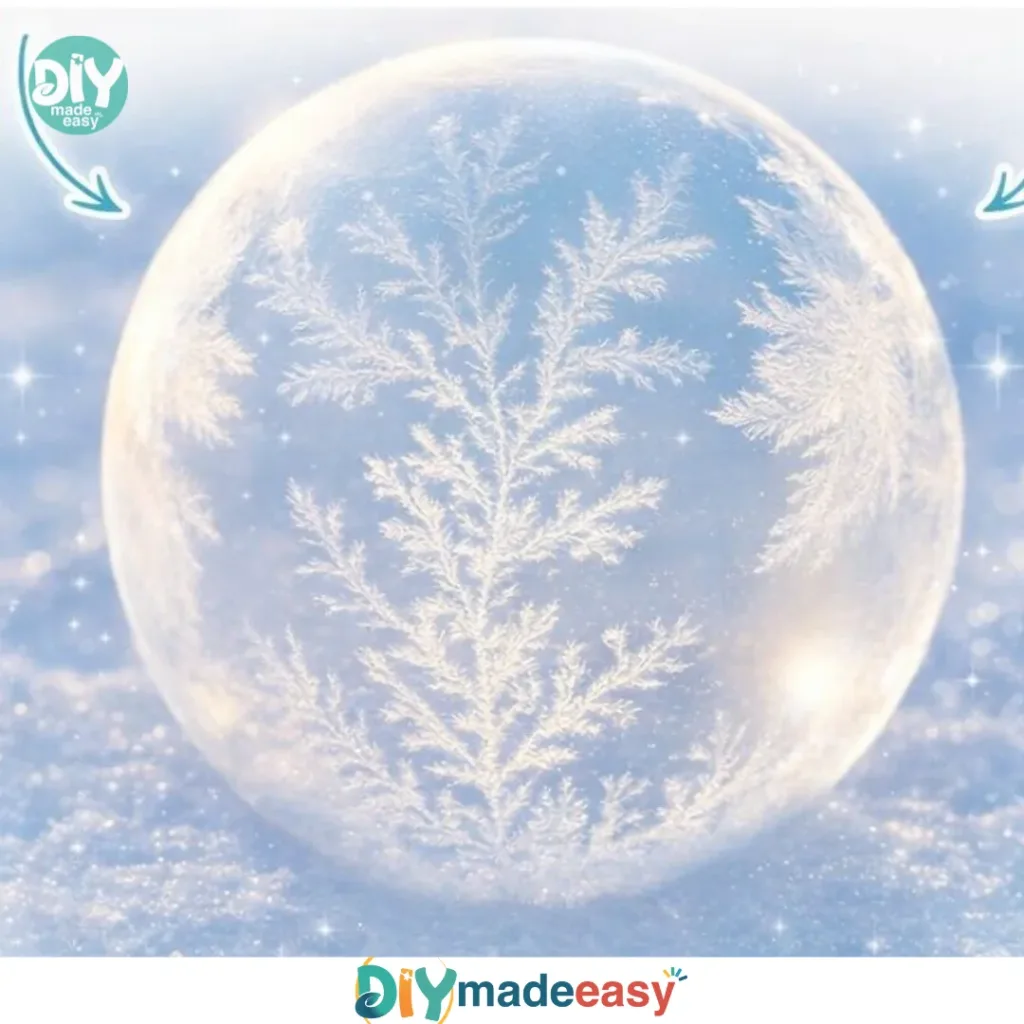
- Watch the bubbles freeze and turn into beautiful ice sculptures! With any luck, you’ll see them shimmer in the sunlight, creating a mesmerizing scene.
The Simple Science or Skills at Work

Making Frozen Bubbles is more than just fun; it engages kids in some basic scientific concepts. When children mix the ingredients, they become familiar with measuring and combining substances, which lays the foundation for early math skills.
The act of blowing bubbles also works on coordination and fine motor skills. Kids learn about cause and effect when they see their breath produce bubbles that float away and freeze in the cold air. They’ll notice quickly that certain conditions lead to their desired results, such as freezing temperatures creating crystal-like formations.
Most importantly, this activity penetrates the mysteries of nature. Kids get to observe how something as delicate as a bubble can transform under specific conditions, fueling their curiosity and sparking questions about the world around them.
Troubleshooting Common Issues
If something doesn’t go as planned, don’t worry. Here are a few common problems and their solutions.
Bubbles may pop before freezing if the air is too dry or if they are blown too fast. Instead of panic, try slowing down your blowing. Gently inhaling before exhaling can help create more stable bubbles.
If the bubbles aren’t freezing quickly enough, ensure the temperatures are appropriate. You may need to wait a little longer before attempting again—patience is key!
If you notice too many bubbles forming in your bowl, it’s likely from stirring too vigorously. Remember to stir gently to avoid air bubbles mixing in.
Easy Variations to Try
Adding a creative twist to your Frozen Bubbles can ensure this activity stays exciting on multiple occasions.
- Colorful Bubbles: Add a few drops of food coloring to your bubble mixture for a vibrant twist. Dark colors may show better against the snow or grass.
- Glittery Sparkles: Experiment with adding edible glitter to your mixture for a sparkling effect on your frozen bubbles.
- Wands of Variety: Try different shapes for your bubble wands. Use cookie cutters or pipe cleaners to create fun shapes that can lead to unique bubble designs.
- Bubble Catching: Create a fun game where kids try to catch the bubbles as they float away.
Storing or Reusing This Project
When it comes to cleanup and storage, you’re in luck. Any leftover solution can easily be stored in a sealed container for later use. If you find that you have made more than enough, consider pouring the excess solution back into a clean bottle to reuse.
Make sure to label your container, as the mixture can still be tempting to curious kids. When it’s time to clean up, rinsing the mixing bowl and wand with hot water will eliminate any stickiness from the corn syrup and soap.
This simple process reduces waste and means more fun can be had on another cold day.
FAQs About Frozen Bubbles
Is this messy?
While making Frozen Bubbles, the mess is minimal. The solution can be sticky, so it’s best to prepare it outside or on a surface that can be easily cleaned. A quick rinse will do wonders.
Are Frozen Bubbles safe for young kids?
Yes, the ingredients used are safe. However, it’s best to supervise, as the mixture can be slippery when spilled.
Can I substitute ingredients?
If you don’t have corn syrup, alternatives like light syrup or glycerin might work in a pinch, although they can alter bubble characteristics slightly. Be mindful of the quantities if using alternatives.
What kind of results can I expect?
You may not achieve perfect frozen sculptures every time. Factors like humidity and temperature can affect the outcome. Embrace the journey and the unexpected shapes you might see!
How should I store any remaining bubble solution?
Simply pour the solution into a sealed container, and store it in a cool area. It should be fine to use again, but check for any changes before the next use.
Conclusion
Engaging in a Frozen Bubbles project can transform an ordinary winter day into an exciting exploration for the whole family. The joy of watching bubbles freeze provides not just laughter but also learning opportunities that kids will cherish.
For more detailed instructions and fascinating variations, you might enjoy checking out this guide on how to make frozen bubbles. Additionally, the Mount Washington Observatory provides excellent resources on this fun phenomenon with their article on frozen bubbles.
Take your time, enjoy the process, and remember that the magic is in both the making and the marveling. Your kids will thank you for the beautiful memories created on this frigid but wonderful adventure!
PrintFrozen Bubbles

Create enchanting frozen bubbles with this simple and fun winter activity that captivates both children and adults.
- Prep Time: 10 minutes
- Cook Time: 0 minutes
- Total Time: 30 minutes
- Yield: Varies based on mixture amount
- Category: DIY Activity
- Method: Outdoor Activity
- Cuisine: N/A
- Diet: N/A
Ingredients
- 1 part corn syrup
- 1 part dish soap
- 6 parts water
Instructions
- In a mixing bowl, gently combine corn syrup, dish soap, and water.
- Stir carefully to avoid creating bubbles.
- Use a bubble wand to blow bubbles outside in the cold.
- Watch the bubbles freeze and turn into beautiful ice sculptures!
Notes
Colorful variations can be made by adding food coloring or edible glitter. Make sure to supervise young children during the activity.
Nutrition
- Serving Size: N/A
- Calories: 0
- Sugar: 0g
- Sodium: 0mg
- Fat: 0g
- Saturated Fat: 0g
- Unsaturated Fat: 0g
- Trans Fat: 0g
- Carbohydrates: 0g
- Fiber: 0g
- Protein: 0g
- Cholesterol: 0mg